Table of Contents
GENOME User's Manual
Adaptive Channel Strip Powered by Two notes’ Proprietary CODEX, TSM™ Amplifier, DynIR™ Cabinet & PEDAL Engines
The complete electronic version of this manual, and the related GENOME software application, are subject to updates without notice. To download the most up-to-date manual for GENOME - alongside user guides for all Two notes Audio Engineering products - head over to the Two notes Audio Engineering website.
This manual describes the use, features and functionality of Two notes’ GENOME plugin and standalone applications, detailing comprehensive instructions for its intended operation. It is highly recommended that you read this document before using the software. The contents of this manual have been thoroughly verified and is believed, unless stated otherwise, to accurately describe the product at the time of download availability from the Two notes Audio Engineering website.
Two notes Audio Engineering is a registered trademark of: OROSYS SAS 76 rue de la Mine 34980 Saint-Gély-du-Fesc France Tel: +33 (0)484 250 910 Fax: +33 (0)467 595 703 Contact and support: http://helpdesk.two-notes.com Website: http://www.two-notes.com
This document is the exclusive property of OROSYS SAS. In the interest of product development, OROSYS SAS reserves the right to change technical specifications, modify and/or cease production without prior notice. OROSYS SAS cannot be held responsible for any damage, accidental or otherwise, that results from inappropriate use of GENOME. Please refer to the safety instructions included in this manual.
The reproduction of any part of this document is strictly forbidden without the written authorization of OROSYS SAS.
All product names and trademarks are the property of their respective owners. Product names and trademarks found in this document were used during the development of GENOME but are in no way associated or affiliated with OROSYS SAS.
Foreword
1. Reader Warning
2. Correct Use of a Loadbox
GENOME may be used either with real-time or prerecorded audio sourced from DI instrument feeds, guitar/bass preamplifiers, hardware amp simulators (Including ReVolt Guitar, ReVolt Bass, OPUS), and/or a tube/solid state amplifier in conjunction with a suitable loadbox (Including Two notes’ Torpedo Captor, Torpedo Captor X, Torpedo Reload). While using a DI instrument feed or the line output of a preamplifier / amp simulator is comparatively safe and simple to administer, using the speaker output of a tube amplifier in conjunction with a loadbox requires caution.
2.1 What is a Loadbox
In routine use of a tube amplifier, it is highly recommended that the power output of the amplifier is always connected to a speaker cabinet or suitable load prior to powering on. The speaker cabinet (rated at either 4-, 8- or 16-Ohms) must always be connected to the corresponding speaker output of the amplifier. Neglecting to do so can lead to partial or complete destruction of the output stage of the tube amplifier.
The majority of tube amplifier designers protect their products with fuses or alternative suitable protection systems; however, some amplifiers are still insufficiently protected. It is therefore impossible to predict the behavior of all amplifiers on the market in the instance load (be it a speaker cabinet or a loadbox).
The electronic term that describes the speaker cabinet with respect to the amplifier is the “load”: we say the cabinet “loads” the amplifier. The term “loadbox” is used to describe any product that provides a load to the amplifier. The main parameter of the loadbox is its impedance, expressed in Ohms. Impedance matching between a loadbox and amplifier is paramount and as such should be actioned wherever possible (i.e. an 8-Ohm loadbox must be plugged to the 8-Ohm speaker output of the related amplifier).
The power sent by the amplifier to the corresponding load is turned into heat; as such, it is vital to refer to the cooling recommendations stipulated in the manual of the respective load; overheating may cause damage, both to the loadbox and to the amplifier.
2.2 Setting the Output Volume for an Amplifier
The correct use of an amplifier with a loadbox requires caution. Due to the inherent silence while playing through an amplifier with a loadbox, it is easier to accidentally run the amplifier beyond the reasonable limits set by the manufacturer - more so than when using a speaker cabinet in conjunction with the amplifier. This can lead to faster tube wear and, in some cases, damage to the amplifier or loadbox.
Please note that the “sweet spot” - the optimal level of the amplifier’s power amp volume - is rarely obtained at maximum volume. In addition, the volume control of the amplifier is usually logarithmic, meaning the volume increases quickly within the first half of the accompanying potentiometer’s rotation, reaching its maximum at 12 o’clock, Therefore, maximum volume of the amplifier can be reached even if the volume potentiometer is not set at its maximum value.
When reaching the maximum value of the aforementioned output potentiometer, you will likely hear considerable distortion. In fact, most amplifiers sound comparatively poor at maximum volume. In addition, always keep in mind that your amplifier may not have been conceived to be used at maximum volume for a long period of time. Running an amplifier at high volume will cause premature wear of the tubes and possible malfunction or damage at the output stage.
3. Minimum Software Requirements
The following details the minimum requirements recommended to run GENOME; in order to instantiate more effect blocks, improved/enhanced system specifications may be required.
GENOME is available as a standalone application and VST3, AU, and AAX plugin formats; as such, for the aforementioned plugin variants, a Digital Audio Workstation (DAW) is required. GENOME has been extensively tested with the following mainstream DAWs:
- Pro Tools
- Apple Logic Pro X
- Ableton Live
- Steinberg Cubase
- Studio One
- Reaper
Windows 10 (64-bit) or Newer
- Intel i5 or AMD equivalent multi-core 64-bit processor
- 4GB RAM
- OpenGL 2.0 compatible GPU
- External ASIO compatible audio hardware highly recommended
macOS Catalina 10.15 or Newer
- Intel i5 or Silicon processor
- 4GB RAM
- Metal compatible GPU
- External Core Audio compatible audio hardware highly recommended
Legal
What follows below is a TWO NOTES AUDIO ENGINEERING SOFTWARE LICENSE. Please read this agreement carefully. By installing, copying or using all or any portion of the software you accept all the terms and conditions of this agreement. If you do not agree with the terms of this agreement, please do not use the software. If you agree with the terms herein, please retain the document as it is your proof of license to exercise the rights granted herein. The SOFTWARE may include product activation and other technology designed to prevent unauthorized use and copying. This technology may cause your computer to access the Internet.
1. Definitions
“TWO NOTES AUDIO ENGINEERING” is a registered trademark of:
- OROSYS
- 76, rue de la Mine
- 34980 SAINT-GELY-DU-FESC
- FRANCE
- Email: contact@orosys.fr
- Phone number: +33 (0)4 84 25 09 10
“COMPUTER” refers to a physical or virtual device that accepts information (in the form of digitized data) and manipulates it for some result based on a program or sequence of instructions on how the data is to be processed.
“SOFTWARE” refers to all the information with which this agreement is provided, including but not limited to TWO NOTES AUDIO ENGINEERING and third party software files, documentation and any graphical elements of the graphical user interface.
“RAM” refers to Random Access Memory; it is the place where the operating system, application programs and data in active use are kept in order that they can be quickly reached by the COMPUTER's processor.
“SERVER“ refers to a computer on which a SERVER program runs to fulfill requests from client programs in the same - or other - COMPUTERS.
“INTERNAL NETWORK” refers to a private and proprietary network resource accessible only by employees (including temporary employees) and individual contractors of a specific corporation of similar business entity; internet and/or other network communities open to the public, including groups accessible under subscription, are excluded from the “INTERNAL NETWORK” definition.
2. Software License
2.1 GENERAL USE
Upon obtaining the SOFTWARE from OROSYS SAS or one of its authorized resellers - and as long as you comply with the terms of this agreement - OROSYS SAS grants you a non-exclusive license to install and use a copy of the SOFTWARE in a manner consistent with its design on a single COMPUTER.
The SOFTWARE is “in use” when it is loaded in the RAM of the COMPUTER or installed in the permanent memory (including but not limited to a hard disk, CD-ROM, USB key or other storage devices) of the COMPUTER. A copy installed on an INTERNAL NETWORK SERVER for the sole purpose of distribution to other computers is not “in use”. The number of persons using the SOFTWARE must not exceed the number of licenses.
COPYRIGHT
OROSYS SAS and its suppliers own all intellectual property in the SOFTWARE, including but not limited to patents, date, secrets and graphical elements. The SOFTWARE is licensed, not sold. OROSYS SAS permits you to copy, use, download, install or otherwise benefit from the functionality or intellectual property of the SOFTWARE only in accordance with the terms of this license agreement. You must not copy any written material accompanying the SOFTWARE. You agree not to use any OROSYS SAS or TWO NOTES AUDIO ENGINEERING trademarks, brand name or logos without prior written consent of OROSYS SAS.
DEMONSTRATION LICENSE
You may have activated/downloaded a 14-day trial/demonstration SOFTWARE version of the TWO NOTES AUDIO ENGINEERING SOFTWARE. The License herein shall apply during the entire period of evaluation. The 14-days trial/demonstration SOFTWARE must only be used for the purpose of evaluation, not for the purpose of commercial use.
UPGRADES OR UPDATES
If the software is an upgrade or update to a previous version of the SOFTWARE, you must process a valid license to such previous version in order to use such an upgrade or update. By using an upgrade or update, you agree that you no longer have the license to use any previous version of the SOFTWARE. Upgrades and updates may be licensed to you by OROSYS SAS with additional or different terms.
RESTRICTION AND REQUIREMENTS
Any permitted copy of the SOFTWARE must contain the same copyright and other proprietary notices that appear on or in the SOFTWARE. In particular, the Customer commits not:
- To make a copy of the SOFTWARE other than the legal backup copy
- To correct, or to make corrected by a third-party, possible errors of/within the SOFTWARE
- To rent, lease, loan, sell or otherwise make the SOFTWARE available by any means, including the Web
- To disclose or distribute the SOFTWARE, against payment or free of charge
- To reverse engineer, decompile or disassemble the SOFTWARE, and, more generally, to recreate the logical functionality of the SOFTWARE or convert the functionality of the Software into an understandable format
- To adapt, modify, transform, amend the SOFTWARE, in particular in order to create new or derived functionality of a new or derived software
- To transcribe or translate the SOFTWARE in other languages, or modify, even partially, the SOFTWARE
- To alter, modify, move or replace trademarks / brands, trade names, logos, copyright and any distinctive OROSYS SAS’ signage as they are included in the SOFTWARE and any element composing the SOFTWARE and/or the related documentation
The rights hereinabove are granted, provided the Customer:
- Ensures that the SOFTWARE is granted a software and hardware environment in accordance with the specifications described in the associated documentation
- Does not transfer and/or disclose the SOFTWARE to any third party in order to install, copy, or use the SOFTWARE in any manner without the express approval of OROSYS SAS
It is agreed that these License Terms grants to the Customer no right other than the right to use the version of the Software in force at the time of the subscription of the license, and the eventual new versions or updates OROSYS SAS may decide to develop.
In any case, access to updates and/or new versions of the Software, is at OROSYS SAS’ sole discretion, as well as whether, and when, to develop any updates or new versions of the Software, without any obligations in terms of content, timing or frequency.
You may transfer your rights under this OROSYS SAS license agreement on a permanent basis provided you transfer this license agreement, the SOFTWARE, and all accompanying written materials, retain no copies, and provided that the recipient agrees to the terms of this Agreement. You may not use the SOFTWARE in any manner that infringes the intellectual property or other rights of another party. You may not transfer education, pre-release or Not For Sales (NFR) copies of the SOFTWARE.
3. Limited Warranty
OROSYS SAS warrants that the SOFTWARE shall perform in accordance with the specifications, properties and functionalities described in the related documentation. This warranty includes the warranty for obvious and latent defects for a period of three (3) months from the delivery (through downloading) of the SOFTWARE.
This warranty implies that OROSYS SAS shall do what is reasonably possible to detect and correct errors and malfunctions that may occur during the warranty period. It is understood that only blocking errors leading to serious malfunctions preventing the expected use of the SOFTWARE and resulting from an inherent default of the SOFTWARE are likely to generate a warranty obligation for OROSYS SAS.
OROSYS SAS expressly excludes any warranty, explicitly or implicitly, including the warranty of compliance with a particular purpose not described in the documentation or with other devices than the Hardware. OROSYS SAS does not warrant the ability of the SOFTWARE package to satisfy individual purposes of the Customer, nor the performance of the SOFTWARE in any combination different from the one described in the documentation, nor a performance free from interruption or material errors.
The warranty does not apply and OROSYS SAS shall not be liable in the event (but not limited to) the proof is not provided that the SOFTWARE:
- Works on a SOFTWARE or hardware configuration compliant with the one recommended by OROSYS SAS;
- Has never been modified in any way;
- Has been correctly installed;
- Has not been worsened or used in a way not in accordance with the recommended usage scenario;
- Has not been subject to multiple installations or smuggled in accordance with these Terms and Conditions;
- Has not been subject to the intervention of a third party not expressly authorized by TWO NOTES.
In the case the Customer is in a situation where the warranty applies, the Customer shall notify OROSYS SAS with a request for implementation of the warranty, describing in detail the occurred dysfunction.
4. Limitation of Liability
Except for the exclusive remedy offered by OROSYS SAS above, and any remedies that cannot be excluded or limited under law, OROSYS SAS, its affiliates, suppliers, or certificate authorities will not be liable for any loss, damages, claims or costs whatsoever including any consequential, indirect or incidental damages, any lost of profits, lost of savings, loss of business informations or other pecuniary loss, any damages resulting from business interruption, personal injury or failure to meet any duty of care, or claims by a third party, even if an OROSYS SAS representative has been advised of the possibility of such loss, damages, claims or costs. In any event, OROSYS SAS’s aggregate liability and that of its affiliates, will be limited to the amount paid for the SOFTWARE, if any. This limitation will apply even in the event of a fundamental or material breach or a breach of the fundamental or material terms of this agreement. The foregoing limitations and exclusions apply to the extent permitted by applicable law in your jurisdiction. This limitation of liability may not be valid in some states. You may have rights that cannot be waived under consumer protection and other laws. OROSYS SAS does not seek to limit your warranty or remedies to any extent not permitted by law.
5. General Provision
If you are a consumer who uses the SOFTWARE for only personal non-business purposes, then this agreement will be governed by the laws of the state in which you purchase the license to use the SOFTWARE. If you are not such a consumer, France law shall govern the interpretation and enforceability of this Agreement. If any part of this agreement is found void and unenforceable, it will not affect the validity of the balance of this agreement, which remains valid and enforceable according to its terms. This agreement may only be modified in writing, signed by an authorized OROSYS SAS officer. In the absence of a specific written agreement signed by you and OROSYS SAS, this Agreement shall be the sole and complete agreement between you and OROSYS SAS, regarding the SOFTWARE. This Agreement expressly supersedes and replaces any other license agreement for the SOFTWARE, including but not limited to any agreement appearing in any user’s manual, prior representations, discussions, undertakings, communications and advertising unless a subsequent agreement for the SOFTWARE is in writing and signed by both you and an authorized OROSYS SAS representative.
6. Support
OROSYS SAS is not obligated to furnish or make available to you any further information, software, technical information, know-how or support. OROSYS SAS reserves the right to modify the SOFTWARE, and all materials provided hereunder, without further notice.
About GENOME
Introducing GENOME, the carrier class software ecosystem engineered to deliver the pinnacle in end-to-end tone shaping. Fusing an ever-growing roster of amplifiers, pedals, class-leading virtual cabinets and essential STUDIO FX, GENOME is your first - and final - destination for the ultimate in-the-box or hybrid backline.
GENOME Highlights
- Carrier-class end-to-end guitar and bass tone shaping ecosystem
- Expertly engineered for both in-the-box and Hybrid rigs, tuned to elevate any amplifier, preamplifier or DI tone with hyper-realistic amp, pedal and cabinet emulation
- Intuitive, guitar-centric interface roots your focus on dialing in the perfect tone
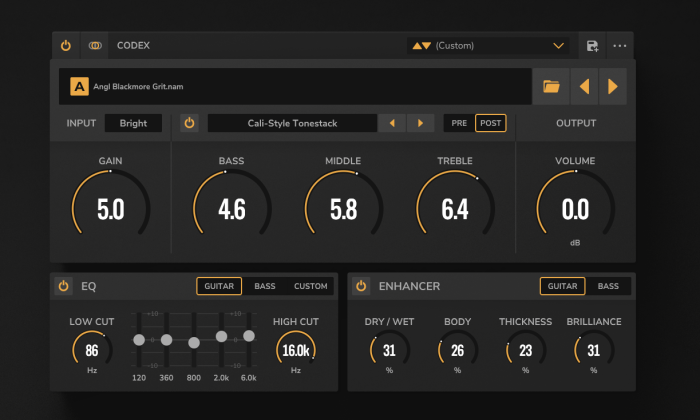
- CODEX Unification Engine for real-time playback of AI-generated amplifier & pedal models, compatible with Neural Amp Modeller (NAM), AIDA-X and Proteus captures; 50+ expertly-curated captures included for immediate out-the-box creative potential
- Tube-Stage Modeling (TSM™) Engine; 12 pristine preamp models, 4 tube poweramp models (6L6, EL34, EL84 and KT88) with Pentode / Triode, Push-Pull (PP) ‘Class AB’, or Single Ended (SE) ‘Class A’ configurations
- Hyper-realistic PEDAL Engine featuring extensive library of overdrive, distortion, delay and modulation PEDALS
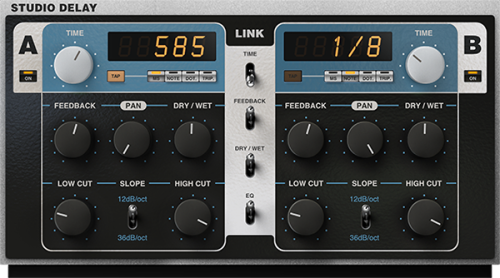
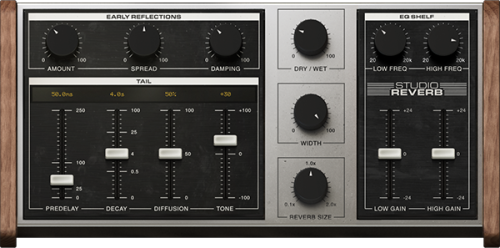
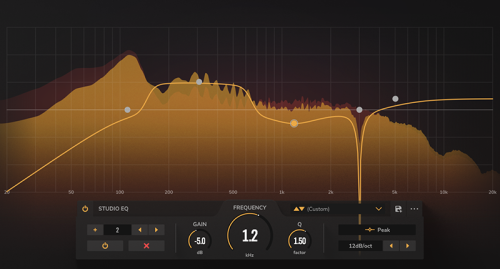
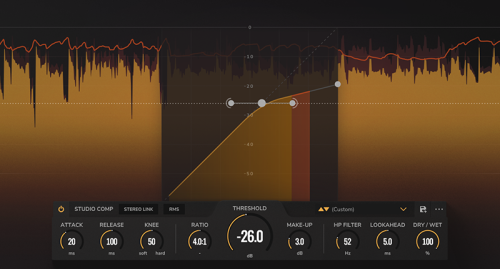
- Comprehensive STUDIO FX arsenal including the STUDIO Compressor, STUDIO EQ (parametric), STUDIO Delay, STUDIO Reverb and more
- Class-leading DynIR Engine™ with complete command of over 600+ virtual guitar and bass cabinets, studio-grade microphones and recording environments
- Optional dual-Lanes for effortless parallel processing
- Includes 15 DynIR™ Captures, 40 Microphones, 31 PEDALS, 12 TSM™ Amplifiers, 2 TSM-Ai™ Amplifiers, 17 STUDIO FX, 50+ AI Amp Captures and an expertly curated RIG library for immediate creative potential from the get go!
- Available for MacOS X & Windows (64- and 32-bit) operating systems in Standalone, VST3, AU, AAX & VST formats
License
To use GENOME, a valid Two notes User Account must be used/created. Upon launch for the first time, GENOME will request the user logs into the application using their Two notes account credentials in order to make use of all features and functionalities of the software. For new Two notes customers, a Two notes User Account can either be created on the Two notes website or during launch of the GENOME application for the first time post installation. Please note, the use of the software is subject to our terms and conditions and licensed accordingly - for more details on the GENOME License Agreement, please refer to “Section B. Legal” in this user guide.
1. Free Trial
Providing a customer possesses a Two notes User Account, but does not have a license to GENOME, a free 14-day evaluation license will be started upon opening / logging into the application. This free 14-day Trial License includes 15 DynIR™ Captures, 40 Microphones, 31 PEDALS, 12 TSM™ Amplifiers, 2 TSM-Ai™ Amplifiers, 17 STUDIO FX, 50+ AI Amp Captures and an expertly curated RIG library for immediate creative potential from the get go!
Before commencing the GENOME 14-day trial, qualifying users are required to insert their account credentials or set up a Two notes Account which can be configured in the GENOME application directly. Upon the cessation of the 14-day trial period, login to the application will be suspended and the user will be directed to the Two notes website to obtain a valid license for GENOME. During the trial period, if any purchasable components are added to the cart, a GENOME license is required and will be additionally added to the cart automatically.
2. DynIR™ & Premium Component Licenses
After acquiring a GENOME license, you can expand your GENOME Component and DynIR™ Virtual Cabinet library by buying and demoing Components & cabinets within GENOME, subsequently purchasing these from the Two notes website.
The Components & cabinets bought will be uploaded to your license once the order is complete. Providing a license for the associated purchased Component and/or DynIR™ is in place, upon reopening the GENOME application, the Component and/or DynIR™ Virtual Cabinet will download to the host machine for unrestricted use within the wider GENOME ecosystem. Purchased Components & DynIR™ Virtual Cabinets can not be sold, redeemed for cash or transferred to another user.
Please note, any Component or DynIR™ redeemed through the registration of a Two notes hardware product, an activation code or a Two notes promotional initiative can also be used in GENOME.
To find out more about DynIR™ and to browse the Two notes DynIR™ catalog, please head here.
To view all Premium Components and Component Packs available for purchase, please head to https://www.two-notes.com/en/get-more-amps-pedals-studio-fx-for-genome/ here.
Installing GENOME
Download the installer of GENOME from https://www.two-notes.com/en/downloads/. The installer will guide you through the installation process and install all available formats of GENOME in the relevant folder directories automatically.
1. GENOME Activation
Providing the user has a valid Two notes User Account and a full license to GENOME, GENOME will activate upon successful login to the plugin or standalone application at startup. For users not in possession of a Two notes User Account or a full license to GENOME, refer to the links below:
2. Latency
What is Latency?
The term latency is common-place is audio production circles and relates to the amount of time it takes for your audio to pass through various stages of conversion and processing within a stereotypical studio setup. There are many factors which impact the latency of your production rig and these often include the following:
- The time taken for your audio (or MIDI) signal to be sent into your interface or computer
- The time taken for your audio interface to process the analog to Digital conversion of the source audio
- The time taken for the internal processing of the audio within your DAW
- The time taken for the Digital to Analog conversion from your interface for the resultant sound to be heard from your headphones or monitors
Latency is a critical consideration when configuring any audio recording or processing setup in order to minimize any lag or delay between your playing and the processed audio being heard. As such, it is vital to configure your audio latency settings as low as possible for the optimal user experience when using GENOME.
GENOME Plugin Variants
1. Supported DAWs, Plugin Formats & Recommended System Specifications
GENOME is available in the following plugin formats, compatible with the noted Digital Audio Workstation (DAW) platforms:
- VST3 ( Cubase, Studio One, Ableton Live, and Reaper)
- AU (Logic and Garage Band)
- AAX (ProTools)
2. Latency & Audio Interface Setup with a GENOME Plugin Variant
- As a starting point, connect your Guitar or Bass to a compatible Audio Interface and engage the Hi-Z switch to optimize the interface for instrument-level inputs
- Then open your DAW and navigate to the Audio Preferences
- Here, you will need to set your buffer size and latency to as low as possible; when using GENOME if you experience pops and clicks while playing, you will need to raise this buffer / latency setting until these non-desirable artifacts are no longer audible. For guides on setting your audio preferences in all mainstream DAWs, please refer to the following knowledgebase articles:
- Finally, if your interface features a Zero-Latency Monitoring option, please ensure this is disabled to avoid hearing your GENOME-processed and DI signal simultaneously.
The GENOME Standalone Application
1. Latency & Audio Interface Setup with a GENOME’s Standalone Application
- As a starting point, connect your Guitar or Bass to a compatible Audio Interface’s Instrument/Inst/DI/Hi-Z input (and engage the Hi-Z switch if applicable) to optimize the interface for instrument-level inputs
- Next, configure the Standalone Application’s audio settings in the software. by clicking on the “Audio Settings” menu item hosted in the application’s hamburger menu
- For Windows Users Only, In the “Audio Device Type” dropdown, select ASIO (if available/applicable)
- Next, select the “Input Device” and “Output Device” corresponding to the audio interface(s) connected to your host computer; please note that one or two inputs can be selected for mono or stereo operation respectively - GENOME will automatically configure its input settings based on this selection
- Within the “Active Inputs” pane, select the audio interface’s input within which your instrument is connected
- Within the “Active Outputs” pane, select the relevant outputs on your audio interface to hear your GENOME-processed sound via monitors and/or headphones
- Finally configure the Standalone Application’s Sample rate using the “Sample Rate” dropdown menu and set your system latency using the “Audio Buffer Size” dropdown menu.
- Note: We recommend setting your sample rate settings to 48000Hz unless your setup requires a specific Sample Rate configuration
- Note: Increased sample rates and buffer sizes may result in unwanted audio artifacts and increased latency, depending on your host machine’s specifications; if such artifacts or latency issues present themselves, lower your sample rate settings and/or increase your buffer size accordingly.
2. Core Differences between GENOME’s Plugin Variants and the Standalone Application
Principal differences between GENOME’s Plugin Variants and the Standalone Application include the following:
- The Standalone Application features a dedicated “Audio Settings” menu, accessible via the Hamburger Menu
- The Standalone Application features a dedicated “MIDI Settings” Menu, accessible via the Hamburger Menu
- The Standalone Application retains the last saved or unsaved instance upon reopening the application
MIDI
As of v1.6 GENOME provides comprehensive MIDI mapping facilities with support for both Program Change (PC) and Control Change (CC) messages. Please note, by default PC messages are automatically assigned to RIGs (0-127) from the instantiated bank; CC messages on the other hand are intended for manual assignment by the user across any assignable architectural- or Component-level parameter. Upon assigning Component–level parameters for MIDI control, they are easily identified via a green overlay; in addition, RIG presets assigned to MIDI are identified by a green dot located in the upper right–hand corner of the RIG slot within the RIG Browser.
Note: Although PC messages are supported by VST3 specifications, at this juncture they are not correctly implemented by many DAWs (including Reaper, Ableton Live & Studio One). As such, for users wishing to switch RIGs via PC commands in GENOME’s plugin variants, AU or AAX variants are recommended.
1. Creating MIDI Assignments
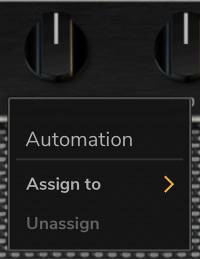
Within GENOME, MIDI can be assigned in 2 ways, either via the matrix within the MIDI Mapping Centre or via right-clicking on any automatable Component or architectural parameter.
1.1 Managing MIDI Assignments Via The Right-Click Contextual Menu
Architectural Parameters
Within GENOME, the architectural parameter arsenal is consistent across any GENOME instance loaded; as such, they are permanently listed within the MIDI Mapping Centre and do not include facilities to delete assignments; instead they permit manual CC assignment, MIDI Learn functionality and Clear CC options. To map an architectural parameter to a MIDI CC value:
- First Right-Click the designated Component-level parameter or RIG in the RIG Browser for assignment
- Use “LEARN” to monitor incoming MIDI signals and automatically assign the first valid CC command to the selected parameter
- Alternatively, manually set the CC parameter by clicking in the field labeled “OFF” by default
Component-Level Parameters
Unlike architectural parameters, Component-level controls are RIG specific; as such they permit manual assignment creation, CC assignment, MIDI Learn functionality, Clear CC options and Delete Assignment functionality. To map a Component-level parameter to a MIDI CC value:
- First Right-Click the designated parameter for assignment
- Click “CREATE” to add the parameter as a selected assignment; note that creation of a selected assignment will add the parameter to the MIDI Mapping Centre. Once created, a MIDI assignment can either be actioned immediately (using the processes outlined in the steps below), or postponed until entering the MIDI Mapping Centre where all selected assignments can be mapped in one convenient workspace
- Use “LEARN” to monitor incoming MIDI signals and automatically assign the first valid CC command to the selected parameter
- Alternatively, manually set the CC parameter clicking in the field labeled “OFF” by default
- To delete a MIDI assignment click the X button situated next to the Clear CC assignment button
- Note: the “Delete a MIDI Assignment“ option will only be visible providing the Component-level parameter has been assigned previously (either via a parameter previously assigned to a MIDI CC command and the CC command cleared, or a component parameter selected for assignment but not assigned to a CC command). Clicking this parameter will therefore remove the assignment entirely from GENOME’s MIDI Mapping Centre Matrix but can be re-added at any time if such is actioned in error.
1.2 Managing MIDI Assignments via the MIDI Mapping Centre
The MIDI Mapping Centre is accessed via GENOME’s Hamburger Menu. Within this submenu, comprehensive facilities to manage all MIDI assignments within a GENOME instance are available, including:
- Management of all fixed Architectural parameter MIDI Assignments
- Management of all created Component-Level parameters either assigned or intended for MIDI assignment
- CC assignment to a selected Architectural- or Component-level parameter either manually or via MIDI Learn
Instance Vs RIG MIDI Mapping Management
Instance Mappings within the MIDI Mapping Centre are architectural parameters that remain consistent between any RIG loaded in GENOME; these are shown in the left-hand column of GENOME’s MIDI Mapping Centre Window. Within this column the following Import, Export and default behavior options are available:
- IMPORT MAPPING: Use this to import a previously saved MIDI Mapping Template within the current GENOME instance
- EXPORT MAPPING: Use this to save a MIDI Mapping Template to your host machine for recall via the IMPORT MAPPING function described above - a useful feature to apply the same architectural MIDI Map to multiple GENOME Instances or switch up architectural MIDI maps when using different control sources
- SET AS DEFAULT: Set the current MIDI Map as the default control map for GENOME at start-up
- LOAD DEFAULT: Overwrite the current architectural MIDI Map with the default assignment (either the factory settings if “SET AS DEFAULT” has not been selected previously, or the last map selected as the default state by the user)
RIG Mappings can be found in the right-hand column of the MIDI Mapping Centre and relate to the current instantiated RIG and related Components within the GENOME Instance. RIG Mappings are saved with the RIG file and as such are available across GENOME Instances. To add further RIG Mappings, please refer to the “i. Managing MIDI Assignments Via The Right-Click Contextual Menu / Component-Level Parameters” guidelines above.
Managing MIDI Assignments in the MIDI Mapping Centre
Within the MIDI Mapping Centre, the following controls are available to manage MIDI assignments on a GENOME instance- or RIG-level: Batch Controls:
- Clear All MIDI CC Assignments in Batch: To clear all MIDI assignments for either Instance or RIG mappings, click the CC button located at the top of either the “Instance: Software”, “Instance: Automations”, “Instance: Lane Mixer” or “RIG” tables
Individual Parameter MIDI Assignments:
- LEARN: Use “LEARN” to monitor incoming MIDI signals and automatically assign the first valid CC command to the selected parameter
- Note: PC messages are locked to RIG changes from the instantiated bank; within the MIDI Mapping Page, this status is indicated via the Padlock Icon (see image below); by clicking the CC button selector to the far right of the “Rig Change” row, a CC number can be assigned to RIG changes via values 1 - 127.
- CC Indicator & Entry Field: By default - and without an active assignment - this field is labeled “OFF” and is located to the right of the “LEARN” parameter; this provides a representation of what MIDI CC is assigned to a given parameter alongside options to manually set the CC assignment by clicking in the field
- Note: Upon assignment - and provided a selected CC value is already in use within the current configuration - the (i) icon will be shown to the left of each duplicate CC assignment. Clicking this (i) icon will reveal a dialogue box stating the parameter names assigned to the related CC command with options to accept multiple assignments of the same CC number if desired (“OK”) or clear any duplicate assignments (“CLEAR DUPLICATE ASSIGNMENTS”)
- Parameter Name: To the right of the “Clear MIDI CC Assignment” icon, the parameter name for MIDI assignment can be viewed
- Assignment Behavior: Located to the right of the “Parameter Name” field are GENOME’s MIDI assignment behavior controls; these offer customization options for how GENOME will respond to a given MIDI message. Within GENOME, assigned parameters are categorized as follows:
- Dual State Parameters: Dual State parameters are those that have only 2 states (i.e. On / Off); a good example being the On / Off state of a PEDAL Component’s switch. Within GENOME the following options are available to configure the behavior of such assignments:
- Toggle (0 = “off” / 1-127 = “on”)
- Reverse (0 = “on” / 1-127 = “off”)
- Any (0-127 = change state)
- Scaled Parameters: In contrast to Dual State Parameters, Scaled Parameters are those where a range of values can be instantiated via the assigned MIDI CC Value (0-127); a good example being the Gain Knob on a TSM or TSM-Ai Amplifier Component. When a Scaled Parameter is assigned to a CC number in GENOME, options are available to set a “Min” and a “Max” value ranging from 0 to 100; such essentially dictates the range of control on the parameter exerted by the MIDI controller. If selecting a value higher for “Min” than for “Max”, the range is effectively inverted offering reversed control functionality.
- Note: This range constraint is applied to the control in GENOME, not the related CC message value
- Delete MIDI CC Assignment (RIG Only): To delete a specific MIDI assignments within the current active RIG mapping, click the X button located to the right of the “Assignment Behavior” field
1.3 MIDI Devices Page (Standalone Application Only)
When using the Standalone Application only, an additional preferences page is available via GENOME’s Hamburger Menu - The MIDI Devices Page. This page provides configuration and setup options that determine how MIDI data is received by the Standalone Application. Note: For GENOME’s Plugin variants, setup options that determine how MIDI data is received is configured via the related MIDI setup facilities within the host DAW’s preferences. For details on how to configure MIDI devices within the host DAW, please refer to the related DAW user guides linked below:
Within the MIDI Devices Page, the following controls are available to configure how MIDI information is received by the GENOME Standalone Application:
- MIDI Channel (Drop Down Menu): Select what Channel MIDI data is received from - either Channels 1-16 or via all channels (OMNI)
- MIDI Inputs: Configure which external devices MIDI data is received from within the GENOME Standalone Application from the compatible hardware connected to the host computer
Use Cases
1. End-To-End Tone Shaping
Within this setup scenario, GENOME will be configured to handle all tone shaping of your Guitar or Bass signal. Please note, any non-GENOME peripheral hardware or software that fundamentally alters and influences your tone should not be used in this setup configuration - in the instance peripheral hardware is incorporated into your pre-GENOME signal chain, please refer to “Use Cases / Hybrid Rig” below.
As a starting point, ensure your DAW/the Standalone Application and Audio Interface are configured in accordance with the holistic procedures noted in "Section F: Latency"
For this setup configuration you will need:
- A compatible Audio Interface with an Instrument / High-Z Input
- A monitoring source (Headphones or Studio Monitors) and suitable cabling to connect your monitoring source to the Audio Interface
- A ¼-inch TS unbalanced instrument cable
- A Guitar or Bass
- For Plugin Use Only: A Digital Audio Workstation (DAW) in which GENOME can be instantiated
Post configuring your audio interface and DAW/the Standalone Application, setup GENOME as an in-the-box rig for end-to-end tone shaping of your guitar or bass tone using the following guidelines:
- If using the standalone application, simply open the application and ensure audio from your source is being received by GENOME.
- If using a DAW:
- Load a new Audio Channel in your DAW
- Within the Channel’s inserts, open your plugin list and select GENOME
- If instantiating GENOME for the first time, you will be prompted to login to GENOME, please use your Two notes account credentials to action this
- Providing the correct account details have been entered, GENOME will open and you will have access to our lane-based architecture and components to start building your in-the-box rig
- For end-to-end tone generation, please ensure an amplifier model is selected (CODEX or a TSM™ Amplifier) as well as a suitable cabinet emulation (the DynIR™ Engine or the IR Loader); to further supplement and refine your tone, add STUDIO FX (post amp or cabinet emulation) and PEDAL components (pre amplifier emulation) to your GENOME RIG
Note: If you have a Stereo input source and loaded GENOME on a Stereo audio channel within your DAW, GENOME will by default sum the left and right channels to a Mono signal source; by clicking the input configuration options in the top left corner of the GENOME Window, you can select whether to continue with the default sum, or take a mono feed of the Left or Right channels of your Stereo signal
2. Hybrid Rig
A Hybrid Rig is any setup that combines your traditional backline - be it modeling processors, amplifiers, a pedalboard or a hardware amp sim - and GENOME’s suite of PEDALS, CODEX AI Amp Captures, TSM™ Amps, DynIR™ / IR Cabinets and STUDIO FX. In the setup scenarios below, we cover the main use cases in order to incorporate GENOME into your backline.
As a starting point, ensure your DAW/the Standalone Application and Audio Interface are configured in accordance with the holistic procedures noted in "Section F: Latency"
For this setup configuration you will need:
- A compatible Audio Interface with suitable Instrument/High-Z and/or Line Level inputs
- A monitoring source (Headphones or Studio Monitors) and suitable cabling to connect your monitoring source to the Audio Interface
- Your existing backline, including - but not limited to - Pedals/Pedalboards, DI Boxes, Amplifiers, Loadboxes, Modeling Processors, Hardware Amp Simulators etc.
- Suitable cabling to connect your Loadbox, Amp Sim or Pedalboard to your Audio Interface (please refer to respective manufacturer’s user-guides for cabling and connectivity requirements)
- A Guitar or Bass
- For Plugin Use Only: A Digital Audio Workstation (DAW) in which GENOME can be instantiated
Post configuring your Audio Interface and DAW, setup GENOME for use in the context of a Hybrid Rig using the following guidelines:
- If using the standalone application, simply open the application and ensure audio from your source is being received by GENOME.
- If using a DAW:
- Load a new Audio Channel in your DAW
- Within the Channel’s inserts, open your plugin list and select GENOME
- If instantiating GENOME for the first time, you will be prompted to login to GENOME, please use your Two notes account credentials to action this
- Providing the correct account details have been entered, GENOME will open and you will have access to our lane-based architecture and components to start building your in-the-box rig
- Note: If you have a Stereo input source and loaded GENOME on a Stereo audio channel within your DAW, GENOME will by default sum the left and right channels to a Mono signal source; by clicking the input configuration options in the top left corner of the GENOME Window, you can select whether to continue with the default sum, or take a mono feed of the Left or Right channels of your Stereo signal
Using GENOME and Your Modeling Processor
- Please connect the Modeling Processor’s Line Level outputs to your Audio Interface
- In the instance that you only want to use your Modelling Processor’s built in amp simulation, ensure you have disabled the unit’s onboard cabinet emulation and use GENOME as your Post Amp signal chain inclusive of our DynIR™ Engine and STUDIO FX Suite
- In the instance that you want to use your Modelling Processor’s built in Pedal FX models, ensure you have disabled the unit’s onboard Amplifier and cabinet emulation and use GENOME as your Post Pedal signal chain inclusive of our Amplifier options (CODEX or a TSM™ Amplifier suite), DynIR™ Engine and STUDIO FX Suite
Using GENOME with Your Physical Amp Collection
- When connecting an amplifier, please ensure this is routed into a suitable load box (like the Torpedo Captor or Captor X); this loadbox should be connected to your Audio Interface’s Line Level Inputs
- Ensure you have disabled any digital / analog cabinet emulation on your Loadbox and use GENOME as your Post Amp signal chain inclusive of the DynIR™ Engine and STUDIO FX Suite
Using GENOME and Your Physical Pedalboard
- Note: If your Pedalboard features a dedicated Amp Sim at the terminus of your signal chain, please refer to “Using GENOME and your hardware Amp Sim” below
- In order to configure GENOME alongside your physical Pedalboard, first check if the last device in your Pedalboard’s signal chain is outputting a Line or Instrument Level signal
- In the instance that this is an Instrument Level signal, connect this pedal to a compatible Audio Interface and engage the High-Z switch to optimize the interface for instrument-level inputs
- In the instance this is a Line Level signal please ensure suitable Line Level Inputs are used on your Audio Interface
- Once the Standalone Application is opened or GENOME is instantiated in your DAW, you can:
- Expand your physical Pedalboard with GENOME’s PEDAL arsenal
- Run your GENOME PEDALS into a CODEX AI Amp Capture or a TSM™ Amplifier
- Apply a DynIR™ or static IR to your post GENOME Amp Signal
- Add STUDIO FX for post-Amp and -cabinet processing
Using GENOME and Your Hardware Amp Sim
- Please connect your Hardware Amp Sim’s Line Level outputs to your Audio Interface
- In the instance that you only want to use your Hardware Amp Sim’s built in amp simulation, ensure you have disabled the unit’s onboard cabinet emulation and use GENOME as your Post Amp signal chain inclusive of the DynIR™ Engine and STUDIO FX Suite
- In the instance that you only want to use your Hardware Amp Sim’s built in amp and cabinet simulation, use GENOME as your Post Amp / Cab signal chain inclusive of our STUDIO FX Suite only
The GENOME Interface
1. Global Parameter Pane
GENOME’s global parameters are located in the Global Parameter Pane, positioned at the top of the GENOME graphical user interface. These parameters are saved independently from RIGs and Component-level Presets.
1.1 Hamburger Menu
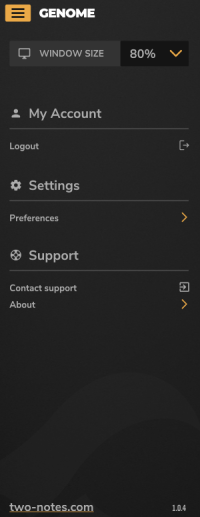 GENOME’s Hamburger Menu provides options for user preferences. licensing information and more. Open the Hamburger Menu by clicking the menu’s 3-dash icon to open the related pane and access the following preferences:
- WINDOW SIZE: Set the size of the plugin from 50% to 200%
- MY ACCOUNT: Access key information related to your account inclusive of Login and Logout functionality
- MIDI MAPPING CENTRE: Manage all Architectural or RIG-level MIDI assignments
- (Standalone Application Only) SETTINGS
- MIDI Devices: Configure all options that determine how MIDI data is received by the Standalone Application.
- Audio Settings: Configure all options that determine how source audio is received by the Standalone Application
- SUPPORT: Submit a ticket to the Two notes Helpdesk and view information relating to the version of GENOME currently installed on your computer
1.2 Input Routing
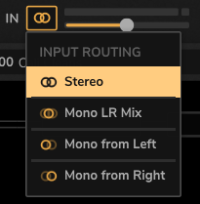
In order to configure GENOME’s routing of the related input signal into the plugin, reveal the dropdown menu visible by clicking the icon next to ‘ IN’ located in the top left portion of GENOME’s Global Parameter Pane.
GENOME (v1.03) has been configured to process a stereo or a mono signal at its input stage and there are dedicated options to select how a Stereo signal is processed into a compatible Mono source. These are:
- Stereo: In this instance, the stereo signal at the input is processed in stereo by GENOME
- Mono LR Mix: In this instance both channels of the Stereo Signal are summed to a Mono Signal
- Mono from Left: In this instance GENOME processes the left channel of the Stereo Signal only
- Mono from Right: In this instance GENOME processes the right channel of the Stereo Signal only
Note: Users under GENOME (v1.02) do not have the Stereo option.
1.3 Input Meter & Input Level Fader
The Input Meter & Input Level Fader are located in GENOME’s Global Parameter Pane and provide quick access to manage the Input Level of your source audio. When configuring your Input Level, it is vital to ensure your source audio does not clip, subsequently driving the instantiated RIG’s Component configuration beyond optimal limits.
- Use the Input Level Fader to adjust the volume of your input signal by -12dB to +12dB. Ensure the Input Signal Level falls within a suitable range using the accompanying Input Meter to monitor the level at the source audio’s input into GENOME
- The optimal range for the input signal is -18dB to -6dB. If after setting the Input Level Fader, the the source audio’s Input Level registers outside of the optimal range, reduce the volume of the source audio’s signal before it reaches GENOME either on your audio interface (when direct monitoring) or via the Digital Audio Workstation’s audio editing preferences, insert utility plugin or similar (during playback)
Note: Within GENOME, internal signals are calculated in 32-bit float format; as such, signals can’t actually ‘clip’ inside GENOME as they might if using fixed 24-bit processing. However, maintaining an optimal volume range will ensure Components sensitive to input gain (Amplifiers/Distortion Pedals) operate within the volume range they were specified for.
Note: Post GENOME’s input, at a RIG/Component Level, the Output Level of each Component can be adjusted to ensure optimal inter-component gain staging.
1.4 TUNER
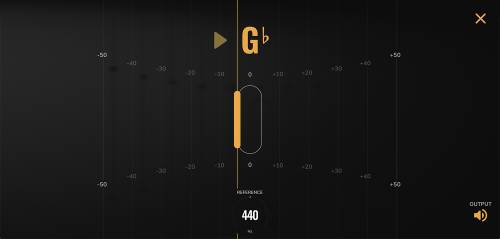
GENOME's TUNER is an accurate monophonic guitar and bass tuning utility located in GENOME’s Global Parameter Pane and is accessed by clicking on the Tuning Fork icon.
- Once instantiated the source input’s current pitch is indicated by the text note display; the accompanying graphic denotes how close the source audio is to the target semitone
- The reference pitch can be selected using the REFERENCE control in the range 432Hz to 448Hz, with 440Hz being the default standard tuning reference
- The OUTPUT switch located in the bottom right of the TUNER GUI determines whether the sound output is muted whilst tuning
- To close the TUNER window, click the 'X' located in the top right of the GUI
Note: TUNER parameters are not saved per RIG preset and exist as part of GENOME’s global parameter controls
1.5 NOISE GATE
GENOME’s NOISE GATE is a corrective utility located in GENOME’s Global Parameter Pane, instantiated and deactivated using the On/Off button to the right of the TUNER icon.
The NOISE GATE will lower the volume of the source signal below a designated input THRESHOLD, reducing any background noise present when not playing.
To reveal and edit the NOISE GATE settings, click the GATE button. To close the NOISE GATE settings either click the GATE button or click anywhere else on GENOME’s graphical user interface. The following parameters are available upon revealing GENOME’s NOISE GATE Settings:
- THRESHOLD: Sets a threshold level under which the NOISE GATE will activate
- HARD/SOFT: Sets the behavior of the NOISE GATE; HARD will cut the sound abruptly when the NOISE GATE is activated; SOFT apply a gentle roll-off to the gating effect
- LEARN: Clicking this button will enable the NOISE GATE’s LEARN Mode for automatic THRESHOLD configuration. When LEARN Mode is instantiated, stop playing and mute your strings; GENOME will then calculate the level of the background noise preset in the source signal and set the THRESHOLD accordingly
Note: The NOISE GATE is a global processor and as such is not saved per RIG
1.6 Output Meter & Output Level Fader
GENOME’s Output Meter & Output Level Fader are located in GENOME’s Global Parameter Pane, positioned next to the OUT moniker in the top right corner of the graphical user Interface.
GENOME’s Output Level can be adjusted using the Output Level Fader and monitored using the Output Meter to set a summative level at the output of the plugin. The Output Level Fader range is scaled from -95dB to 12dB. Use the Output Meter to monitor GENOME’s output signal level in real time post any adjustments made to the Output Level Fader.
Note: The Output Level Fader is a global processor and as such is not saved per RIG
1.7 CPU Meter & Oversampling
GENOME’s CPU Meter is located in GENOME’s Global Parameter Pane, positioned to the right of the Output Level Fader in the top right corner of the graphical user Interface. The CPU Meter provides an indication of how much CPU is used for the current loaded instance of GENOME.
Oversampling
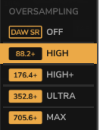
GENOME’s Oversampling modes are located, selected and instantiated via the drop down menu above the CPU Meter. These modes allow the user to select the amount of Oversampling that is used within GENOME. Oversampling will reduce any audio anomalies (Aliasing) caused by frequency content in the processed signal above GENOME’s operating Sample Rate frequency. Higher Oversampling will increase GENOME’s effective Sample Rate to prevent any Aliasing, but will also increase CPU usage. For older computers it is recommended to use the OFF setting, as this is less CPU intensive. For more modern computers with faster CPUs, the choice of Oversampling can be made from all available options including OFF, HIGH, HIGH+, ULTRA, and MAX.
Ultra and MAX Oversampling modes are designed for offline rendering (bounce). These modes provide slight enhancements to audio quality at the cost of very high CPU usage. They are not fit for playback.
Note: The CPU Meter is not an indication of total CPU usage, but instead a meter showing how much CPU time is being used within the processing buffer for the currently active RIG and related components. As such, it will display a different value to a host- or system-centric CPU usage meter.
2. RIG Config Pane
The RIG Config Pane is located immediately under GENOME’s Global Parameter Pane, providing a suite of comprehensive RIG management facilities.
A note about GENOME RIGS: A GENOME RIG is a headline preset consisting of a pre-designated selection of Components organized across GENOME’s lane based architecture. Out-the-box, GENOME ships with an extensive selection of GENOME RIGS. Whether it’s a snarling lead tone or an ambient post-rock soundscape, GENOME’s RIGs are your fast track to tonal bliss.
2.1 RIG Select
To select a RIG, click the currently instantiated RIG name located in the top right of the RIG Config Pane. This will open GENOME’s RIG Browser where all available GENOME RIGs can be viewed, loaded and managed (see 2.2. RIG Browser)
To cycle through RIGs sequentially, use the Up/Down arrow positioned to the left of the GENOME RIG Select Window. This will load the previous/next RIG in the currently selected RIG Browser Bank respectively.
2.2 RIG Browser
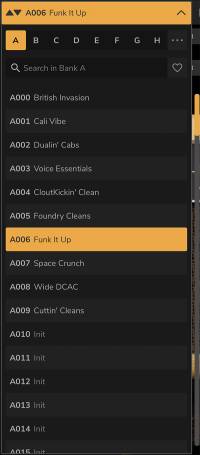
The RIG Browser is accessed by clicking the RIG Select window within GENOME’s RIG Config Pane. This is a RIG management tool, allowing the user to Browse, Select, Save, Import and Export RIGs / RIG Banks. GENOME’s RIG Browser contains 8 Banks of RIGs with storage of up to 128 RIGs per bank. Within the RIG Browser, the following information and editable parameters are accessible to manage your library of GENOME RIGS:
- RIG Name: The RIG Name is shown at the top of the RIG Browser, displaying the name of the currently active RIG. If the name is followed by an asterisk ('*'), this notes that the RIG has been edited, and differs from the saved variant of the currently active RIG. To rename a RIG, either:
- Double-click the name at the top of the RIG Browser/RIG Select window and edit accordingly
- Or, hover over a RIG Preset in the RIG Browser, click the three horizontal dots on the right of the RIG Browser entry, and select 'Rename'
- Bank Search: RIGs be searched for by name within the currently selected Bank using the Search Box text entry field. The search results are updated in real-time as you type
- Bank Select: To choose current instantiated RIG Browser Bank, use the Bank A to H buttons located at the top of the RIG Browser
- Bank Import: To import an entire Bank, click the three dots to the right of the RIG Browser’s Bank Select, and choose 'Import File Over Bank'.
- Note: This will overwrite the current Bank; please save any RIGs you wish to keep prior to actioning a Bank Import
- Bank Export: To export an entire Bank, click the three dots to the right of the RIG Browser’s Bank Select, and choose 'Export Bank To File'. This will open a operating-system-specific file browser window, where a location can be selected on the host machine to save the entire instantiated Bank as a single .tnb GENOME RIG Bank file.
- Favorites: The RIG Browser’s Favorites feature allows you to flag your Favorite RIGs. To mark a RIG as a Favorite, click the Heart icon next to each RIG name, revealed when you hover over any RIG in the RIG Browser. To filter the RIG Browser RIG display to those marked as a 'Favorite', click the heart icon located at the top of the RIG Browser pane
- Delete RIG: To permanently delete a RIG, hover over the corresponding RIG slot in the RIG Browser, click the three dots located to the right of the RIG slot, and select 'Delete'
- Save RIG: To save a RIG to a slot in the RIG Browser, select a Bank, hover over a RIG slot, click the three dots within the corresponding RIG slot, and select 'Replace With Current Rig'
- RIG Export: To export a single RIG, click the three horizontal dots that appear when hovering over a RIG slot in the RIG Browser, and select 'Export'. This will open a operating-system-specific file browser window where a location can be selected on the host machine to save the RIG as a single .tnr RIG file.
- RIG Import: To import a single RIG, click on the three horizontal dots that appear when hovering over a RIG Slot in the RIG Browser, and select 'Import'. This will open a operating-system-specific file browser window for folder and file selection, alongside options to load a single .tnr RIG file into the current RIG slot
- Note: This will overwrite the current RIG Preset; please ensure the existing RIG is saved if you wish to keep this prior to actioning a RIG Import
2.3 RIG Revert, Save RIG, Undo/Redo
Within the RIG Config Pane, GENOME provides a suite of comprehensive tools to manage the instantiated RIG. These quick-access RIG Management Tools are positioned to the right of RIG Config Pane’s RIG Select tool and include the following options:
- Revert: To Revert an edited RIG to the saved variant of the RIG, click the RIG Revert icon
- Save RIG: Clicking the Save (Disk) icon saves the instantied RIG to the current RIG slot
- Undo / Redo: Virtually all editable RIG-centric actions are saved in GENOME’s Undo/Redo history. To Undo or Redo any modifications to the currently instantiated RIG, use these features to navigate back and forth through your edits
2.4 RIG Tempo
GENOME’s RIG Tempo is located in the top right of the RIG Config Pane, and displays the current BPM saved as part of the instantiated RIG. The ‘LOCK’ icon to the left of the RIG Tempo BPM Display provides the following options:
- Tempo From Rig: If selected, the RIG Tempo can be manually defined and edited by double-clicking in the BPM display
- In addition, if Tempo From Rig is selected, the RIG Tempo BPM can also be manually set by tapping the TAP button at the desired speed
- (Plugin Application Only) Tempo From Host: If selected, this BPM display is grayed out and uneditable; the RIG Tempo will subsequently match the BPM set within the host Digital Audio Workstation
Note: Where a GENOME component features a time-base parameter that can be synced to tempo-specific beat-divisions (e.g. STUDIO Modulation FX or the STUDIO Delay), any synchronization will be actioned in accordance with GENOME’s RIG Tempo.
3. RIG Builder
GENOME’s RIG Builder contains up to 20 effects slots (or Inserts'), each of which can be loaded with a GENOME Component. Within the RIG Builder, multiple components can be configured in Series or Parallel to create a RIG which in turn can be saved via GENOME’s RIG Browser (see section 2.2. RIG Browser).
3.1 Lane Architecture
GENOME’s RIG Builder harnesses a Lane Architecture with options to configure Dual Lanes for parallel processing and a Single Lane for series-based processing. Signal flow through GENOME’s Lane architecture is actioned from left to right; the left-most Insert takes its input from GENOME’s source, post the Input Level Fader; the right-most Insert outputs all processing from the instantiated RIG to the Output Level Fader before returning the signal to the Digital Audio Workstation.
3.2 Automatic Mono / Stereo Signal Flow Management
While GENOME’s source is always configured in Mono, Components within GENOME’s Component arsenal are classified as either Mono or Stereo processors; as such, a given Component will process the preceding audio at its input stage in accordance with it’s Mono or Stereo classification.
For the most part, the user cannot define whether a Component processes its input in Mono or Stereo however in some special cases, a Stereo Component can be forced to receive a Mono input (examples being the STUDIO Reverb and STUDIO Delay). For ease of use, GENOME will automatically manage Stereo/Mono routing within a RIG; lines connecting the Inserts will denote what type of connection has been configured.
- If an instantiated Component has a mono input, a single line will connect to the preceding Component/Insert
- If an instantiated Component has a Stereo input, a double line will connect to the preceding Component/Insert
Once a signal has been processed in Stereo, it will remain Stereo until it passes through a Component configured for a Mono input. Likewise, if a signal is Mono, it will remain Mono until it passes through a Component configured for a Stereo output.
3.3 Component Management
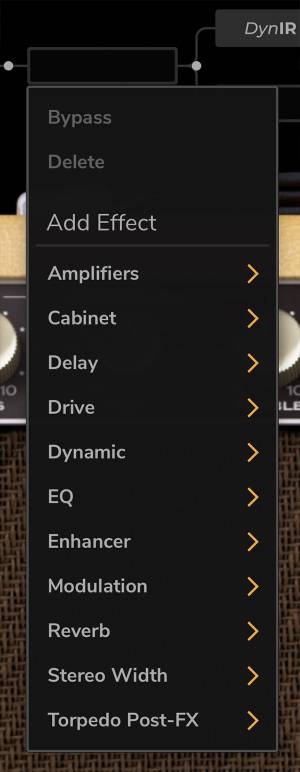
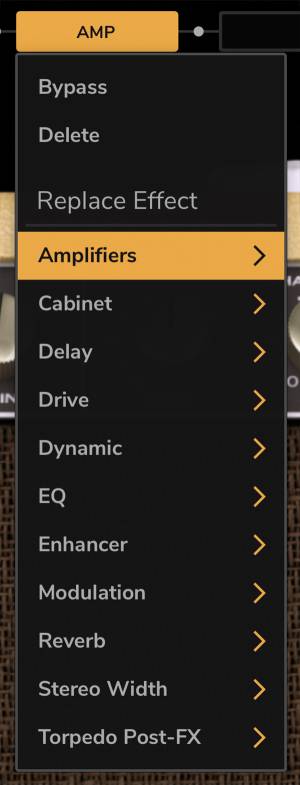
From adding new Components to moving Components within GENOME’s Lane based Architecture, Component Management has been configured as a hyper-intuitive process. Detailed below are the principal Component-management tools available when configuring a RIG.
3.4 Nodes
Hovering on any portion of GENOME’s Lane Architecture will reveal Nodes positioned between all qualifying Inserts. Nodes are used to configure GENOME’s Lane Split / Merge functionality detailed below.
GENOME’s Lane Split / Merge functionality allows for parallel processing within the GENOME RIG; for example, GENOME’s Lane Split / Merge can be configured to route amplifier and / or cabinet components in parallel, feeding a merged STUDIO FX chain in Series.
3.5 Splitting Lanes
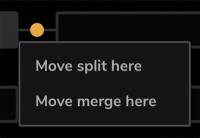
To Split a Lane configured in series routing, click the Node between two target Inserts and select 'Split Here'. To move the Split junction, click on a different target Node and select 'Move Split Here'.
3.6 Merging Lanes
To Merge a Split configuration back into a single Lane for Series processing, click the Node between two Inserts anywhere after the Split junction and select 'Move Merge Here'.
Note: If a Merge junction has not been instantiated, the processed signal will always Merge after the last Insert, prior to the RIG output.
3.7 Lane Merge Mixer
At the Merge junction, the two parallel Lanes can be mixed using the Lane Merge Mixer. This can be accessed by clicking the Mixer icon shown at the Merge junction. The Lane Merge Mixer provides the following identical parameters for Lane A (the upper lane) and Lane B (the lower lane):
- Lane Mono/Stereo Routing: Defines the Stereo / Mono configuration of the respective Lane’s signal in accordance with the following options: Stereo, Mono LR Mix, Mono From Left or Mono From Right
- LEVEL: Sets the volume level of the respective Lane from -95dB to 12dB
- PAN: Sets the respective Lane’s pan value scaled from full left to full right
- MUTE: Provides controls to Mute/Unmute the Lane
- PHASE INVERT: Provides controls to Invert the Phase of the Lane
GENOME Components
1. Component Presets and Preset Management Common to All GENOME Components
Within GENOME, each Component includes a Component Module Preset Browser featuring an effect bypass/engage switch, a drop-down menu that lists any saved Presets, arrows that cycle through the component-level Presets, and an Import/Export option.
- To save a Preset, click the disk icon and enter a name for the Preset
- Hovering over each Preset in the drop-down menu will reveal three horizontal dots for quick access to a variety of Preset management tools; management options include moving the selected Preset up or down in the list, as well as facilities to replace, duplicate, rename or delete the selected Preset. The Preset can also be exported from this menu.
- To export the current Preset to a file on your host machine, click the three horizontal dots on the right of the Preset Browser
Component Output Level
Each Component in a GENOME RIG features a dedicated control for the OUTPUT LEVEL of the Component. This is positioned in the bottom right corner of the effects module’s Graphical User Interface. The Component Output Level can be used for volume compensation and inter-Component gain staging, setting the desired level of the processed signal prior to passing to the adjacent Component in the instantiated RIG.
Precision Parameter Control
When editing a parameter within a given GENOME Component, fine adjustment of the value can be achieved by holding CTRL (PC) / CMD (MAC) whilst dragging.
Parameter Reset
To reset a Component’s parameter to its default value, double-click the parameter name.
2. TSM™ Amplifiers
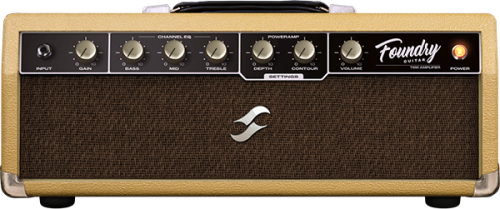
2.1 Foundry
Whether it’s a pristine high-headroom clean or a primo foundation for your pedal collection, Foundry delivers. In short, it’s the epitome of a classic Cali clean, brimming with warm saturation and engineered to capture every subtle nuance of your delivery.
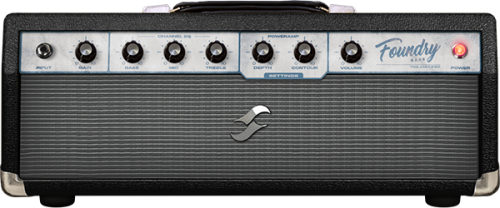
2.2 Foundry Bass
Whether it’s a pristine clean or a primo foundation for your pedal collection, Foundry Bass delivers. In short, it’s the epitome of a classic Bass clean, brimming with warm saturation and engineered to capture every subtle nuance of your delivery.
2.3 Peggy
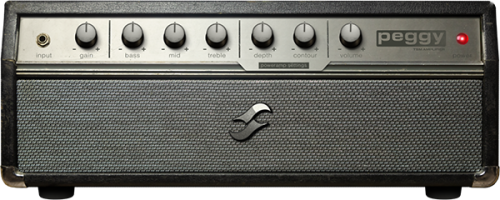
Bass players seeking the pinnacle in low-end theory, look no further than Peggy. Pushing complex harmonic overtones, a warm midrange and oodles of rafter ratlin’ thump, Peggy delivers the perfect blend of classic ’60s bass sonics with expertly-tuned tweak-ability to sit your tone in any pocket!
2.4 Albion
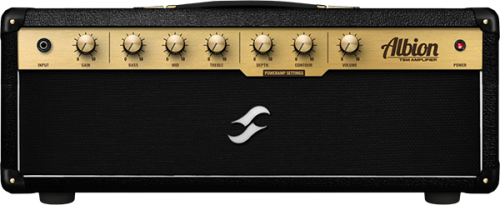
For those times when only a legendary Brit-inspired roar will suffice, there’s Albion. Complete with a rich, vocal mid-range, lashings of punch, boat-loads of power and gain-for-days, Albion is your secret weapon when diving head-first into Classic- and Hard-Rock territory.
2.5 ElDorado
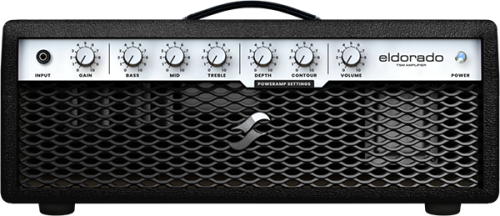
Tight response? Check. Rich in harmonics? Check. Searing, perfectly balanced gain fused with lashings of sustain? Oh Yes! This really is a “triple threat” for the guitarist venturing into hard-rock and metal territory.
2.6 Foxy
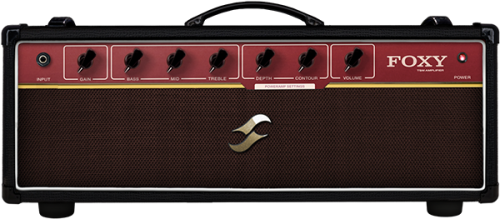
Seeking chime, articulation and buttery-smooth presence? Foxy’s a one-stop-shop! With airy highs, impeccable breakup and sublime mid-range bite when pushing the gain, Foxy is primed to take on everything from sultry Jazz to rauch-fuelled Rock n’ Roll.
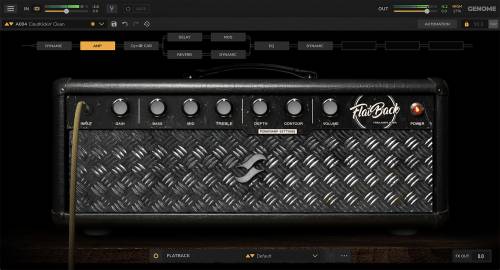
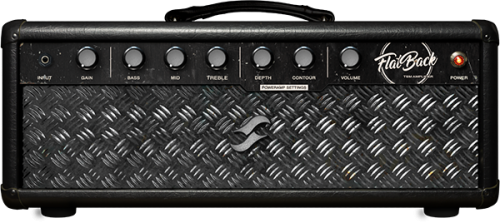
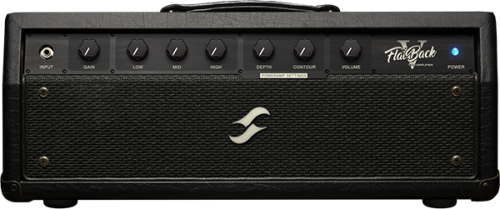
2.7 FlatBack
Looking for some Cali-born high-gain sonics, pushing the perfect combination of unrelenting power and deft levels of clarity? FlatBack’s a one-stop-shop offering lashings of harmonically rich overtones, a full bodied low-end and articulation for days!
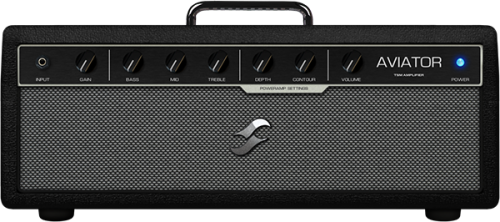
2.8 Aviator
Looking for the epitome of a modern, forward-thinking bass tone? You owe it to your tone to check out Aviator. Whether it’s rafter-rattlin lows, or a high-gain onslaught fused with the all-important clarity your tone demands, this TSM™ Amplifier delivers on all counts!
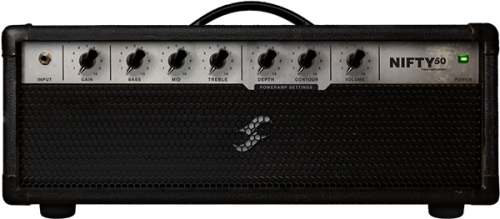
2.9 NiftyFifty
Want gain? Nifty50’s got it on tap! It’s aggression incarnate. It’s punchy. It’s super-versatile covering everything from a warm full-throttle onslaught to a searing lead tone that cuts through any mix. Whether it’s the darker side of metal or a tone that wouldn’t be amiss in 80’s inspired virtuosity, Nifty50 is deserving of any contemporary player's sonic arsenal.
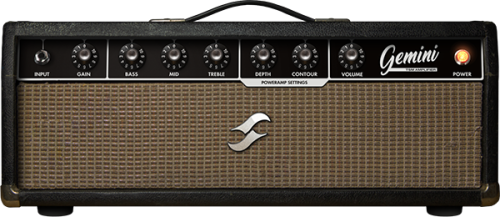
2.10 Gemini
For players seeking an alt slant on the iconic Bear-State clean, Gemini is just what the doctor ordered! At its core it delivers an articulate touch-sensitive sparkling-clean with oodles of warm breakup when pushed - in a nutshell, it’s contender #1 when it comes to getting the best from your overdrive pedal collection, lest we forget a dead-cert to pair with a vintage spring reverb for the epitome of a retro-inspired tone!
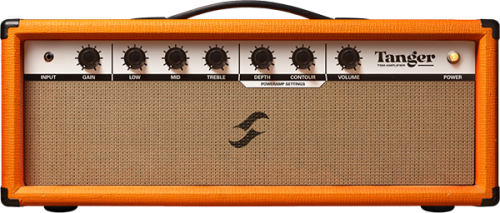
2.11 Tanger
When you’re in the market for sheer versatility - covering everything from a well-rounded articulate clean to a full-throttle high-gain onslaught - Tanger delivers on all counts! Fusing boat-loads of punch, lashings of sustain and a unique brit-inspired gain stage, Tanger ‘aint no one-trick-pony - it’s a powerhouse of tone primed for virtually any performance or recording scenario!
2.12 FlatBackFive
Looking for an alternate slant on Gold Coast high-gain sonics, complete with unrelenting gain, the perfect blend of relentless power and deft levels of precision? If the answer’s a resounding “YES”, then FlatBackFive is an absolute must-have!
2.13 Parameters Common to All TSM™ Amplifiers
The following parameters are available on all TSM™ Amplifier models:
INPUT (Preamp) Stage:
- GAIN: Sets the amount of input gain applied to the preamp stage. Higher settings will drive the input more, increasing the amount of PREAMP distortion. An additional method of adding more gain at the input is to increase the output volume of the previous component block.
- CHANNEL EQ: Each TSM™ Amplifier features a custom voiced 3-band Tone Stack, specific to the instantiated amplifier model
- BASS: Adjusts the level of bass frequency content for the selected model
- MID: Adjusts the level of mid frequency content for the selected model
- TREBLE: Adjusts the level of high frequency content for the selected model
POWERAMP Stage:
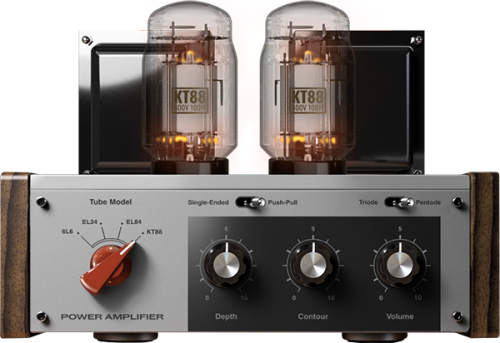
- DEPTH: Increasing this control adds more low frequency content to the POWERAMP stage
- CONTOUR: Low values result in reduced bass and treble frequency content creating a more 'mid-focussed’ tone; higher settings will increase the bass and treble frequency content while reducing mid-range frequencies resulting in a more 'scooped' sound
- VOLUME: Sets the tube output stage volume. As well as increasing the output volume, higher settings will also drive the output more, increasing the amount of POWERAMP distortion
- SETTINGS: Clicking the SETTINGS button will reveal the customisable POWERAMP SETTINGS pane complete with dedicated options for Tube Model, Type and Configuration. The following controls are available for surgical tuning of the selected POWERAMP’s tone:
- Tube Model: Choose between 6L6, EL34, EL84 & KT88 Tube Models
- Tube Configuration: Select whether the selected Tube Model is configured in SINGLE-ENDED or PUSH-PULL states
- Tube Type: Define whether the Tube model is a TRIODE- or PENTODE-centric emulation
3. TSM-Ai™ Amplifiers
3.1 PVH50
Introducing the PVH50, a titan-grade twin-channel TSM-Ai Amplifier inspired by the nefarious Peavey® 5150 (BLOCK). Engineered with the preferences of a legit guitar icon in mind, the Peavey® 5150 is regarded by many as the ultimate tonal powerhouse, revered for its supreme versatility in catering for everything from a raunchy rock crunch to a full-blown articulate metalcore onslaught.
The following parameters are available on within the PVH50:
- CHANNEL (Switch): Switches the active Channel between PVH50’s LEAD and RHYTHM Channels
- INPUT (Switch): Switches the active input (HIGH GAIN or NORMAL GAIN) for PVH50’s instantiated CHANNEL offering modified tonal responses
RHYTHM Channel Controls
- PRE GAIN: Adjusts the input gain for PVH50’s RHYTHM Channel affecting the volume and subsequent drive produced by the related channel
- BRIGHT (Switch): Applies a boost to the RHYTHM Channel’s mid-range and treble frequency content irrespective of the CRUNCH (Switch) state
- CRUNCH (Switch): Switches the RHYTHM Channel between Clean and Crunch modes
- RHYTHM EQ
- LOW: Use this control to attenuate or boost the Bass frequency content of the related channel’s processed signal
- MID: Use this control to attenuate or boost the Mid-Range frequency content of the related channel’s processed signal
- HIGH: Use this control to attenuate or boost the High frequency content of the related channel’s processed signal
- VOLUME: Sets the volume of PVH50’s RHYTHM Channel relative to the volume of PVH50’s LEAD Channel
LEAD Channel Controls
- PRE GAIN: Adjusts the input gain for PVH50’s LEAD Channel affecting the volume and subsequent drive produced by the related channel
- RHYTHM EQ
- LOW: Use this control to attenuate or boost the Bass frequency content of the related channel’s processed signal
- MID: Use this control to attenuate or boost the Mid-Range frequency content of the related channel’s processed signal
- HIGH: Use this control to attenuate or boost the High frequency content of the related channel’s processed signal
- VOLUME: Sets the volume of PVH50’s LEAD Channel relative to the volume of PVH50’s RHYTHM Channel
POWERAMP Controls
- RESONANCE: Applies a global scaled resonance boost / reduction to the low / low-mid frequency content of PVH50’s sound output
- PRESENCE: Applies a global scaled presence boost to the sound output of PVH50
- MASTER: Sets the global volume of PVH50’s Poweramp; increased values drive the Poweramp resulting in increased distortion, harmonics & compression
Additional Controls
- POWER (Switch): Sets whether the TSM-Ai component is bypassed or engaged
- POWERAMP (Switch): Enables or disables the poweramp emulation for both channels of the PVH50 TSM-Ai amplifier. When disabled we recommend using the stock POWERAMP GENOME Component to configure a custom Poweramp emulation immediately post the PVH50 Component
- QUALITY MODES: The following quality modes are accessible via the ellipses menu in the the PVH50 TSM-Ai amplifier interface
- STANDARD: Engage this setting for performance / playing scenarios where low CPU load is required
- HIGH: Engage this setting for improved definition and reduced aliasing, perfect for render-centric scenarios
3.2 Calibro73
 Introducing CaliBro73, a certified GENOME-essential twin-channel TSM-Ai Amplifier inspired by the legendary 1973 Fender® Bassman. Although ‘technically’ a Bass Amplifier, today the Fender® Bassman has cemented itself as the ultimate pedal-platform Guitar Amplifier. Pairing perfectly with virtually any driver configuration, it’s a go-to for players of all walks seeking the warmth, articulation and quintessential essence of a Californian-born clean.
The following parameters are available on within the CaliBro73:
- CHANNEL SELECTION (Switch): Use this control to switch between the BASS INSTRUMENT Channel, NORMAL Channel or a BRIDGE Setting featuring a 50/.50 split of the BASS INSTRUMENT and NORMAL Channels
BASS INSTRUMENT Channel Controls
- DEEP (Switch): Use this switch to increase the mid & treble frequency content when in the up position, and cut the mid & treble frequency content when set to the down position
- VOLUME: Sets the volume of CaliBro73’s BASS INSTRUMENT Channel relative to the volume of CaliBro73’s NORMAL Channel
- TREBLE: Use this control to attenuate or boost the High frequency content of the related channel’s processed signal
- MIDDLE: Use this control to attenuate or boost the Mid-Range frequency content of the related channel’s processed signal
- BASS: Use this control to attenuate or boost the Bass frequency content of the related channel’s processed signal
NORMAL Channel Controls
- BRIGHT (Switch): Applies a simulated Bright Cap parallel with the volume pot creating a path where high-end frequency content bypasses CaliBro73’s NORMAL Channel VOLUME control. As the VOLUME control is turned up, the non-affected mid-range and low- end frequency content relative to the treble frequency content ballance and the effect of the Bright Cap is negated
- VOLUME: Sets the volume of CaliBro73’s NORMAL Channel relative to the volume of CaliBro73’s BASS INSTRUMENT Channel
- TREBLE: Use this control to attenuate or boost the High frequency content of the related channel’s processed signal
- MIDDLE: Use this control to attenuate or boost the Mid-Range frequency content of the related channel’s processed signal
- BASS: Use this control to attenuate or boost the Bass frequency content of the related channel’s processed signal
POWERAMP Controls
- MASTER: Sets the global volume of CaliBro73’s Poweramp; increased values drive the Poweramp resulting in increased distortion, harmonics & compression
Additional Controls
- POWER (Switch): Sets whether the TSM-Ai component is bypassed or engaged
- POWERAMP (Switch): Enables or disables the poweramp emulation for both channels of the PVH50 TSM-Ai amplifier. When disabled we recommend using the stock POWERAMP GENOME Component to configure a custom Poweramp emulation immediately post the PVH50 Component
- QUALITY MODES: The following quality modes are accessible via the ellipses menu in the the PVH50 TSM-Ai amplifier interface
- STANDARD: Engage this setting for performance / playing scenarios where low CPU load is required
- HIGH: Engage this setting for improved definition and reduced aliasing, perfect for render-centric scenarios
4. STUDIO FX
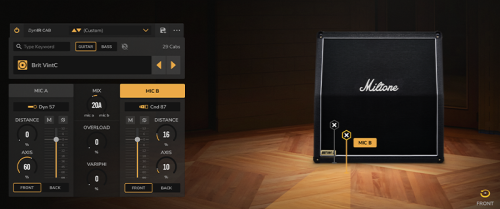
4.1 DynIR Engine
Conquering the dividing line between sublime authenticity and uncompromising digital emulation, DynIR™ represents the pinnacle in virtual guitar- and bass-cabinet technology. Harnessing power equivalent to 160,000 studio- grade IR files, each Two notes DynIR™ can be shaped to the needs of even the most discerning tone chaser. With 8 mics per cabinet, dual mic-ing and 10K mic positions (front & back), unleashing your tone and finding your signature sound has never been simpler.
Top Tip: For optimal performance, the DynIR™ Engine should be placed post a TSM™ Amplifier or the CODEX Engine to recreate a typical guitar-centric signal chain.
The DynIR™ Engine’s GUI is divided up into four sections:
- Top Left: Cabinet Explorer/Selection
- Bottom Left: Microphone Controls (MIC A and MIC B)
- Central Pane (in-between the MIC A & MIC B channels): Global Controls
- Right: Cabinet & Microphone Interactive Mic’ing Quadrant
Cabinet Explorer/Selection: The Cabinet Explorer/Selection section is used to browse and select which DynIR™ Cabinet is loaded within the DynIR™ Engine. Within this section, the following controls are available:
- Text Search Box: The Text Search Box grants comprehensive searching facilities across Two notes’ extensive catalog of DynIR™ virtual cabinets, with the resulting Cabinet Explorer list being adjustable depending on the filtering criteria determined by the user. To remove the text search filter, click the red 'X' on the left of the box. The following filters are available to the user to refine the DynIR™ virtual cabinets shown within the Cabinet Explorer list:
- GUITAR/BASS Filter Switches: Selecting GUITAR or BASS limits the Cabinet Explorer list to DynIR™ virtual cabinets captured from either Guitar or Bass cabinets respectively
- Ownership Filter: Clicking the icon positioned to the right of the GUITAR/BASS Filter Switches toggles the 'Owned' filter - if instantiated/highlighted, the Cabinet Explorer will list any DynIR™ virtual cabinets not currently owned and therefore assigned to the user’s Two notes account ID; all non-owned cabinets shown within the Cabinet Explorer are available to demo and subsequently purchase. When in demo mode, only one microphone channel is available within the DynIR™ Engine’s GUI; in addition, GENOME will insert silence at random intervals until either an owned cabinet is instantiated and the demonstration mode exited, or the related cabinet is purchased from the Two notes store
- DynIR Cabinet Quantity Display: This is positioned To the right of the GUITAR/BASS Filter Switches and the Ownership Filter; here, a number is displayed indicating the quantity of DynIR™ virtual cabinets currently listed in the Cabinet Explorer
- Selected Cabinet Name Display Box: The currently instantiated DynIR™ virtual cabinet name is displayed in the Cabinet Name Display Box.
- Clicking in this box will reveal the Explorer/Browser window where cabinets can be selected based on SPEAKER SIZE, CAPTURE MASTER (the studio / party that created the capture), and OWNERSHIP (whether the license for the cabinet has been assigned to your Two notes account license)
- Note: This list will already be filtered by the GUITAR/BASS Filter, the Ownership Filter button, and any currently active Text Search
- Using the Explorer window, cabinets can be selected by highlighting a cabinet type in the left pane, and selecting a specific cabinet in the right pane
- The resultant cabinet list can be further refined by using the dedicated Sort Options positioned at the top of this Explorer/Browser window, either alphabetically (A-Z), by CAPTURE MASTER or by OWNERSHIP status
- The left/right arrows to the right of the Selected Cabinet Name Display Box cycle through all cabinets in the currently filtered list.
Microphone Controls (MIC A and MIC B): Each of the two microphones available to mic up the instantiated DynIR™ virtual cabinet share the same set of controls, located within the two Microphone Channels of the GENOME DynIR™ Engine component GUI; note that these controls are specific to each Microphone channel, both of which have been configured to operate independently from one another. The microphone controls common to the MIC A and MIC B channels are as follows:
- Microphone Type Drop-Down: Use this option to choose a Microphone for the selected Microphone channel from a list of eight microphones used to capture the instantiated DynIR™ virtual cabinet. Selecting 'Bypass' from this menu will remove any microphone-processing from this channel
- Microphone Channel Controls:
- DISTANCE: Adjusts the microphone distance from the speaker cabinet
- AXIS: Adjusts the microphone position; from on-axis (in the middle of the speaker cone), to off-axis (towards the edge of the speaker cone)
- Mute: The 'M' button mutes/unmutes the associated Microphone Channel
- Phase Invert: The “Ø” button inverts the phase of the associated microphone channel
- Microphone Volume Fader: Adjusts the selected Microphone Channel’s volume, from -inf to +12dB
- FRONT/BACK Selection: FRONT will place the mic in front of the cabinet, BACK will place the microphone at the rear of the cabinet
Global Controls:
- MIX: Adjusts the balance between the MIC A and MIC B Microphone Channels
- OVERLOAD: Simulates speaker cone break-up
- VARIPHI: The VARIPHI parameter is a one-of-a-kind control, exclusive to Two notes Torpedo and software ecosystem technology. It allows you to modify the frequency content of the signal, using the properties of the sum of two signals with different phase levels. Essentially, you emulate a situation where two microphones are used, and the VARIPHI parameter controls the distance (hence the phase relation) between the two microphones
Cabinet & Microphone Interactive Mic’ing Quadrant: The Cabinet & Microphone Interactive Mic’ing Quadrant permits placement of the instantiated microphones by dragging them within a pre-designated area relative to the selected cabinet’s speaker. When manually moving microphones in this manner, related parameters in the Microphone Controls (MIC A and MIC B) section will update accordingly.
- The selected microphones can be placed on- or off-axis, relative to the speaker
- The selected microphones can be moved away from the speaker to pick up more of the 'room' sound
- A 'Speaker Aim Assist' ('+' sign) is displayed on the cabinet grill to aid with microphone axis positioning when the selected microphones are being placed within the mic’ing quadrant
- Holding CMD (Mac) / CTRL (PC) while dragging allows for refined positioning with a greater degree of clinical accuracy
- If the microphone you wish to select is 'hidden' by the companion microphone, use the MIC A or MIC B buttons in the Microphone Controls (MIC A and MIC B) section to instantiate it
- At the bottom right of the DynIR™ Engine’s GUI, a FRONT/BACK selector allows the cabinet to be viewed from the front or back facilitating microphone placement in front or behind the cabinet respectively
4.2 IR Loader
Purpose engineered to load static cabinet IR files - and featuring capacity for 2 static IRs per component instance - the IR loader is primed to load and adapt all your Mono or Stereo .wav, .aiff and .tur files to perfection. Some key features of the IR Loader include:
- Up to two IRs can be loaded in each IR Loader component, edited, and the resulting Output IR used in your RIG
- Loaded IRs can be up to 2 seconds in length. If the IR File is over 2 seconds, the file will be automatically truncated to 2 seconds
- Supported File Formats are .wav, .aiff and .tur in mono; the files can also exhibit different sample rates or bit depths to the current project settings
IR Browser and Selection:
- To select the folder on your host computer’s file system where your IRs are stored, use the Folder icon and navigate to the desired location
- Once a folder has been selected, the left/right buttons will cycle through the IRs in that folder
- The name of the currently loaded IR file is displayed in the IR File Name Text Box
- Clicking the IR File Name Text Box will bring up a drop-down menu where individual IRs can also be selected and loaded
- When an IR is loaded, the Waveform/Info Window displays the IR alongside the specifications of the instantiated IR file
IR Editing Controls: For each IR Channel (IR A and IR B), the following controls are available:
- MUTE: The 'M' button mutes/unmutes the related IR Channel
- PHASE INVERSION: The Ø button inverts the phase of the IR Channel when engaged
- VOLUME: Adjusts IR Channel volume, from -95dB to +12dB
Global Controls: The following global controls are available, affecting but the IR A and IR B channels:
- MIX: Adjusts the balance between the IR A and IR B channels
- OVERLOAD: Simulates speaker cone break-up.
- VARIPHI: The VARIPHI parameter is a one-of-a-kind control, exclusive to Two notes Torpedo and software ecosystem technology. It allows you to modify the frequency content of the signal, using the properties of the sum of two signals with different phase levels. Essentially, you emulate a situation where two microphones are used, and the VARIPHI parameter controls the distance (hence the phase relation) between the two microphones
FX Options Submenu: Further controls are available from the FX Options Submenu Icon in the top right of the GUI:
- ALIGN MODE: The following controls are available:
- NONE: The IR file is processed without changes
- MIN PHASE: The IR files are automatically configured to be in phase with one another
- MIN LATENCY: The IR files are placed to generate the minimum possible latency
- TIME UNIT: The following controls are available:
- MILLISECONDS: Selects whether the IR length should be displayed in milliseconds in the Waveform/Info Window
- SAMPLES: Selects if the IR length should be displayed as a number of samples in the Waveform/Info Window
4.3 STUDIO Delay
The STUDIO Delay is a pro-grade STUDIO FX component developed by Two notes Audio Engineering for use exclusively within GENOME. Fusing dual-channel (stereo/dual-mono) operation, tempo-synced & free-form delay times, comprehensive channel link facilities, dedicated channel filters and every mainstay you would expect from a studio-grade delay, creating anything from an ambient post-rock delay bed to a mix-cuttin’ slapback is ripe and ready for the taking.
The A Channel and B Channel both share the same arsenal of controls; these can be linked together using the LINK switches located in the central pane of the STUDIO Delay’s GUI under the TIME, FEEDBACK, DRY / WET & EQ labels.
The A- and B-Channel’s delay times can be manually adjusted in milliseconds, or can be synced to the current RIG tempo. In addition, HIGH CUT and LOW CUT filters can be engaged to alter the tone of the repeats as they decay.
Note: The input to the STUDIO Delay Component can be either mono or stereo; to configure this, click the three dots in the Preset Browser at the bottom of the GUI, and select the Wet Summing option. For more details on the STUDIO Delay’s Preset Browser, please refer to “Component Presets and Preset Management Common to All GENOME Components”
Controls common to both the A- and B-Channels:
- ON: Sets whether the related channel is bypassed or engaged
- TIME: Sets the delay time, either in ms, or subdivisions of the beat, depending on the mode selected:
- ms Mode: Manually sets the delay time from 1ms - 8000ms
- Note Mode: Sets the delay time to subdivisions of the beat from 1/64 to 8/1
- Dot Mode: Sets the delay time to dotted subdivisions of the beat from 1/64d to 8/1d
- Trip Mode: Sets the delay time to triplet subdivisions of the beat from 1/64t to 8/1t
- TAP: When in ms Mode, this can be used to set the delay time manually by tapping at the desired speed
- FEEDBACK: Controls the number of delay repeats, or the 'regeneration' amount
- PAN: Sets the pan position of the channel's delayed signal
- DRY / WET: Controls the volume of the delayed signal relative to the input signal
- LOW CUT: Sets the frequency of the LOW CUT filter that is in the delay loop from 10Hz to 5kHz
- HIGH CUT: Sets the frequency of the HIGH CUT filter that is in the delay loop from 100Hz to 20kHz
- SLOPE: Alters the steepness of both the HIGH CUT and LOW CUT filters, allowing for different tonal options
4.4 STUDIO Reverb
The STUDIO Reverb is a pro-grade STUDIO FX component developed by Two notes Audio Engineering for use exclusively within GENOME. Combining every mainstay control you demand from a studio verb, with an easy-to-use interface for expert-level tone-shaping, the STUDIO Reverb is primed for everything from an expansive cloud-like wash to a hyper-accurate room simulation.
GENOME's STUDIO Reverb provides extensive control over both the TAIL and EARLY REFLECTIONS via the dedicated editing panes in the STUDIO Reverb’s GUI (for more information, please see below). For rapid setting of the overall Reverb length - via simultaneous adjustment of the EARLY REFLECTIONS, PREDELAY and TAIL - a handy SIZE parameter is available to expand and contract all noted Reverb lengths at the same time.
Note: The input to the STUDIO Reverb Component can be either mono or stereo; to configure this, click the three dots in the Preset Browser at the bottom of the GUI, and select the Wet Summing option. For more details on the STUDIO Reverb’s Preset Browser, please refer to “Component Presets and Preset Management Common to All GENOME Components”
The interface is split into four main areas:
- Top Left Pane: Early Reflections
- Bottom Left Pane: Reverb Tail
- Right Pane: Post-Reverb EQ
- Middle Pane: Global Controls
Early Reflections:
- AMOUNT (0 - 100): Sets the volume of the early reflections
- SPREAD (0 - 100): Sets the time spacing between reflections, or the 'room size'
- DAMPING (0 - 100): Sets the Early Reflection high frequency damping, affecting the 'color' of the room from bright to dull
Reverb Tail:
- PREDELAY (0 - 250ms): Sets the time delay before the reverb tail starts
- DECAY (0.1 - 100secs): Sets the decay time of the Reverb Tail
- DIFFUSION (0 - 100): Sets the 'smearing' of the reverb tail, where higher settings make the reverb more diffuse
- TONE (-100 - +100): Controls the high frequency damping, allowing spaces that feel brighter or darker
Post-Reverb EQ:
- LOW FREQ (20hz - 20kHz): Sets the frequency of the Low Shelf Filter
- HIGH FREQ (20hz - 20kHz): Sets the frequency of the High Shelf Filter
- LOW GAIN (-24 - 24dB): Sets the level of gain applied to the Low Shelf Filter
- HIGH GAIN (-24 - 24dB): Sets the level of gain applied to the High Shelf Filter
Global:
- DRY / WET (0 - 100): Sets the balance between DRY and WET signals
- WIDTH (0 - 100): Sets the stereo WIDTH of the overall Reverb, from Mono to full Stereo
- REVERB SIZE (0.1 - 2.0): Simultaneously expands or contracts the three time-based controls (SPREAD, PREDELAY, DECAY) to adjust the overall length of the Reverb
4.5 STUDIO Chorus
In the market for a rich, liquid tone fused with fuss free operation? The STUDIO Chorus is a one-stop-shop! Whether it’s a smooth, subtle modulation or a dramatic contemporary ensemble with lashings of width, this GENOME component delivers everything you need in a format that keeps you focussed on your all-important performance!
Within the STUDIO Chorus, the following parameters are available to configure the Chorus effect:
- SPEED: Determines the speed of the modulation in either Hertz or beat subdivisions depending on the mode selected:
- Hz Mode: Allows manual control of the modulation speed from 0.03Hz to 5Hz
- Note Mode: Sets the modulation speed to subdivisions of the beat from 1/64 to 8/1
- Dot Mode: Sets the modulation speed to dotted subdivisions of the beat from 1/64d to 8/1d
- Trip Mode: Sets the modulation speed to triplet subdivisions of the beat from 1/64t to 8/1t
- FEEDBACK: Sets the 'Regeneration' amount that adds resonance to the modulation effect
- DRY / WET: Controls the volume of the Chorus effect relative to the input signal
- AMOUNT: Sets the range of the modulation, with higher settings sweeping the modulation over a greater range
- WIDTH: Adjusts the stereo width of the Chorus effect
4.6 STUDIO Vibrato
Want to add a touch of vibrato to your tone fast? The STUDIO Vibrato delivers on all counts! With an elegant 3-parameter operation, expertly-tuned to deliver contemporary and traditional modulations alike, the STUDIO Vibrato is a guaranteed final destination and a must-have in the modern guitarist’s sonic arsenal.
Within the STUDIO Vibrato, the following parameters are available to configure the Vibrato effect:
- SPEED: Determines the speed of the modulation in either Hertz or beat subdivisions depending on the mode selected:
- Hz Mode: Allows manual control of the modulation speed from 0.1Hz to 10Hz
- Note Mode: Sets the modulation speed to subdivisions of the beat from 1/64 to 8/1
- Dot Mode: Sets the modulation speed to dotted subdivisions of the beat from 1/64d to 8/1d
- Trip Mode: Sets the modulation speed to triplet subdivisions of the beat from 1/64t to 8/1t
- AMOUNT: Sets the range of the modulation, with higher settings modulating the pitch over a greater range. The maximum pitch variation is approximately 1 semitone
- WIDTH: Adjusts the stereo width of the pitch modulation, where higher settings vary the pitch more on one side of the stereo field than the other
4.7 STUDIO Tremolo
Fusing Dynamic or Harmonic operation with every must-have control you demand, the STUDIO Tremolo is perfect for adding everything from 60’s surf-fuelled vibe to a hard cutting effect giving edge and definition to sustained chords. For comprehensive control, the speed of the STUDIO Tremolo can be adjusted manually or sync'ed to the RIG tempo.
Within the STUDIO Tremolo, the following parameters are available to configure the Tremolo effect:
- SPEED: Determines the speed of the modulation in either Hertz or beat subdivisions depending on the mode selected:
- Hz Mode: Allows manual control of the modulation speed from 0.1Hz to 20Hz
- Note Mode: Sets the modulation speed to subdivisions of the beat from 1/64 to 8/1
- Dot Mode: Sets the modulation speed to dotted subdivisions of the beat from 1/64d to 8/1d
- Trip Mode: Sets the modulation speed to triplet subdivisions of the beat from 1/64t to 8/1t
- AMOUNT: Sets the scale of the modulation, with higher settings modulating the volume or harmonic content over a greater range
- MODE: There are two principal modes of operation available:
- Harmonic: Provides modulation of harmonic distortion within the processed signal
- Dynamic: Provides modulation of volume only
4.8 STUDIO Phaser
Featuring selectable 6-stage operation and every mainstay demanded from a studio-grade phaser, the STUDIO Phaser component delivers everything from a subtle enhancing drift to a full-throttle ultra-wide stereo lead that guarantees a veritable fog of distinction.
Within the STUDIO Phaser, the following parameters are available to configure the Phaser effect:.
- SPEED: Determines the speed of the modulation in either Hertz or beat subdivisions, depending on the mode selected:
- Hz Mode: Allows manual control of the modulation speed from 0.03Hz to 10Hz
- Note Mode: Sets the modulation speed to subdivisions of the beat from 1/64 to 8/1
- Dot Mode: Sets the modulation speed to dotted subdivisions of the beat from 1/64d to 8/1d
- Trip Mode: Sets the modulation speed to triplet subdivisions of the beat from 1/64t to 8/1t
- FEEDBACK: Sets the 'Regeneration' amount that adds resonance to the modulated signal
- DRY / WET: Controls the volume of the modulated signal relative to the input signal
- AMOUNT: Sets the scale of the modulation, with higher settings sweeping the phaser over a greater range
- WIDTH: Adjusts the stereo width of the phasing effect
- COLOR: Sets the center tone of the modulation, adjusting the frequency range over which the phaser is active
- STAGES: Sets the number of phasing stages from 1 to 6
4.9 STUDIO Flanger
From a mix-ready stereo sweetening effect brimming with subtle modulations to the most contemporary extreme flanging effects, the STUDIO Flanger with its raft of essential controls delivers on any - and every Flanger-centric need.
Within the STUDIO Flanger, the following parameters are available to configure the Flanging effect:.
- SPEED: Determines the speed of the modulation in either Hertz or beat subdivisions, depending on the mode selected:
- Hz Mode: Allows manual control of the modulation speed from 0.03Hz to 10Hz
- Note Mode: Sets the modulation speed to subdivisions of the beat from 1/64 to 8/1
- Dot Mode: Sets the modulation speed to dotted subdivisions of the beat from 1/64d to 8/1d
- Trip Mode: Sets the modulation speed to triplet subdivisions of the beat from 1/64t to 8/1t
- FEEDBACK: Sets the 'Regeneration' amount that adds resonance to the modulated signal
- SYNC / OPPOSITE: Sets the Stereo operation mode of the STUDIO Flanger:
- SYNC Mode: Both left and right channels sweep up and down together
- OPPOSITE Mode: One Stereo Channel sweeps up when the other Channel sweeps down
- DRY / WET: Controls the volume of the Flanger effect relative to the input signal
- AMOUNT: Sets the scale of the modulation, with higher settings sweeping the flanger over a greater range
- WIDTH: Adjusts the stereo width of the Flanging effect
- COLOR: Sets the center tone of the modulation, adjusting the frequency range over which the Flanger is active
4.10 TSM™ Power Amp
GENOME's Tube Stage Modelling Power (TSM™) Amplifier component is a pro-grade customisable power amplifier emulation. Using our proprietary TSM™ technology, dive in and sculpt your tone with 4 separate tube models (6L6, EL34, EL84 and KT88) in Push- Pull / AB class, or Single Ended / A class configurations. In a nutshell, it’s everything you need to tweak to your heart’s content and enrich your tone with the undeniable mojo of an authentic clipping/compressed power section.
Note: The TSM™ Power Amp component does not feature a preamp or tone stack, and as such should be placed post a suitable preamp component or DI feed for optimal results.
Within the TSM™ Power Amp, the following parameters are available to configure the Power Amp Emulation:
- TUBE MODEL: Choose between 6L6, EL34, EL84 & KT88 Tube Models
- DEPTH: Increasing this control adds more low frequency content to the POWERAMP stage
- CONTOUR: Low values result in reduced bass and treble frequency content creating a more 'mid-focussed’ tone; higher settings will increase the bass and treble frequency content while reducing mid-range frequencies resulting in a more 'scooped' sound
- VOLUME: Sets the tube output stage volume. As well as increasing the output volume, higher settings will also drive the output more, increasing the amount of POWERAMP distortion
- Tube Configuration: Select whether the selected Tube Model is configured in SINGLE-ENDED or PUSH-PULL states
- Tube Type: Define whether the Tube model is a TRIODE- or PENTODE-centric emulation
Note: In the preset browser section, clicking the three dots on the right hand side of the pane provides options for the TSM™ Power Amp’s Processing Mode. This feature is principally included for preset compatibility with Wall Of Sound; the Wall Of Sound option will switch the Power Amp component into a legacy mode, faithfully replicating the tonality and control specification of the Power Amp component included in Two notes’ Wall of Sound plugin. When the GENOME mode is instantiated, expect an updated tonal output when adjusting DEPTH, CONTOUR and VOLUME parameters.
4.11 CODEX
CODEX is a next-gen unification engine, primed to unleash the full-potential of your AI-powered amp & pedal capture arsenal. Featuring complete-compatibility with Neural Amp Modeller (NAM), AIDA-X and Proteus / Proteus Knob captures captures, CODEX delivers a suite of custom-engineered FX to surgically adapt and reimagine any static AI model to your exacting needs.
Within CODEX, the following parameters are available to configure the component:
- Input Source Configuration: Use this drop-down selector to determine whether CODEX is fed by a Stereo or Mono source; the following options are available:
- Stereo: In this instance, CODEX is fed with a Stereo Signal and will always process two channels of audio; note that this will effectively increase the host machine’s CPU load and should only be used when front-loading CODEX with Stereo effects and processors
- Mono LR Mix: In this instance both channels of the Stereo Signal are summed to a Mono Signal
- Mono from Left: In this instance CODEX processes the left channel of the Stereo Signal only
- Mono from Right: In this instance CODEX processes the right channel of the Stereo Signal only
- File Browser: Use the File Browser to select the folder on your computer’s file system where your compatible AI Amp and Pedal capture files are stored: click the Folder icon, navigate to the desired folder on your host machine's hard-drive and select a compatible file. Once a folder has been selected, the left/right buttons will cycle through the AI Amp and Pedal capture files stored in that folder. The name of the currently loaded AI Amp and Pedal capture is displayed in the File Name Text Box located at the top left of the GUI. Clicking the File Name Text Box will open a drop-down menu where individual AI Amp and Pedal capture profiles can be selected and loaded.
- INPUT Section: When configuring the input stage of CODEX, the following controls are available:
- Input Voicing: A fixed EQ setting to optimize the input to the AI Amp and Pedal capture profile - available options include WARM, NEUTRAL and BRIGHT. This control offers a fast and effective solution to the common pitfall of amp sims often sounding too muddy or too harsh depending on the personal taste of the player. Comprising a simple 2 band EQ + gain compensation, the selected input voicing ensures AI Amp and Pedal capture profiles react in accordance with what the guitar player generally enjoys in terms of tightness/fullness
- GAIN: Adjusts the input gain to the AI Amp and Pedal capture, affecting the volume and subsequent drive of the instantiated profile
- Note: The range of the GAIN control varies depending on the compatible file format loaded. This has been configured to ensure optimal sound for the capture profile instantiated and maintain an input signal within an ideal range
- TONESTACK: CODEX’s TONESTACK emulates a variety of real-world Tone Stacks modeled from classic amplifier tone circuits. Depending on the TONESTACK selected, up to four EQ-centric Tone Stack controls operate at different frequencies. When configuring CODEX’s TONESTACK, the following controls are available:
- Off/On Switch: Accessible via the top left corner of the TONESTACK section to bypass/engage the TONESTACK processing
- Tonestack Type: Use this selection box to determine the TONESTACK model to add to the AI Amp and Pedal capture
- PRE/POST: Use this to position the selected TONESTACK at different points in the signal chain:
- If PRE is selected, the routing is configured as follows: Input Signal > TONESTACK > Gain > Input Voicing > Amp Model > Output > EQ > Enhancer
- If POST is selected, the routing is configured as follows: Input Signal > Gain > Input Voicing > Amp Model > TONESTACK > Output > EQ > Enhancer
- BASS: Use this control to attenuate or boost the Bass frequency content of your signal of the instantiated AI Amp or Pedal capture profile
- MID: Use this control to attenuate or boost the Mid-Range frequency content of your signal of the instantiated AI Amp or Pedal capture profile
- TREBLE: Use this control to attenuate or boost the Treble frequency content of your signal of the instantiated AI Amp or Pedal capture profile
- Note: If a TONESTACK type features a different number of tone controls than those listed above, only those controls will be visible and labeled accordingly
- OUTPUT Section: The following controls are available:
- VOLUME: Adjusts the OUTPUT VOLUME of the instantiated AI Amp or Pedal capture profile
- EQ Section: Use the 5-band Graphic Equalizer to further refine the instantiated AI Amp or Pedal capture profile. Within the Graphic Equalizer, the following controls are available:
- Off/On Switch: Located in the top left corner of the EQ section, this can be used to bypass/engage the EQ section.
- EQ Controls:
- GUITAR/BASS/CUSTOM Mode: Choosing GUITAR or BASS mode selects fixed frequency bands optimized for guitar or bass respectively; selecting CUSTOM allows the user to manually configure the specified frequencies for each band
- LOW CUT: Determines the frequency at which the LOW CUT Filter is applied
- HIGH CUT: Determines the frequency at which the HIGH CUT Filter is applied
- 5-Band Graphic EQ: Depending on the mode chosen, each of the 5 bands operates at a particular frequency, with a range of +/-20dB
- In GUITAR Mode: The frequencies are fixed at 120Hz, 360Hz, 800Hz, 2kHz and 6kHz
- In BASS Mode: The frequencies are fixed at 50Hz, 120Hz, 360Hz, 800Hz and 4kHz
- In CUSTOM Mode: The frequency of each band can be adjusted using the dedicated FREQUENCY controls that appear below the vertical sliders
- ENHANCER: CODEX’s ENHANCER is a tone-shaping tool that can be used to boost the signal-content of the AI Amp or Pedal capture profile via three pre-designated frequency bands - low, mid and high. This works somewhat like an EQ, but adds a degree of compression to each of the aforementioned bands. The ENHANCER is placed at the end of the signal chain and features the following controls to refine the output of the instatied AI Amp or Pedal capture profile:
- Off/On Switch: Located in the top left corner of the ENHANCER section, use this to bypass/engage the ENHANCER
- ENHANCER Controls:
- GUITAR/BASS: Switch to select whether the ENHANCER’s Frequency Bands are optimized for Guitar or Bass
- DRY / WET: Sets the volume of the affected signal relative to the input signal
- BODY: Sets the amount of processing applied by the ENHANCER to the mid-range frequency content
- THICKNESS: Sets the amount of processing applied by the ENHANCER to the low-end frequency content
- BRILLIANCE: Sets the amount of processing applied by the ENHANCER to the high-end frequency content
4.11.1 Securing additional CODEX Captures
CODEX is compatible with Neural Amp Modeller (NAM), AIDA-X and Proteus captures. We'd like to take this opportunity to thank the teams at Mod Audio, Guitar ML, Amalgam Audio and Tone Hunt veteran Arlington Audio / Nathan Mesiti for supplying our stock captures! Need more captures? We’ve included some quick links below for your perusal:
Neural Amp Modeller (NAM)
- Get more information on NAM: https://www.neuralampmodeler.com/
- Discover ToneHunt: https://tonehunt.org/
- Check out Nathan Mesiti’s Captures: https://tonehunt.org/ArlingtonAudio
Mod Audio / AIDA-X
- Get more information on AIDA-X: https://aida-x.cc/
Guitar ML / Proteus:
- Get more information on Proteus: https://guitarml.com/
- Go Support Proteus: https://www.patreon.com/GuitarML
- Follow Proteus: https://www.youtube.com/@GuitarML
Amalgam Audio:
- Get more information on Amalgam Audio: https://www.amalgamcaptures.com/
4.12 STUDIO EQ
Featuring up-to 16 bands of operation, an intuitive layout complete with a visual analysis engine, band-isolate functionality and every main-stay control you would expect from a pro-grade parametric equalizer, the STUDIO EQ covers all your creative and corrective needs, whether it’s the all-important mixdown or honing the perfect live tone.
The STUDIO EQ is divided into 2 principal sections:
- The Graphical User Interface featuring an editable EQ curve defined per instantiated band and backed by a visual analysis engine
- The Control Pane featuring parameters to add / remove bands and dedicated controls to surgically configure each EQ band
Top Tip: Many of the controls in the Control Pane of the STUDIO EQ can also be adjusted by clicking on the EQ nodes in the Graphical User Interface.
Within the STUDIO EQ, the following configuration options are available:
Adding or Removing EQ Bands:
- In the Control Pane, a band can be added using the '+' button, and deleted using the 'X' button
- In the Graphical User Interface, a band can be added by double-clicking and deleted by double-clicking the EQ node while holding the CTRL Key (PC) or CMD Key (MAC)
Selecting EQ Bands:
- In the Control Pane, a band can be selected by using the left/right arrows to cycle through the instantiated bands, or by clicking on the Band Number and using the related drop-down menu
- In the Graphical User Interface, a band can be selected by clicking on the desired EQ node
Enabling/Disabling EQ Bands:
- In the Control Pane, a band can be enabled or disabled using the On/Off button located in the bottom left of the pane
- In the Graphical User Interface, a band can be enabled or disabled by double-clicking on the EQ node
EQ TYPE:
- To change the EQ type for a specific band, click in the EQ type box located in the Control Pane and select the desired band from the resultant drop-down menu
- The available EQ types include: Peak, Notch, Low-Cut, High-Cut, Band-Pass, Low-Shelf & High-Shelf
GAIN:
- The GAIN applied to each band can be adjusted in either the Control Pane, or by clicking and dragging each EQ node up or down within the Graphical User Interface
- The GAIN parameter is only active on the following EQ types: Peak, Low-Shelf, High-Shelf
- To ensure only GAIN is altered and not the frequency setting of the selected node, hold CTRL (PC) or CMD (MAC) whilst dragging the related node
FREQUENCY:
- The center frequency of each band can be adjusted in the Control Pane or by clicking and dragging each EQ node left or right within the Graphical User Interface
- To ensure only FREQUENCY is altered and not the GAIN of the selected node, hold ALT (PC) / Option (MAC) whilst dragging
Q
- The Q factor, or 'width' of each node’s band can be adjusted in the Control Pane
- Note: Q values are centered around 0.707 but ranges have been tweaked for each EQ type to be musically pleasing; as such, duplicating settings from another EQ plug-in may not garner desired results
SLOPE
- The SLOPE of the selected band can be adjusted via the dedicated control located within the right hand side of the Control Pane; use either the left/right arrows or click the SLOPE text box to reveal the related drop-down menu
- In most instances, SLOPE affects the 'order' (or 'steepness') of the band from the center frequency
- Note: When using the Peak EQ TYPE, a SLOPE value other than 12dB/oct will transform the Peak EQ TYPE into a Band-Shelf EQ TYPE; in this instance, the Q parameter will control the bandwidth of the Band Shelf
4.13 STUDIO Compressor
When it comes to surgical dynamic control, a full-featured Compressor is a certified must-have. Complete with every mainstay control demanded from a pro-grade compressor - plus lookahead and an ultra-intuitive visual analysis engine - the STUDIO Compressor is a one-stop-shop when it comes to complete control over your source signal’s dynamic content.
Within the STUDIO Compressor, the following parameters are available to configure the component:
- ATTACK: Sets the attack time from 1ms to 200ms
- RELEASE: Sets the release time from 10ms to 500ms
- KNEE: Sets the sharpness of the compression curve. A “Soft” KNEE will react to lower signal levels in and around the THRESHOLD level to a moderate degree, whereas a “Hard” KNEE will only ever compress signal levels above the THRESHOLD
- Note: This setting can also be controlled using the horizontal handles located in the Compression Curve Graphic
- RATIO: Sets the compression ratio from 1:1 (no compression) to 100:1 (limiting). This setting can also be controlled using the rightmost handle in the Compression Curve Graphic
- THRESHOLD: Sets the input level in dB required to trigger compression. This setting can also be controlled using the central handle in the Compression Curve Graphic
- MAKE-UP: Sets a level of Gain make-up to compensate for level reduction caused by the component’s compression amount
- HP FILTER: Sets the STUDIO Compressor’s Sidechain High-Pass frequency in Hz. Frequencies below this value will not trigger compression
- LOOKAHEAD: Sets the LOOKAHEAD from 0ms to 10ms. This parameter forward-analyses signal content resulting in quicker reaction to peaks in the audio signal
- Note: Using LOOKAHEAD will add latency equal to the lookahead time
- DRY / WET: Controls the volume of the compressed signal relative to the input signal, ideal for implementing 'parallel compression' techniques
- UNLINKED/LINKED: Use these options to determine how the STUDIO Compressor reacts to Stereo Signals:
- LINKED: Maintains compression for both Left and Right channels regardless of differentials between each channel within the Stereo signal
- UNLINKED: Configures the STUDIO Compressor to compress Left and Right channels separately and independently
- PEAK/RMS: Determines the mode for the STUDIO Compressor’s signal detection:
- PEAK: The compressor will be configured to engage on shorter peaks
- RMS: The compressor will be configured to engage based on an averaged input signal over time
4.14 STUDIO Enhancer
When it comes to tone, primo dynamic- and tone-shaping tools are a certified must-have. Enter GENOME’s STUDIO Enhancer. Complete with ‘Thickness’ and ‘Brilliance’ controls to emphasize the low- and high-end sonic content of your DI signal respectively - plus a super-handy ‘Body’ encoder to dial in a fuller, more present tone - and all rudiments are well-and-truly set to push meteoric sonics whatever your next performance demands.
Within the STUDIO Enhancer, the following parameters are available to configure the component:
- DRY / WET: Sets the volume of the affected signal relative to the input signal
- BODY: Determines the mid-range frequency enhancement amount
- THICKNESS: Determines the low-end frequency enhancement amount
- BRILLIANCE: Determines the high-end frequency enhancement amount
- OFF/ON: Sets whether the component is bypassed or engaged
- GUITAR/BASS: Determines whether the frequencies affected are optimized for guitar or bass respectively
4.15 STUDIO Twin Tracker
Seeking a radical stereo makeover? Meet GENOME’s TWIN TRACKER - a cutting-edge stereo double tracking wunderkind. Simply fire-it-up to create a proxy - or ‘Virtual Guitarist’ - on the right channel in real-time!
Note: The STUDIO Twin Tracker component will always sum the input to mono, even if it is fed with a stereo signal.
Within the STUDIO Twin Tracker, the following parameters are available to configure the component:
- BALANCE: Determines the position of the affected and source signal within the stereo field
- TIGHTNESS: Controls the level of synchronization/drift of the proxy as well as width of the source- and affected-signal within the Stereo field; higher values for this parameter result in a more extreme double-tracking effect
- OFF/ON: Sets whether the component is bypassed or engaged
4.16 STUDIO Exciter
Looking to add some low end definition or top-end sizzle to your tone? The STUDIO Exciter is just what the doctor ordered. Fusing a fuss-free interface and an expertly-tuned algorithm, the STUDIO Exciter guarantees to get your tone where you need it fast. The result? You spend less time tweaking and more time on the important business of playing!
Note: The STUDIO Exciter operates somewhat like an EQ; however, instead of boosting frequencies, it adds harmonic content relative to the original signal to predesignated processing bands.
Within the STUDIO Exciter, the following parameters are available to configure the component:
- LOW: Sets the low frequency excitation amount
- HIGH: Sets the high frequency excitation amount
- OUT: Sets whether the component is bypassed or engaged
4.17 Wall of Sound Post FX
For our legion of Wall of Sound users, we’ve engineered a specific component that replicates the Post FX suite included in industry standard poweramp modelling, cabinet emulation and virtual mic’ing plugin.
Note: Presets created in Wall of Sound can be imported into GENOME. Preset import is limited in that only the first two DynIR Virtual Cabinets used in the target Wall of Sound preset will be ported into the respective GENOME preset. Upon importing the Wall of Sound preset, multiple qualifying component blocks will be added to the GENOME RIG to recreate the complete Wall of Sound preset.
EQ Section
The Wall of Sound Post FX Component features a Graphic Equalizer to refine your tone by increasing/decreasing the level of specific pre-defined frequencies. Within the Graphic Equalizer, the following controls are available:
- Off/On Switch: This can be used to Bypass/Engage the EQ section
- GUITAR/BASS/CUSTOM Mode: Choosing the GUITAR or BASS Mode selects fixed frequency bands optimized for guitar or bass respectively. Selecting the CUSTOM Mode allows the user to manually configure the specified frequencies for each band. Each Mode features a HIGH CUT filter that can be adjusted to remove all frequencies below the HIGH CUT filter frequency. Depending on the Mode selected, each of the bands operates at a particular frequency, with a range of +/-20dB; Each frequency band can also be bypassed/enabled using the Off/On buttons above each band slider:
- In GUITAR Mode: The band frequencies are fixed at 120Hz, 360Hz, 800Hz, 2kHz and 6kHz. The HIGH CUT can be set between 10Hz and 500Hz
- In BASS Mode: The band frequencies are fixed at 50Hz, 120Hz, 360Hz, 800Hz and 4kHz. The HIGH CUT can be set between 10Hz and 500Hz
- In CUSTOM Mode: The Frequency and Q (or 'bandwidth') of each band can be adjusted using the dedicated FREQUENCY and WIDTH controls visible below the vertical sliders. An additional high frequency band is available in CUSTOM Mode, and the lowest and highest bands are configurable for EQ TYPE:
- LOW BAND: Select between Low Shelf, Peak & High Pass (or 'Low Cut'), and adjust the frequency between 10Hz and 500Hz
- HIGH BAND: Select between High Shelf, Peak & Low Pass (or 'High Cut'), and adjust the frequency between 1kHz and 20kHz.
EXCITER Section
The Wall of Sound Post FX EXCITER operates somewhat like an EQ; however, instead of boosting frequencies, it adds harmonic content relative to the original signal to predesignated processing bands.
Within the EXCITER, the following parameters are available to configure the component:
- Off/On Switch: Sets whether the EXCITER Section is bypassed or engaged
- LOW: Sets the low frequency excitation amount
- HIGH: Sets the high frequency excitation amount
COMPRESSOR Section
The Wall of Sound Post FX COMPRESSOR can be used to control the dynamics of the processed signal, reducing peaks and scaling the source signal’s dynamic range. A Gain Reduction Meter denotes how much compression is being applied to the signal in real time. The following controls are available to configure the Wall of Sound Post FX COMPRESSOR:
- Off/On Switch: Sets whether the COMPRESSOR Section is bypassed or engaged
- THRESHOLD: Sets the input level in dB required to trigger compression
- RATIO: Sets the compression ratio from 1:1 (no compression) to 20:1
- ATTACK: Sets the attack time from 0ms to 200ms
- RELEASE: Sets the release time from 10ms to 500ms
- MAKE-UP: Sets a level of Gain Make-Up to compensate for level reduction caused by the component’s compression amount
REVERB Section
The Wall of Sound Post FX REVERB provides a quick means to simulate various rooms and spaces. Configuring the Reverb is actioned using the following parameters:
- Off/On Switch: Sets whether the REVERB Section is bypassed or engaged
- Room Type: Provides a drop-down menu to select a preset REVERB 'Space'; Available options include: Studio A, Studio B, Basement, Loft, Hall A, Hall B, Crypt, Cathedral, or Custom. Selecting one of these preset spaces will adjust the following controls to preset values used to simulate the chosen space:
- DRY / WET: Controls the volume of the Reverb signal relative to the input signal
- SIZE: Adjusts the overall Reverb length, with higher values emulating larger spaces
- ECHO: Adjusts the 'echo' effect within the Reverb, simulating reflections from surfaces within the virtual space
- COLOR: Controls the amount of 'damping' within the Reverb space, resulting in spaces with darker or brighter tonal characteristics
5. PEDALS
5.1 Dupe Delay
Taking inspiration from the legendary MXR® Carbon Copy, the Dupe Delay is a mono modulated PEDAL component delivering the epitome of a rich bucket-brigade delay brimming with all the warm overtones you demand from such an iconic pedal-board mainstay. Featuring dedicated TIME, DRY/WET and RATE controls - plus a handy MOD re-voicing switch and up to 600 ms of delay time - the Dupe Delay is primed for everything from an expansive Gilmour-inspired wash or a subtle slapback to sit your tone perfectly in any pocket!
Note: The component’s modulation can be switched in or out with the MOD button; when engaged the modulation speed is fixed at 0.15Hz.
Within the Dupe Delay, the following parameters are available to configure the component:
- DRY / WET: Sets the volume of the delayed signal relative to the input signal
- TIME: Determines the time between delay repeats; the range is 10ms to 600ms
- FEEDBACK: Controls the quantity of delay repeats ('regeneration' amount)
- MOD: A switch that engages pitch modulation of the delayed signal
- EFFECT: On/Off control that engages or bypasses the component
5.2 Big Fuzz
Inspired by the legendary EHX® Big Muff Pi, the Big Fuzz packs BIG tone shaping potential with its rich, buttery, string-esc sustain, complete with all the spit and life-like fuzz your performance demands. With dedicated controls for Volume, Tone and Sustain/Distortion amount, everything from a subtle muted saturation to a full-throttle balls-to-the-wall Fuzz-fuelled onslaught is ripe for the taking!
Within the Big Fuzz, the following parameters are available to configure the component:
- VOLUME: Sets the output volume of the effect
- TONE: Sets the tone of the fuzz from dull to bright
- SUSTAIN: Sets the amount of distortion generated
5.3 9-Phase
Inspired by the MXR® Phase 90, this component delivers an iconic tone incarnate - tone (we might add) that’s been a mainstay on the boards for legends for over 4 decades! More often than not, simplicity is often the spark for the greatest creative exploits; following this ethos, the 9-Phase delivers single knob control taking your tone from a nuanced phased shimmer to a meteoric cosmic swoosh and everywhere in between. In short, if you're in the market for a fuss-free Phaser that continues to define - and redefine - the sound of generations of musicians, the 9-Phase is a certified must-have!
Within the 9-Phase, the following parameter is available to configure the component:
- SPEED: Sets the speed of the phasing effect from slow and subtle to fast and swooshing
5.4 Green Meanie
Inspired by the iconic Ibanez® TS9 Tube Screamer, the Green Meanie delivers the same mid-range hump, next-level dynamic response and sublime drive that’s perfect for front-loading an amplifier and cutting your tone through any mix!
Within the Green Meanie, the following parameters are available to configure the component:
- DRIVE: Sets the amount of overdrive generated
- TONE: Sets the tone of the overdrive from dull to bright
- LEVEL: Sets the output volume of the effect
5.5 Klonataur
Taking inspiration from the iconic and much-revered Klon® Centaur, the Klonataur delivers the same expansive tone with notes akin to tube clipping - all underpinned with the richness and dynamics that made the Centaur so popular with pedal aficionados. At low gain, prepare yourself for a semi-transparent boost with a touch of breakup; push the gain, and enter a world of pure hard-clipped distortion - all blended to perfection with your clean, unaffected signal and brimming with harmonically-rich saturation in all the right places!
Within the Klonataur, the following parameters are available to configure the component:
- GAIN: Sets the amount of overdrive generated
- TREBLE: Sets the tone of the overdrive from dull to bright
- OUTPUT: Sets the output volume of the effect
5.6 RaunchMaker
Inspired by the original Marshall® Blues Breaker, the RaunchMaker delivers the same buttery smooth tone, warmth and full-bodied harmonic saturation to deliver the pinnacle in expressive tone shaping. Inspired by the amp and sultry sonics of the one-and-only Eric Clapton, the RaunchMaker is primed for frontloading CODEX or our TSM Amplifiers for next-level bluesy leads, complete with all clarity and sparkle your performance demands.
Within the RaunchMaker, the following parameters are available to configure the component:
- GAIN: Sets the amount of overdrive generated
- TONE: Sets the tone of the overdrive from dull to bright
- VOLUME: Sets the output volume of the effect
5.7 Vermin
inspired by the ProCo® RAT, Vermin redefines any expectations of what a versatile distortion pedal should be. Whether it’s a primary distortion for an expansive high-gain onslaught, a “dirty channel” supplement for your existing amp rig, or simply a flavor-packed boost, Vermin delivers on all mandates. Plus, with an onboard FILTER control, taming any nuisance high frequency content to sit your tone in any pocket couldn't be simpler!
Within the Vermin, the following parameters are available to configure the component:
- DISTORTION: Sets the amount of distortion generated
- FILTER: Sets the tone of the distortion from bright to dull
- VOLUME: Sets the output volume of the effect
5.8 Ultra Drive
Taking inspiration from the 1981-born Boss® SD-1 Super Overdrive, the Ultra Drive faithfully reproduces the classic asymmetrical clipping circuit for iconic tube-like overdriven sonics. Perfect for front-loading clean and saturated amps alike, the Ultra Drive’s mild-to-moderate drive - complete with a cutting mid-range and a super-tight low-end - is primed for everything from overdriven bluesy raunch or a searing lead tone that cuts through any mix! High gain aficionados, don't think of the Ultra Drive as a one-trick-pony! It’s perfect for adding clarity, bite and tightness to even the most gain-fuelled amp!
Within the Ultra Drive, the following parameters are available to configure the component:
- LEVEL: Sets the output volume of the effect
- DRIVE: Sets the amount of overdrive generated
- TONE: Sets the tone of the overdrive from dull to bright
5.9 D-250
Inspired by the 70’s-born DOD® Overdrive Preamp 250, the D-250 replicates every subtlety of the period-authentic LM741 OpAmp, covering everything from a transparent boost to a gritty full-throttle saturated distortion. Whether it’s some authentic 70’s driven mojo, or a distinctive OD-Boost that’s perfect for revoicing your amplifier on-the-fly, the D-250’s simplified control layout guarantees to get your tone where it needs to be fast!
Within the D-250, the following parameters are available to configure the component:
- GAIN: Sets the amount of overdrive generated
- LEVEL: Sets the output volume of the effect
5.10 Bass-Q
Every pedal enthusiast knows, no board would be complete with a graphic-style EQ. That’s why GENOME ships as standard with Bass-Q, a 7-band graphic EQ, spec’d to dial in the perfect pre-amplifier bass EQ in a snap!
Within the Bass-Q, the following parameters are available to configure the component:
- BANDS: Each band features +/-15dB of gain, and the effect can be bypassed/enabled using the GUI footswitch; the bands are set at 50Hz, 120Hz, 400Hz, 500Hz, 800Hz, 4.5kHz, 10kHz
5.11 Guitar-Q
Every pedal enthusiast knows, no board would be complete with a graphic-style EQ. That’s why GENOME ships as standard with Guitar-Q, a 7-band graphic EQ, spec’d to dial in the perfect pre-amplifier Guitar EQ in a snap!
Within the Guitar-Q, the following parameters are available to configure the component:
- BANDS: Each band features +/-15dB of gain, and the effect can be bypassed/enabled using the GUI footswitch; the bands are set at octave intervals of 100Hz, 200Hz, 400Hz, 800Hz, 1.6kHz, 3.2kHz, 6.4kHz.
5.12 V-1
Looking for expert level volume control, the V-1 is the answer! Complete with Heel and Toe scaling, it’s primed to give you immediate control whenever and wherever you need it!
Note: This Component is primed for use alongside GENOME’s assignable Automation functionality, specifically for real-time control over the volume of the signal wherever V-1 is placed GENOME’s Lane architecture.
Within the V-1, the following controls are available to configure Component:
- HEEL: Sets the volume in dB when the PEDAL POSITION is set at its lowest value
- TOE: Sets the volume in dB when the PEDAL POSITION is set at its highest value
- PEDAL POSITION: Sets the PEDAL’s volume in dB when positioned between the predesignated HEEL and TOE volume settings
- CURVE TYPE: Selects the volume change CURVE TYPE; available options include LOG (logarithmic) and LINEAR scaling
5.13 WahBaby
Inspired by the infamous Jim Dunlop® Cry Baby, WahBaby delivers all the Wah-tastic tone akin to this certified legend in the pedal annals, all enhanced with a smattering of handy performance customisations thrown-in for good measure.
Within WahBaby, the following controls are available to configure Component:
- HEEL: Sets the frequency in Hz when the PEDAL POSITION is set at its lowest value
- TOE: Sets the frequency in Hz when the PEDAL POSITION is set at its highest value
- PEDAL POSITION: Sets the PEDAL’s Frequency in Hz when positioned between the predesignated HEEL and TOE volume settings
- BYPASS MODE: Sets the Bypass behavior for the PEDAL with options for:
- No Bypass: WahBaby is never bypassed regardless of Heel or Toe Pedal Position
- Heel Off: WahBaby is bypassed when the Pedal Position is set to full Heel
- Toe Off: WahBaby is bypassed when the Pedal Position is set to full Toe
5.14 Saber
Looking for some pre-amplifier PEDAL format tone shaping and a boost that guarantees to revoice your TSM Amp or CODEX capture with J3D1-like precision? Well Tone Heads, this is most certainly the droid (ehem.) PEDAL you’ve been looking for! Introducing Saber, a Clean Boost and Tone Shaping component that’s free with GENOME v1.2. Fusing dedicated controls for FORCE (Gain) and DARK/LIGHT (Tone), this aint no trap - on the contrary, it’s primo tone in a snap!
Within Saber the following controls are available to configure Component:
- FORCE: Sets the level of the clean boost from -18dB to +30dB
- DARK/LIGHT: Sets the tone of the boosted signal from dark to bright
5.15 Ping Pong Delay
Much like you can't have Ying without Yang, no one wants Ping without Pong. Enter GENOME’s full-featured Ping Pong Delay, delivering everything you demand from a PEDAL format fuss-free stereo Delay. Front-and-centre, every mainstay delay-centric control you’d expect is here, plus a raft of unique innovations including a “GROOVE” control to switch up the time-relationship between Ping and Pong repeats for next-level creative rhythmic interplay. In short, if you’re seeking the ultimate fuss-free stereo delay, this is one component you will certainly turn to time-and-time again.
Within Ping Pong Delay the following controls are available to configure Component:
- LOW CUT: Applies a High Pass Filter to the affected signal with a designated range from 10Hz to 5kHz
- DRY/WET: Controls the volume of the delayed signal relative to the input signal
- WIDTH: Defines the Stereo Width of the Ping Pong effect
- FEEDBACK: Controls the number of delay repeats, or the 'regeneration' amount
- HIGH CUT: Applies a Low Pass Filter to the affected signal with a designated range from 100Hz to 20kHz
- TIME Sets the delay time, either in ms, or subdivisions of the beat, depending on the mode selected:
- ms Mode: Manually sets the delay time from 1ms - 8000ms
- Note Mode: Sets the delay time to subdivisions of the beat from 1/64 to 8/1
- Dot Mode: Sets the delay time to dotted subdivisions of the beat from 1/64d to 8/1d
- Trip Mode: Sets the delay time to triplet subdivisions of the beat from 1/64t to 8/1t
- GROOVE Adjusts the time-relationship between Ping and Pong repeats for creative rhythmic interplay. The PONG control provides a total of 9 options (inclusive of a standard Ping Pong 1:1 setting) resulting in either the Ping’s or Pong’s relative time relationship being 2, 3, 4 or 8 times shorter than the base tempo (TIME) setting.
- TAP TIME: When in ms Mode, this can be used to set the delay time manually by tapping at the desired speed
- EFFECT: Sets whether the component is bypassed or engaged
5.16 NG-1
For those times where you demand complete control over gating in your GENOME RIG, there’s the NG-1 PEDAL Component. This super-handy utility component delivers comprehensive gate facilities, primed for placement anywhere in GENOME’s lane-based architecture. Packing THRESHOLD, HARD/SOFT Modes and a super handy smart LEARN facility, you’re primed with everything you need to banish any nuisance noise for good!
Within NG-1 the following controls are available to configure Component:
- THRESHOLD: Sets a threshold level under which the NOISE GATE will activate
- HARD/SOFT: Sets the behavior of the NOISE GATE; HARD will cut the sound abruptly when the NOISE GATE is activated; SOFT apply a gentle roll-off to the gating effect
- LEARN: Clicking this button will enable the NOISE GATE’s LEARN Mode for automatic THRESHOLD configuration. When LEARN Mode is instantiated, stop playing and mute your strings; GENOME will then calculate the level of the background noise preset in the source signal and set the THRESHOLD accordingly
5.17 ABC Bass Chorus
When you’re in the market for a fuss-free pedal format bass chorus, GENOME’s ABC Bass Chorus PEDAL Component is a one-stop-shop. Taking inspiration from the revered EHX® Bass Clone Chorus, you’re primed with the perfect blend of studio-grade modulated effect processing and a control arsenal developed to get your tone where it needs to be, fast!
Within ABC Bass Chorus the following controls are available to configure Component:
- AMOUNT:Sets the range of the modulation, with higher settings sweeping the modulation over a greater range
- RATE: Determines the speed of the modulation
- X-OVER: Removes the low-end frequency content from the mod circuit and therefore the affected wet signal
- BASS: Attenuates or boosts all Bass frequency content at the PEDAL Component’s output
- TREBLE: Attenuates or boosts all Treble frequency content at the PEDAL Component’s output
5.18 Disorder Drive
For players seeking the epitome of a “wall of sound”, Disorder Drive is a one-stop-shop! Inspired by the revered Fulltone® OCD V2, expect the very same MOSFET-style response, primed for anything from a subtle vibey crunch to high-gain onslaught - all with zero compromise of the articulate responsive and touch-sensitive dynamics you demand.
The following parameters are available within the Disorder Drive:
- VOLUME: Sets the output volume of the effect
- DRIVE: Sets the amount of overdrive generated
- TONE: Sets the tone of the overdrive from dull to bright
- HP/LP (Switch): Switches between High- and Low-Peak modes. Engage LP (Low-Peak) and push Disorder Drive’s gain to taste without any compromise of the core tone of your companion amp. Engage HP (High-Peak) mode for extended gain, a touch of compression and a boost in the mid-range
5.19 HERA-60
Don your aviators, fire up the DeLorean and dive headfirst into nostalgic 80’s BBD-style Chorus with HERA-60! Inspired by the classic stereo chorus from the infamous Roland® JUNO-60 analog synth, HERA-60 is primed to deliver anything from an immersive super-wide retro mod oozing with character, to a gentle shimmer that cuts your tone through any mix.
The following parameters are available within the HERA-60:
- POWER: Sets whether the HERA-60 component is bypassed or engaged
- DRY / WET: Controls the volume of the Chorus effect relative to the input signal
- WIDTH: Adjusts the stereo width of the Chorus effect
- TONE: Sets the tone of the Chorus Effect from dull to bright
- DRIVE: Pushes HERA-60’s input to saturate the emulated BBD circuit
- MODE SWITCHES (I, II, I+II, CUSTOM): Selects between 3 Chorus flavors and a custom user configurable MODE; MODE I instantiates a gentle shimmer ; MODE II instantiates a deep, wide Chorus effect; MODE I+II fuses MODES I and II for a heavy Chorus effect with a distinctive swirl; the CUSTOM Mode provides access to configure the DEPTH and RATE parameters for a fully-customizable modulation
- DEPTH (Only accessible in the CUSTOM MODE): Sets the range of the modulation, with higher settings sweeping the modulation over a greater range
- RATE (Only accessible in the CUSTOM MODE): Determines the speed of the modulation
5.20 Dual Octaver
Meet Dual Octaver – your new stock octave-slinging, tone-shaping pedalboard mainstay! Inspired by the legendary EHX® PICO POG, this Dual-Octave Generator PEDAL Component delivers lightning-fast tracking for dead-on octave tones and a no-nonsense control setup that lets you dial in the magic—fast. Whether you want a deep, growling sub-octave or shimmering, sci-fi pitch-up effects, Dual Octaver has you covered for any scenario!
The following parameters are available within the Dual Octaver Component:
- OCTAVE DOWN: Sets the volume of the -1 OCTAVE DOWN processed signal
- OCTAVE UP: Sets the volume of the +1 OCTAVE UP processed signal
- DRY: Sets the volume of the DRY unprocessed signal
- TONE: Sets the amount of tonal EQ applied to the processed signal; please note a 50% position on the TONE knob represents no filter-based processing
- TONE Type (3-Way Selector): Provides options to select the type of EQ applied to the processed signal; available options include a V-Shape, Low Cut or High Cut Filter
- POWER: Sets whether the Dual Octaver component is bypassed or engaged
- Performance Options: The following performance-centric options are available via the ellipses menu within the Dual Octaver interface:
- Wet Summing: Sets whether the pitch effected signal is processed in Mono (Mono Feed) or Stereo (Stereo Feed); for improved CPU performance please select the MONO FEED option.
- Dry Signal Latency: Sets whether the dry signal is processed latency free (None) or whether the latency of the dry signal is aligned to the processed pitch affected signal (Aligned to Pitched Signal); during performance scenarios it is advised that “None” is selected for optimal playback; for mixdown and render use cases please select the “Aligned to Pitched Signal” setting.
5.21 Pitch Mix
Looking for essential Pitch Control? Meet Pitch Mix - GENOME’s fuss-free pitch shifting powerhouse, inspired by the legendary Digitech® Drop! Want to dive into deep, growling tunings? Go for it. Need soaring, shimmering highs? Dial it up.
The following parameters are available within the Pitch Mix Component:
- POWER: Sets whether the Pitch Mix component is bypassed or engaged
- MIX: Controls the volume of the Pitch Shifted effect relative to the input signal
- PITCH: Configures the processed pitch of the affected signal across a +24 to -24 chromatic pitch range
- Note: Values can also be typed manually for precision pitch settings between semitone ranges
- Performance Options: The following performance-centric options are available via the ellipses menu within the Pitch Mix interface:
- Wet Summing: Sets whether the pitch effected signal is processed in Mono (Mono Feed) or Stereo (Stereo Feed); for improved CPU performance please select the MONO FEED option.
- Dry Signal Latency: Sets whether the dry signal is processed latency free (None) or whether the latency of the dry signal is aligned to the processed pitch affected signal (Aligned to Pitched Signal); during performance scenarios it is advised that “None” is selected for optimal playback; for mixdown and render use cases please select the “Aligned to Pitched Signal” setting.
5.22 ELEMENT FLANGER
Introducing ELEMENT FLANGER (2 Fl) – A uniquely voiced Flanger outfitted with two distinct COLOUR variants for a choice of rich, sweeping textures. With simple AMOUNT and RATE controls, you can dial in everything from subtle movement to a deep, dramatic modulation in seconds. Pure, expressive Flanging—no fuss, just flow.
The following parameters are available within the ELEMENT FLANGER Component:
- POWER: Sets whether the ELEMENT FLANGER component is bypassed or engaged
- COLOR I/II (Switch): Sets the center tone of the modulation, adjusting the frequency range over which the Flanger is active
- AMOUNT: Sets the scale of the modulation, with higher settings sweeping the Flanger over a greater range
- RATE: Determines the speed of the modulation
5.23 ELEMENT PHASER
Introducing ELEMENT PHASER (5Ph) – A dual-voiced Phaser PEDAL Component designed for a sought-after spectrum of lush, dynamic sweeps. With intuitive AMOUNT and RATE controls, you can effortlessly craft everything from a subtle, shimmering movement to deep, swirling modulation in seconds. From gentle undulations to dramatic sweeps, every phasing need is covered—all powered by a control set that keeps you rooted on what’s important.
The following parameters are available within the ELEMENT PHASER Component:
- POWER: Sets whether the ELEMENT PHASER component is bypassed or engaged
- COLOR I/II (Switch): Sets the center tone of the modulation, adjusting the frequency range over which the Phaser is active
- AMOUNT: Sets the scale of the modulation, with higher settings sweeping the Phaser over a greater range
- RATE: Determines the speed of the modulation
5.24 ELEMENT TREMOLO
Introducing ELEMENT TREMOLO (3Tr) – A fuss-free dynamic Tremolo designed for rich, rhythmic modulation in a snap. With intuitive AMOUNT and RATE controls, effortlessly shape everything from smooth, flowing pulses to sharp, choppy stutters in seconds. Whether it’s subtle movement to dramatic amplitude shifts, every tremolo need is covered—powered by a streamlined control arsenal for pure, uninterrupted creativity.
The following parameters are available within the ELEMENT TREMOLO Component:
- POWER: Sets whether the ELEMENT TREMOLO component is bypassed or engaged
- COLOR I/II (Switch): Sets the center tone of the modulation, adjusting the frequency range over which the TREMOLO is active
- AMOUNT: Sets the scale of the modulation, with higher settings sweeping the TREMOLO over a greater range in terms of amplitude
- RATE: Determines the speed of the modulation
5.25 ELEMENT VIBRATO
Introducing ELEMENT VIBRATO (4Vb) – A characterful Vibrato PEDAL Component designed for a rich spectrum of expressive pitch modulation. With intuitive AMOUNT and RATE controls, you can effortlessly shape everything from gentle, tape-like warble to deep, seasick wobbles in seconds. From subtle detuning to dramatic pitch sweeps, every vibrato need is covered—powered by a control arsenal engineered for pure, uninterrupted creativity.
The following parameters are available within the ELEMENT VIBRATO Component:
- POWER: Sets whether the ELEMENT VIBRATO component is bypassed or engaged
- COLOR I/II (Switch): Sets the center tone of the modulation, adjusting the frequency range over which the VIBRATO is active
- AMOUNT: Sets the scale of the modulation, with higher settings sweeping the VIBRATO over a greater range
- RATE: Determines the speed of the modulation
5.26 ELEMENT CHORUS
Introducing ELEMENT CHORUS (1Ch) – A lush, multi-dimensional Chorus PEDAL Component with two distinct voicing modes for a versatile range of rich, flowing modulation. With dedicated AMOUNT and RATE controls, you can effortlessly shape everything from subtle, widening shimmer to deep, immersive swirls in seconds. Whether it’s classic doubling or an expansive mod-fuelled movement, every chorus need is covered—powered by a control set built for pure, uninterrupted creativity.
The following parameters are available within the ELEMENT CHORUS Component:
- POWER: Sets whether the ELEMENT CHORUS component is bypassed or engaged
- COLOR I/II (Switch): Sets the center tone of the modulation, adjusting the frequency range over which the CHORUS is active
- AMOUNT: Sets the scale of the modulation, with higher settings sweeping the Chorus over a greater range
- RATE: Determines the speed of the modulation
5.27 76 Classic
Meet 76 Classic – your go-to for studio-grade squeeze, right on your GENOME pedalboard. Inspired by iconic 1176-style compressors, this PEDAL Component delivers punchy, lightning-fast dynamic control with a sleek one-knob setup that makes dialing in pro-level compression a breeze. Whether you're tightening up funk chops, adding sustain to leads, or locking your rhythm tone in the pocket, 76 Classic delivers that classic snap and glue with a control arsenal that keeps you firmly focussed on what’s important––your tone! The following parameters are available within the 76 Classic Component:
- POWER: Sets whether the 76 Classic Component is bypassed or engaged
- COMP: Controls a variable threshold (ranging from 0 to -60dB) and a linked variable ratio (from 1:1 to 10:1); note that 76 Classic’s Attack and Release controls are fixed at 0.1ms and 10ms respectively
- MIX: Sets amount of effected/compressed signal relative to the unprocessed dry signal at 76 Classic’s output
- OUT: Sets the output volume of the effect
5.28 Red Comp
Introducing Red Comp – classic compression reborn for the GENOME era. Inspired by the legendary MXR® Dyna Comp Deluxe, Red Comp delivers the very same iconic squash and snap into a fuss-free PEDAL Component, delivering the pinnacle in must-have vintage-inspired dynamic control. The following parameters are available within the Red CompComponent:
- POWER: Sets whether the Red Comp Component is bypassed or engaged
- MIX: Sets amount of effected/compressed signal relative to the unprocessed dry signal at Red Comp’s output
- TONE: Turn to engage a 2-band EQ; boost or cut lows at 300Hz and highs at 1200Hz with smooth curves and ±12dB of range
- ATTACK (Switch): Switches Red Comp’s Attack parameter between Slow (5ms) and Fast (1ms) modes
- OUTPUT: Sets the output volume of the effect
- SENS: Turn to adjust and shape Red Comp’s grit, Ratio (1:1 to 20:1), Threshold (-12 to -59dB), and Make-Up Gain (0 to +40dB) parameters
5.29 Empire Comp
Meet Empire Comp – pristine, precision compression with studio-grade smarts, built for total control and musical clarity. Inspired by the acclaimed Empress® Compressor line, Empire Comp is your ultimate PEDAL Component for dynamic shaping with surgical finesse. Whether you're smoothing out fingerstyle transients, tightening snappy funk grooves, or balancing complex tones in a dense mix, Empire Comp gives you transparent control with a workflow designed for the modern player. The following parameters are available within the Empire Comp Component:
- POWER: Sets whether the Empire Comp Component is bypassed or engaged
- INPUT: Sets the input level of the source signal feeding Empire Comp’s Threshold parameter (fixed at -30dB)
- OUTPUT: Sets the output volume of the effect
- ATTACK: Sets Empire Comp’s Compression Attack value from 50μs to 50ms
- RELEASE: Sets Empire Comp’s Compression Release value from 50ms to 1s
- MIX: Sets amount of effected/compressed signal relative to the unprocessed dry signal at Empire Comp’s output
- SC HI PASS: Turn to engage a Empire Comp’s Pre-Compression Hi-Pass Filter, removing low frequency content from the detection path with a scaled range of 20Hz–1kHz
- TONE (Switch): Use the 3-position selector to adjust the tonal response of Empire comp:
- Switch Position Left: Engage a low shelf boost at 160Hz for added warmth
- Switch Position Centre: Engage to apply a neutral tone setting
- Switch Position Right: Engage to add a peak boost at 1800Hz for extra bite and presence
- RATIO (Switch): Use the 3-position selector to engage Empire Comp’s 3 fixed ratio Values (available settings include 2:1, 4:1 & 10:1 ratios)
5.30 K-Comp
Introducing K-Comp – a modern classic built for smooth sustain, subtle glue, and the perfect touch of punch. Inspired by the award-winning Keeley® C4 Compressor, K-Comp captures the soul of vintage rack compression with the simplicity and smarts of a PEDAL Component that’s ready to elevate any board. The following parameters are available within the K-Comp Component:
- POWER: Sets whether the K-Comp Component is bypassed or engaged
- SUSTAIN: Turn to configure K-Comp’s pre-compression gain stage from -12dB to +12dB, letting you push or pull the signal before it hits the K-Comp’s fixed Threshold (-65dB)
- LEVEL: Sets the output volume of the effect
- MIX: Sets amount of effected/compressed signal relative to the unprocessed dry signal at K-Comp’s output
- ATTACK: Sets K-Comp’s Attack and Release Parameters from a fast, snappy 2.5ms / 500ms combo to a tighter, punchier 5ms / 60ms feel at full rotation
- CLIPPING: Simultaneously sets K-Comp’s harmonic breakup and Ratio (5:1 to 20:1), delivering the pinnacle in bite and compression strength in one intuitive sweep
5.31 CM Comp
Meet CM Comp – vintage precision meets modern pedalboard power. Inspired by the legendary Carl Martin® Compressor/Limiter, this PEDAL Component brings studio-grade control to the front of your signal chain with a clean, no-nonsense layout built for players who demand pro-level punch, presence, and polish. The following parameters are available within the CM Comp Component:
- POWER: Sets whether the CM Comp Component is bypassed or engaged
- TRESH: Use to set CM Comp’s threshold (0 to -75dB) and makeup gain (0 to +30dB) in one intuitive sweep
- COMP: Sets CM Comp’s Ratio parameter from a focused 5:1 to a commanding 20:1
- RESP: Sets CM Comp’s Attack (6ms to 10ms) and Release (5ms to 525ms) timing parameters simultaneously
- GAIN: Sets the output volume of the effect
- MIX: Sets amount of effected/compressed signal relative to the unprocessed dry signal at CM Comp’s output
Automation
Please note, Automation is only available in the Plugin Variants of GENOME when instantiated in a compatible Digital Audio Workstation.
GENOME provides comprehensive tools to configure your automation preferences in production scenarios. Within GENOME there are two categories of Automation Assignments:
- Hard-coded, non-configurable automation assignments
- 10 User-Configurable Automation Assignments (A1 - A10)
1. Hard Coded Automation Assignments
GENOME features a range of hard-coded automation assignments that are exposed to your Digital Audio Workstation. These cannot be edited and are best considered as Global Assignments. Parameters available in the GENOME’s Hard Coded Automation Assignments include:
- Input Level
- Input Gate Enable/Disable
- Input Gate Threshold
- Input Gate Soft/Hard
- Output Level and more.
2. User-Configurable Automation Assignments
GENOME also features 10 user-configurable Automation Assignments allowing you to customize your Automation preferences at a RIG level.
Automation Assignments can be managed in 2 ways.
For assignment of individual parameters to one of the 10 user-configurable slots:
- Right click any automatable parameter in a selected GENOME component
- Select “Assign to” and choose an available assignment slot (A1 - A10)
- Once actioned, this assignment will be exposed to your DAW and you will be able to automate this using your DAW’s internal automation options
Alternatively, the Automation Assign / Unassign Window showcases - and allows management of - all User-Configurable Automation Assignments from A1 - A10 in one convenient window:
- Click the Automation button within GENOME’s RIG Config pane to bring up the Automation Assign / Unassign window
- Click the “+” button within an empty Automation Assignment slot from A1 - A10. This highlights in blue all the automatable parameters of the GENOME component you are currently editing / viewing
- Click the desired parameter to Automate to assign that parameter to the Automation Assignment slot
- Note: You are free to navigate through effects while staying in this mode
Removing a User-Configurable Automation Assignment
Either right click an assigned parameter and select unassign, or open the Automation assign / unassign window for batch changes by clicking the X icon to terminate related assignments.
Purchasing additional DynIR Virtual Cabinets and GENOME Premium Components
Two notes’ catalog contains an ever-expanding list of Components (DynIRs, PEDALs, AMPS and STUDIO FX). Within GENOME, comprehensive facilities are available to preview and purchase any components not assigned to your Two notes License in real-time within the context of your virtual RIG.
1. AMPS, PEDALS and STUDIO FX
1.1 Identifying AMPS, PEDALS and STUDIO FX Not Assigned to your Two notes Account
Within GENOME’s Component Menu, accessed by clicking on a blank Component Slot, non-owned components are displayed with a cart icon located next to the Component name.
1.2 Previewing AMPS, PEDALS and STUDIO FX in GENOME
In order to preview non-owned AMPS, PEDALS and STUDIO FX in GENOME, simply instantiate the Component from the Component Menu. The Component will subsequently load in Demo mode highlighted by a cart symbol overlaid above the Component name in the lane architecture alongside a GENOME RIG Builder “DEMO” overlay.
1.3 Purchasing AMPS, PEDALS and STUDIO FX in GENOME
2. DynIR Virtual Cabinets
2.1 Identifying DynIR Virtual Cabinets Not Assigned to your Two notes Account
Within GENOME’s DynIR Component, the symbols next to the cabinet’s name distinguish whether a cabinet is owned / assigned to your Two notes license or available for demo / preview.
To view cabinets allocated to your Two notes Account license, simply exit Preview Mode by turning off the Preview symbol (circled in red below); you will notice the number of cabinets available in the DynIR Browser is reduced to only those assigned to your Two notes Account (circled in green below).
2.2 Previewing DynIR Virtual Cabinets in GENOME
To preview a cabinet, simply instantiate the related DynIR. You will notice a message is displayed in the DynIR component window warning that silences are inserted while you play. The preview symbol (circled in red below) is also present in the component block of GENOME’s Lane based architecture to indicate at a quick glance that the cabinet loaded is in Preview Mode.
2.3 Purchasing DynIR Virtual Cabinets in GENOME
Hotkeys & Shortcuts
The Following Hotkeys & Shortcuts are available in GENOME
General
- Ctrl/CMD + drag - Precision edition of knobs and controls
- Double Click on Control Label - Reset control to default
FX Chain
- Ctrl/CMD + drag FX block - Duplicates the FX block to a selected insert
Studio EQ Band Nodes
- Double Click - Bypass/Enable band
- Ctrl/CMD + Double click - Delete band
- Shift + Drag - Locks frequency
- Alt + Drag - Locks Gain
Technical Support
Should you encounter a problem with your product or need general assistance regarding your purchase, Two notes Audio Engineering has developed an on-line service to provide you with fast and efficient technical support, the Two notes Help Desk. Here you can submit a ticket and a member of our support team will be glad to assist you in your enquiry.
In addition, for common questions and general reference, don't hesitate to browse the Knowledgebase.
Connect With Us!
1. The Two notes Website
Looking for more information about Two notes Audio Engineering? Your first port of call is the Two notes website. Here you will find:
- News about the company and our product portfolio
- Comprehensive information about GENOME
- Firmware & software updates across the entire Two notes product portfolio
- Access to the Two notes Store where you can buy new DynIR™ Virtual Cabinets
- An official forum where you can share tips and advice with other Torpedo users.
2. Connect With Us!
You can also follow us on Facebook, Instagram and Twitter - we also have a group on Facebook where customers from all over the world get together to discuss gear and tone, would be great to see you there!
3. Sign-up to the Newsletter
To stay up-to-date with the latest news, releases and promotions from Two notes, please subscribe to our newsletter here.

