Table of Contents
OPUS User's Manual
Multi-Channel Amp Sim, DynIR Engine, Amp DI, IR loader and Silent Stage Solution.
The complete electronic version of this manual, as well as the Two notes Audio Engineering software and hardware products, are subject to updates. You can download the most recent versions of the products on the Two notes Audio Engineering website.
This manual describes the OPUS and provides instructions for its operation. It is highly recommended that you read this document before using the product. The contents of this manual have been thoroughly verified and it is believed, unless stated otherwise, to accurately describe the product at the time of shipment from the factory or download from our website.
Two notes Audio Engineering is a registered trademark of:
OROSYS SAS
76 rue de la Mine
34980 Saint-Gély-du-Fesc
France
Tel: +33 (0)484 250 910
Fax: +33 (0)467 595 703
Contact and support: http://support.two-notes.com
Website: http://www.two-notes.com
This document is the exclusive property of OROSYS SAS. In the interest of product development, OROSYS SAS reserves the right to change technical specifications, modify and/or cease production without prior notice. OROSYS SAS cannot be held responsible for any damage, accidental or otherwise, that results from an inappropriate use of OPUS. Please refer to the safety instructions included in this manual. The reproduction of any part of this document is strictly forbidden without the written authorization of OROSYS SAS.
All product names and trademarks are the property of their respective owners. Product names and trademarks found in this document were used during the development of OPUS but are in no way associated or affiliated with OROSYS SAS.
Foreword
1. Safety instructions
Before using the product, it is necessary to carefully read and to bear in mind the following information. Keep this document in a safe place as it is important for the protection of both user and product. Should you suspect any malfunction of the device, always seek the assistance of a qualified technician, preferably Two notes in the first instance.
1.1 Reader warning
1.2 Power adapter
Please verify that the voltage required by the mains power adapter matches the voltage in your country. If not or if unsure, do not connect the unit to the wall outlet. This could result in damage to the mains power adapter, the unit and injuries to the user. This product must not be used when there is lightning. In case of severe weather with a risk of lightning, unplug the power adapter to reduce the risk of electric shock and fire.
The mains power adapter provided with the machine complies with the standards of the country where you purchased the product. If replacement is needed, please use a standard compliant mains power adapter.
1.3 Safety use conditions
OPUS must never be used near a heat source, near a flame, in the rain, in damp areas, near any kinds of liquids. When transporting the unit, care needs to be taken to avoid any shocks that could cause damage that would require the assistance of a qualified technician.
1.4 Cleaning
Always use a dry and soft cloth with no alcohol or solvents for cleaning. Please keep the unit clean and free from dust.
1.5 Maintenance
All maintenance operations must be done by service centers approved by OROSYS SAS or by qualified technicians. Never try to repair the unit by yourself.
2. Contents of the package
The shipped package contains:
- 1x OPUS unit in a protecting sleeve
- 1x mains power adapter
- 1x USB cable
- 1x 256 MB memory card
- 1x MIDI (DIN type A) to ⅛” jack cable
- 1x quickstart guide
The complete electronic version of this manual is subject to updates.
3. Declaration of conformity
- Manufacturer: OROSYS SAS
- Category of product: digital audio signal processor
- Product: OPUS
- Test Manager: Guillaume Pille
OPUS is certified to be compliant to the CE and FCC standards:
- EN 55103-1 : 1996 and EN 55103-2 : 1996.
- EN 60065 05/2002 + A1 05/2006.
- EMC directive 89/336/EEC and Low Voltage Directive 73/23/EEC.
- FCC Part 15 : 2008.
- ICES-003 : 2004.
- AS/NZS 3548 class B for Australia and New Zealand.
- IEC : 2008 - CISPR 22 class B.
4. Disposal of Waste Equipment by Users in Private Household in the European Union
5. Warranty
OROSYS SAS warrants that this TWO NOTES AUDIO ENGINEERING product shall be free of defects in parts and workmanship when used under normal operating conditions for a period of two (2) years from the date of purchase. This warranty shall apply to the original purchaser when purchased from an Authorized TWO NOTES AUDIO ENGINEERING dealer.
IMPORTANT: PLEASE RETAIN YOUR SALES RECEIPT, AS IT IS YOUR PROOF OF PURCHASE COVERING YOUR LIMITED WARRANTY. THIS LIMITED WARRANTY IS VOID WITHOUT YOUR SALES RECEIPT.
Defective products that qualify for coverage under this warranty will be repaired or replaced, (at OROSYS SAS's sole discretion) with a like or comparable product, without charge. In the case that warranty service is required, Please contact your authorized TWO NOTES AUDIO ENGINEERING dealer in order to obtain an RMA to return the complete product to the Authorized TWO NOTES AUDIO ENGINEERING Service Center closest to you, with proof of purchase, during the applicable warranty period.
Transportation costs to the service center ARE NOT INCLUDED in this limited warranty. OROSYS SAS will cover the cost of standard ground return transportation for repairs performed under this warranty. This limited warranty becomes void if the serial number on the product is defaced or removed, or the product has been damaged by alteration, misuse including connection to faulty or unsuitable ancillary equipment, accident including lightning, water, fire, or neglect; or if repair has been attempted by persons not authorized by OROSYS SAS. Any implied warranties, including without limitation, any implied warranties of merchantability or fitness for any particular purpose, imposed under state or provincial law are limited to the duration of this limited warranty. Some states or provinces do not allow limitations on how long an implied warranty lasts, so the above limitations may not be applicable.
OROSYS SAS ASSUMES NO LIABILITY FOR PROPERTY DAMAGE RESULTING FROM ANY FAILURE OF THIS PRODUCT NOR ANY LOSS OF INCOME, SATISFACTION, OR DAMAGES ARISING FROM THE LOSS OF USE OF SAME DUE TO DEFECTS OR AVAILABILITY OF SAME DURING SERVICE.
In case you have to send your TWO NOTES AUDIO ENGINEERING product to any other location, it is of vital importance to retain the original packing materials. It is very difficult to avoid damage if shipping the product without these materials. OROSYS SAS is not responsible for damages to the product due to improper packaging and reserves the right to charge a reboxing fee for any unit returned for service without the original packing materials. THE FOREGOING CONSTITUTES THE ONLY WARRANTY MADE BY OROSYS SAS WITH RESPECT TO THE PRODUCTS AND IS MADE EXPRESSLY IN LIEU OF ALL OTHER WARRANTIES EXPRESSED OR IMPLIED
About OPUS
1. Introducing OPUS
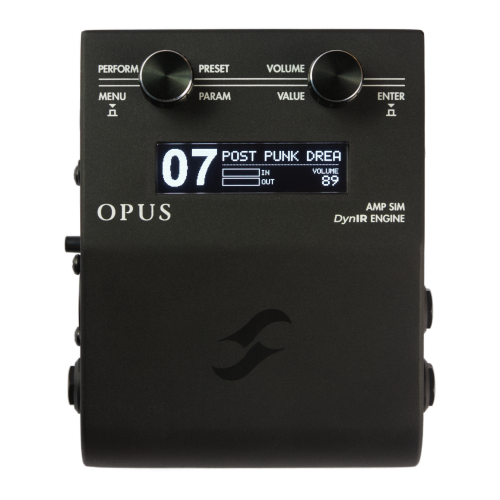
Introducing OPUS, an end-to-end tone shaping Amp Simulator and DynIR™ Engine ushering-in the next milestone-evolution of the Two notes ecosystem. Building upon the C.A.B. lineage - and our critically- acclaimed digital cabinet simulation legacy - OPUS adds Pre- & Power-amp Tube-Stage Modeling™ (TSM™), MIDI integration and a future-proofed USB-C specification, empowering players of all- walks with apex-level tone in a go-anywhere footprint.
For deft ease-of-use, Torpedo Remote (iOS/Android/MacOS/Windows) serves as the nexus of your tone shaping experience; simply hookup to your Phone, Tablet or Desktop and experience liberated 1:1 integration with every editable parameter in the OPUS architecture. Tonally, everything you demand from a state-of-the-art digital Amp Sim is here; whether it’s a thundering high-gain onslaught, a sublime clean primed to serve as the foundation of a pedalboard rig or a mojo-fuelled brit-inspired roar, each and every base is covered. OPUS, it’s more than our masterpiece: it’s a back-line in your gig-bag and a macrocosm of next-level tonal excellence.
2. OPUS Highlights
- The ultimate pedal platform Amp Sim and DynIR™ Engine powered by Tube-Stage Modeling™ (TSM™) technology
- 12 pristine TSM™ Preamp emulations
- Exquisite TSM™ Poweramp simulation with 4 tube amp models (6L6, EL34, EL84 and KT88), Pentode / Triode, Push-Pull (PP) ‘Class AB’, or Single Ended (SE) ‘Class A’ power amps
- On-board DynIR™ Engine for class-leading cabinet simulation with dual-miking facilities, 8 microphones per cabinet and 12 room emulations
- Pro-grade suite of essential DSP-powered processors and effects including an EQ, Enhancer, Noise Gate and Reverb
- Pre-loaded with the OPUS-Series DynIR Cabinet Collection featuring 35 Cabinets including captures from Steve Stevens, Dave Friedman, Pete Thorn, George Lynch and Phil X
- 99 preset locations and an exclusive collection of 40+ artist-series presets from the likes of Pete Thorn, Michael Nielsen, Jack Gardiner, Tom Quayle, Adam Steel, John Browne, Jay Leonard J and more
- Wireless Bluetooth® and USB integration with Torpedo Remote (iOS, Android, MacOS, Windows) for expert-level tone shaping, preset management and real-time auditioning of 500+ DynIR Cabinets
- MIDI input for seamless assimilation into existing set-ups; MIDI breakout cable included
- Dual Static IR Loader and Acoustic DI with 40+ premier Acoustic Impulse Responses included
- USB-C connectivity for future-proofed rapid data transfer
- Compact ultra-portable footprint and rugged, road-ready metal chassis
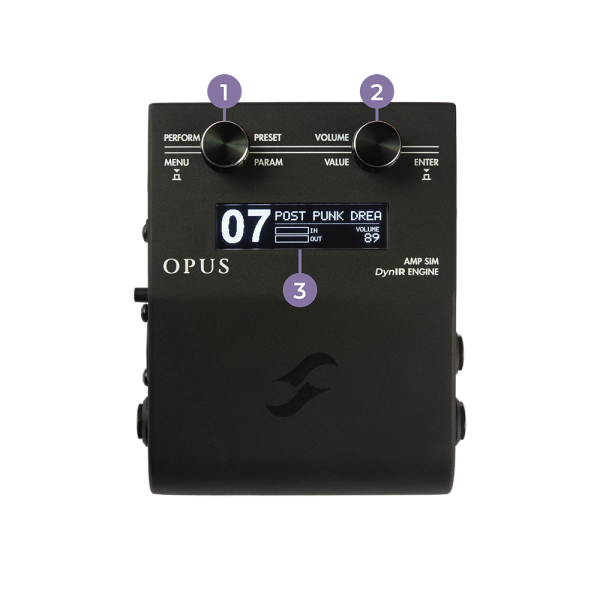
2.1 Top Panel
2.2 Right Panel
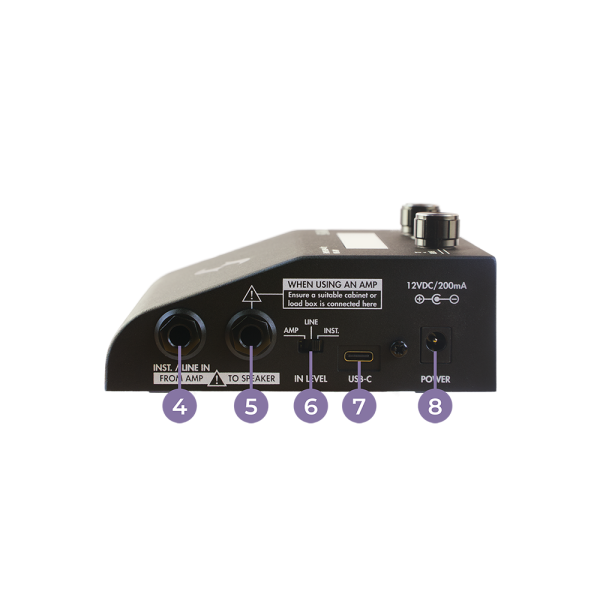 4 - AMP/INSTRUMENT/LINE input
5 - TO SPEAKER (Warning! When an amp is connected to the AMP input, the related cabinet or a suitable load box has to be connected to the Speaker Output of the pedal)
6 - IN level selector
7 - USB-C connector
8 - POWER
2.3 Left Panel
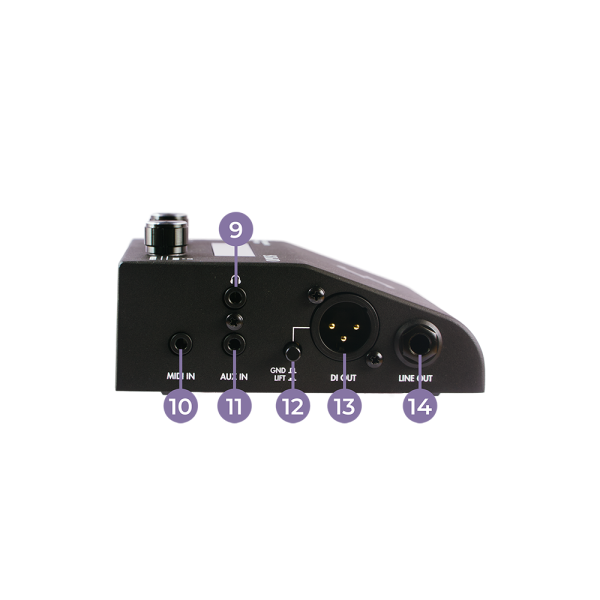 9 - Headphone Input
10 - MIDI IN
11 - AUX Input(*)
12 - Ground Lift Switch
13 - DI OUT
14 - LINE OUT
(*) NOTE: OPUS’ AUX IN is a stereo input; the PHONES output accommodates this allowing you to play back stereo tracks when monitoring through headphones. The processing of your Guitar / Bass Signal in OPUS is a mono operation and as such will always be heard in mono via the PHONES output.
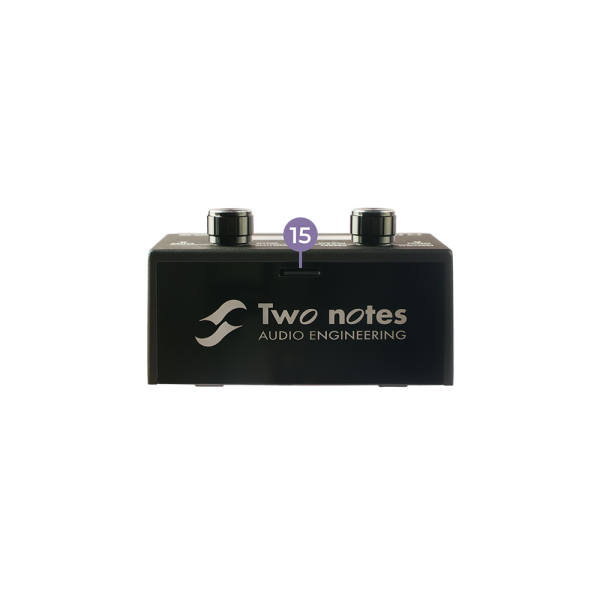
2.4 Back Panel
3. Torpedo Remote For OPUS
For ease of use, you can set each and every parameter within OPUS’ DSP architecture with your computer or your mobile device via the Torpedo Remote application. Download Torpedo Remote for your specific device from www.two-notes.com/torpedo-remote
3.1 On Your Computer
3.1.1 Registering OPUS with Torpedo Remote On Your Computer
First, connect OPUS to your computer with the provided USB cable.
3.1.2 Managing OPUS with Torpedo Remote
Through Torpedo Remote, you will be able to:
- Command each and every parameter within the OPUS architecture directly from the software application
- Create and manage your OPUS presets
- Manage OPUS’ internal memory in terms of Presets, static IRs and DynIR™ Virtual Cabinets; please note, this is only accessible if your unit is registered to your Two notes account
3.1.3 Virtual Cabinet / IR loader Mode Overview
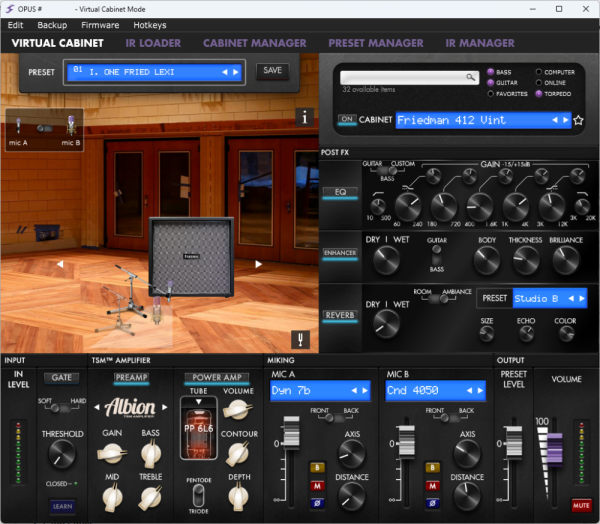
The main window of Torpedo Remote provides access to all of OPUS' tone shaping tools, as well as preamp, poweramp, cabinet and mic choice. This is also where you will manage the internal memory of the unit via the tabs located at the top of the window.
3.1.4 Internal Memory Management
Through a USB connection to the desktop variant of Torpedo Remote, all tools are provided to load and manage OPUS’ DynIR™s, 3rd Party IRs and Presets using the menu tabs entitled CABINET MANAGER, IR MANAGER, and PRESET MANAGER respectively.
In each tab, the left panel shows the files available on your computer; the right tab shows the files loaded into the internal memory of OPUS.
3.2 On Your Mobile Device or Tablet
3.2.1 Pairing Procedure
Before attempting to pair OPUS with your Mobile Device or Tablet, please ensure you have installed the Torpedo Wireless Remote application accessible www.two-notes.com/here.
One installed, pair your device with OPUS using the following procedure:
- Tap on DEVICES in the bottom bar of Torpedo Remote
- Tap on “Pair a new device”
- Tap on “Pair an OPUS” and follow the prompt on screen provided by your device’s OS to pair to a new device
- OPUS will be listed on your device’s Bluetooth menu. Tap on OPUS in the list
- Input the pin code noted in OPUS’ “BLE pin code” menu item (accessed via OPUS’ OLED screen following MENU / Global / BLE pin code)
3.2.2 Key Differences With The Desktop Version Of Torpedo Remote
When using either the Desktop or Mobile/Tablet variants of Torpedo Remote, there are some distinct differences to bear in mind which may impact your use of OPUS:
- Through the mobile app, it is not possible to load/unload cabinets and 3rd party static IR from OPUS. These processes can only be actioned via the Desktop application and a USB connection once the unit is registered to your Two notes account.
- As a result, there are no CABINET MANAGER, IR MANAGER and PRESET MANAGER tabs in the Mobile/Tablet application.
- Please note, when a DynIR™ cabinet is purchased, it is not automatically loaded into OPUS’s internal memory, and as such it will not be listed in the Mobile/Tablet application. These cabinets are however visible in the Desktop application variant through the CABINET MANAGER tab, where they can be loaded to the internal memory of OPUS via a suitable USB connection. Providing the DynIR™ virtual cabinets have been loaded to OPUS, these will be visible on the Mobile/Tablet application variant.
OPUS Setup Scenarios
OPUS has been engineered to work in the context of multiple setup scenarios, including but not limited to:
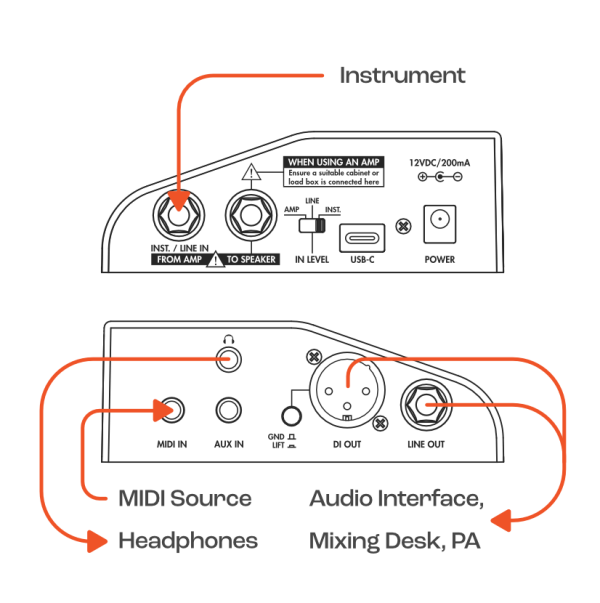
- An acoustic, electric or bass guitar directly connected to the INST./LINE IN/FROM AMP input of OPUS
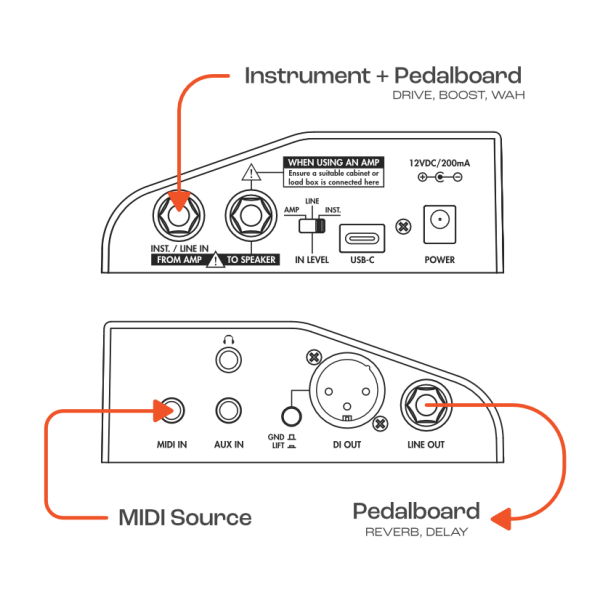
- A pedal/pedalboard/multieffects unit connected to the INST./LINE IN/FROM AMP input of OPUS
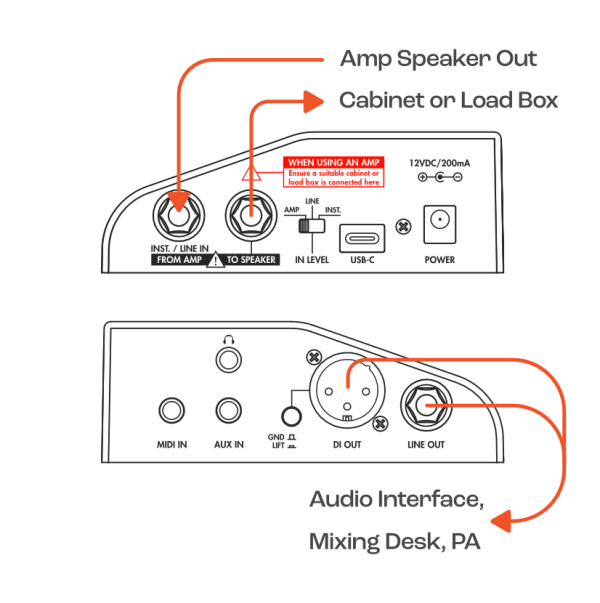
- As an amp DI in conjunction with a traditional amp and cabinet rig connected to the INST./LINE IN/FROM AMP input of OPUS and TO SPEAKER output of OPUS respectively
Top Tip: OPUS can also be used in conjunction with an electro-acoustic guitar. Please follow the connectivity guideline outlined above but bear in mind setup within Torpedo Remote will differ. For further information, head over to “Using OPUS As An Acoustic DI”.
1. Go Direct With Your Guitar
- Connect your guitar directly to the INST./LINE IN/FROM AMP input of OPUS
- Set the IN LEVEL switch to INST.
- Check the input level VU Meter on OPUS OLED display; if the display indicates clipping of the input signal, navigate to the pedal’s MENU using the Rotary Encoders, and scroll to the GLOBAL section. Enter the section, and scroll to the INPUT PAD page - Set it to ON to apply a 10dB reduction of your input signal to negate clipping OPUS’s input stage
- Connect the XLR output to an audio interface, mixing desk or active speakers; alternatively all internal processing in OPUS can be monitored silently using the dedicated Headphone output
Top Tip: OPUS can also be used in conjunction with an electro-acoustic guitar. Please follow the connectivity guideline outlined above but bear in mind setup within Torpedo Remote will differ.
2. The Ultimate Fly Rig
- Connect your pedals/pedalboard to the input of OPUS using an instrument cable
- Set the IN LEVEL switch to INST
- Check the input level VU Meter - if the display indicates clipping of the input signal, set the 3-way IN LEVEL selector to LINE
- Connect the XLR output to an audio interface, mixing desk or active speakers; alternatively all internal processing in OPUS can be monitored silently using the dedicated Headphone output
3. Lose The Mics For Your Amp On Stage & In The Studio
- Connect your amplifier’s speaker output to the input of OPUS using a speaker cable
- Connect the SPEAKER OUT of OPUS to a load box or a cabinet (OPUS is not a load box)
- Set the IN LEVEL switch to AMP
- Turn off the PREAMP and POWERAMP processing in OPUS
- Check the input level VU Meter on OPUS' OLED display; if the display indicates clipping of the input signal, navigate to the pedal’s MENU using the Rotary Encoders, and scroll to the GLOBAL section. Enter the section, and scroll to the INPUT PAD page - Set it to ON to apply a 10dB reduction of your input signal to negate clipping OPUS’s input stage
- Connect the XLR output to an audio interface or mixing desk to send your amp’s signal complete with OPUS’ DSP processing to your computer or Front Of House respectively. In this instance, traditional miking of a cabinet is no longer required as OPUS handles all cabinet simulation and the associated miking process courtesy of the on-board DynIR™ engine.
Configuring Your Tone With OPUS
Within OPUS, the following signal chain is enacted via the on-board DSP processing
Input ⇒ Preamp ⇒ Noise Gate ⇒ Power Amp ⇒ Cabinet Miking ⇒ EQ ⇒ Enhancer ⇒ Reverb
1. Noise Gate
Top Tip: OPUS’ Noise Gate is listed first in Torpedo Remote and in the pedal’s menu but in-fact takes place after the preamp, as is common practice for 4-Cable-Method noise gate units.
2. TSM™ Pre & Power Amps
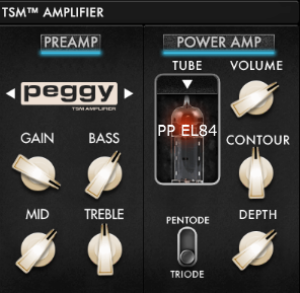
OPUS’ TSM™ (Tube Stage Modelling) Emulation furnishes you with a suite of pro-grade Preamps and fully-customisable Power Amps. Within the TSM™ Amplifier pane of the Torpedo Remote window you will find:
- 12 pristine TSM™ Preamp emulations; 10 total slots for future Preamp models via free Firmware Updates
- TSM™ Poweramp simulation with 4 tube amp models (6L6, EL34, EL84 and KT88), Pentode / Triode, Push-Pull (PP) ‘Class AB’, or Single Ended (SE) ‘Class A’ power amps
2.1 The TSM™ PreAmp
Within the TSM™ Preamp pane, the following Preamps are available to shape your tone:
- Foundry : Whether it’s a pristine high-headroom clean or a primo foundation for your pedal collection, Foundry delivers. In short, it’s the epitome of a classic Cali clean, brimming with warm saturation and engineered to capture every subtle nuance of your delivery.
- Peggy : Bass players seeking the pinnacle in low-end theory, look no further than Peggy. Pushing complex harmonic overtones, a warm midrange and oodles of rafter ratlin’ thump, Peggy delivers the perfect blend of classic ’60s bass sonics with expertly-tuned tweak-ability to sit your tone in any pocket!
- Albion : For those times when only a legendary Brit-inspired roar will suffice, there’s Albion. Complete with a rich, vocal mid-range, lashings of punch, boat-loads of power and gain-for-days, Albion is your secret weapon when diving head-first into Classic- and Hard-Rock territory.
- Foxy : Seeking chime, articulation and buttery-smooth presence? Foxy’s a one-stop-shop! With airy highs, impeccable breakup and sublime mid-range bite when pushing the gain, Foxy is primed to take on everything from sultry Jazz to rauch-fuelled Rock n’ Roll.
- NiftyFifty : Want gain? NiftyFifty’s got it on tap! It’s aggression incarnate. It’s punchy. It’s super-versatile covering everything from a warm full-throttle onslaught to a searing lead tone that cuts through any mix. Whether it’s the darker side of metal or a tone that wouldn’t be amiss in 80’s inspired virtuosity, NiftyFifty is deserving of any contemporary player's sonic arsenal.
- Tanger : Covering everything from a well-rounded articulate clean to a full-throttle high-gain onslaught - Tanger delivers on all counts! Fusing boat-loads of punch, lashings of sustain and a unique brit-inspired gain stage, Tanger ‘aint no one-trick-pony!
- ElDorado : Tight response? Check. Rich in harmonics? Check. Searing, perfectly balanced gain fused with lashings of sustain? Oh Yes! This TSM™ pre really is a “triple threat” for the guitarist venturing into hard-rock and metal territory.
- Aviator : If the epitome of a modern, forward-thinking bass tone is your thing, Aviator’s rafter-rattlin lows, gain-staging for an unrelenting tonal blitz and a no-compromise approach to the clarity you demand delivers on all counts!
- Gemini : For players seeking an alt slant on the iconic Bear-State clean, Gemini is just what the doctor ordered! At its core it delivers an articulate touch-sensitive sparkling-clean with oodles of warm breakup when pushed - in a nutshell, it’s contender #1 when it comes to getting the best from your overdrive pedal collection, lest we forget a dead-cert to pair with a vintage spring reverb for the epitome of a retro-inspired tone!
- FlatBack : Looking for some Cali-born high-gain sonics, pushing the perfect combination of unrelenting power and deft levels of clarity? FlatBack’s a one-stop-shop offering lashings of harmonically rich overtones, a full bodied low-end and articulation for days!
- FlatBackV : an alt slant on OPUS’s high-gain, high-power FlatBack! In a nutshell, if high-gain sonics - complete with unrelenting gain, the perfect blend of relentless power and deft levels of precision - are your bag, FlatBackV is one preamp you will find yourself turning to time-and-time again!
- Foundry Bass : Whether it’s a pristine clean or a primo foundation for your pedal collection, Foundry Bass delivers the proverbial goods in spades. In short, it’s the epitome of a classic Bass clean, brimming with warm saturation and engineered to capture every subtle nuance of your delivery.
Navigate through the preamp models by clicking on the arrows located on each side of the name of the preamp. To further refine your preamp tone, the following controls are provided:
- GAIN - this parameter dictates the level of gain applied to the input signal; depending on the preamp model, the higher this parameter is set, the more driven/distorted/saturated the preamp tone will be.
- BASS - Part of the TSM™ Preamp’s tone stack, this parameter dictates the amount of low-frequency content applied by the processing of the TSM Preamp Emulation
- MIDDLE - Part of the TSM™ Preamp’s tone stack, this parameter dictates the amount of mid-range frequency content applied by the processing of the TSM Preamp Emulation
- TREBLE - Part of the TSM™ Preamp’s tone stack, this parameter dictates the amount of high-frequency content applied by the processing of the TSM Preamp Emulation
Top Tip: The tone stacks and gain curve within each TSM™ Preamp are unique to the selected preamp; as such experimentation with these controls is paramount to achieving the desired preamp tone.
2.2 The TSM™ Poweramp
The TSM™ Poweramp pane provides all options to choose and configure a power-amplifier topology (Push Pull (PP) or Single Ended (SE)) and the tubes type (6L6, EL34, EL84 or KT88) by simply clicking on the tube image.
One a topology has been selected, the following controls are provided to further refine your Poweramp tone:
- PENTODE / TRIODE Switch - This parameter allows you to define whether the tube is used in TRIODE or in PENTODE configurations. As a general rule of thumb, the PENTODE mode features more headroom and volume than its TRIODE counterpart
- VOLUME - Sets the output volume of the TSM™ Poweramp
- DEPTH - Sets the tube stage frequency (bandwidth) and defines the range of the CONTOUR’s impact on the poweramp’s tone
- CONTOUR - Sets tone response of the power amp. At 50% the parameter is bypassed. CONTOUR acts like a loudness EQ; above 50%, it cuts the mid-range of the signal resulting in more low-end and high-end frequency content in the final tone; below 50% it cuts the low-end and gently rolls-off the high-end providing a more pronounced mid-range
3. The DynIR™ Engine | Cabinet Miking
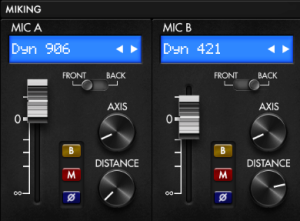
All Two notes Virtual Cabinets come with an individual collection of 8 microphones specifically matched to the cabinet. You access the list of microphones by clicking the blue window above the mic channel fader. For easy identification, microphones are described by their underlying technology: DYN is a dynamic microphone, CND is a condenser microphone and RBN is a ribbon mic.
Within each Mic Channel, the following controls are available to refine your mic’ed cabinet’s tone:
- Channel Fader - Use the fader to set the volume level of the related mic channel
- FRONT / BACK - Use this switch to place the selected microphone in front or behind the cabinet
- B - Use the “Bypass” (B) button to send an unprocessed signal though the mic channel
- M - Use the Mute button (M) to mute the associated mic channel
- Ø - Use the Phase button (Ø) to flip the phase of the selected microphone channel
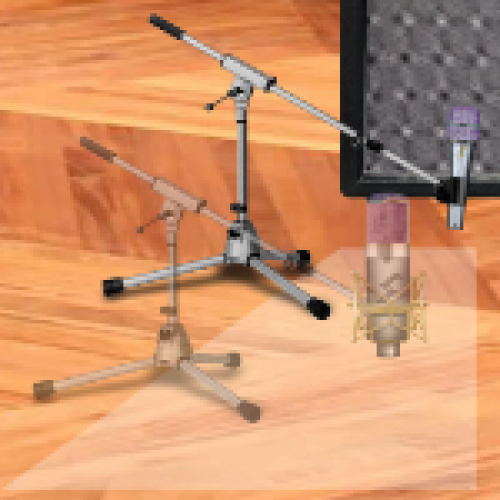
- DISTANCE - Use the DISTANCE knob to move your microphone forward and backwards within the designated miking quadrant on the Torpedo Remote DynIR™ graphical user interface
- AXIS - Use the AXIS knob to position the mic horizontally within the designated miking quadrant on the Torpedo Remote DynIR™ graphical user interface
4. Post FX
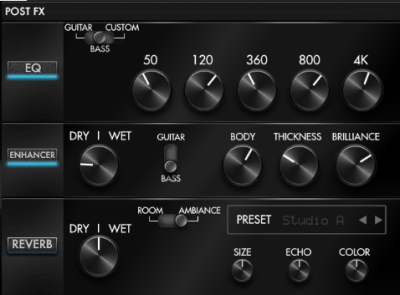
After defining your foundation tone via the TSM™ AMPLIFIER and DynIR™ Engine panes, OPUS provides you with a suite of Post FX to further refine your OPUS preset. The following Post FX components are available:
4.1 EQ
OPUS’ EQ features 3 modes of operation: GUITAR, BASS and CUSTOM. The GUITAR and BASS modes provide 5-band EQs with a gain range of -20dB to +20dB. The CUSTOM mode is a fully-customisable 5-band semi-parametric EQ complete with high-pass and low-pass filters.
Guitar mode: 120Hz, 360Hz, 800Hz, 2000Hz, 6000Hz (centre frequency of each band from the lower to the highest).
Bass mode: 50Hz, 120Hz, 360Hz, 800Hz, 4000Hz (centre frequency of each band, from the lowest to the highest)
Custom mode: The bands are structured as follows:
- Low Cut: low cut, 10 - 500Hz (12 dB per octave slope)
- Low: low shelf, 60 - 240Hz, +/-20dB
- LMid: peak, 180 - 720Hz, +/-20dB
- Mid: peak, 400 - 1600Hz, +/-20dB
- HMid: peak, 1 - 4kHz, +/-20dB
- High: peak, 3 - 12kHz, +/-20dB
- High Cut: high cut, 3 - 20 KHz (12 dB per octave slope)
4.2 Enhancer
OPUS’ ENHANCER provides you with a combination of dynamic and tone-shaping tools specifically tailored for your guitar and/or bass.
- Dry/Wet allows you to balance the cab sim signal and the processed signal by the Enhancer. At zero (knob turned all the way down), only the cab sim signal is heard. At the halfway position, the level of the cab sim signal is equal to the level of the enhancer. At full (knob turned all the way up), you are only hearing the signal processed by the Enhancer.
- Body is a compressor with a high-pass filter (set at 100Hz in Guitar mode and 150Hz in Bass mode). It only affects the low-mids and above frequencies of the signal. Body will render your tone fuller and more present.
- Thickness and Brilliance emphasize the low end and high end of the tone, respectively.
- Thickness is centered at 400Hz in Guitar mode and 150Hz in bass mode.
- Brilliance is centered at 1500Hz in Guitar mode and 2000Hz in bass mode. Both Thickness and Brilliance have a gain range between 0 and +15dB.
4.3 Reverb
There are 12 room reverbs and one full ‘CUSTOM’ reverb in OPUS.
When using the Reverb, you have access to the following parameters:
- Dry/wet: adjusts the balance between the incoming signal and the reverb. With the knob at halfway, both levels are equal
- Preset: selects the reverb acoustic environment. There are 12 spaces and one custom reverb.
- Size: adjusts the scale of the simulated room, from tiny to gigantic
- Echo: adjusts the level of the reflections
- Color: adjusts the tone of the reverb from darker to bright.
There is also a dedicated switch to change the acoustic characteristics of the REVERB module on-the-fly:
- Room: plenty of early reflections with a bright sound.
- Ambience: subtle early reflections and a bass-heavy response
Creating a Preset
An OPUS preset can contain the following components:
- A TSM™ Preamp
- A TSM™ Poweramp
- An Emulated Cabinet (using either the built-in DynIR™ Engine or 3rd Party IR Loader)
- Two (selected from a choice of 8) microphones and their positions within the room if using the DynIR™ Engine
- Post FX including the NOISE GATE, EQ, ENHANCER and/or REVERB
- A predefined Preset Level
1. Using the DynIR™ Engine
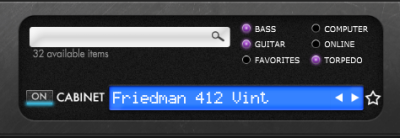
To create a foundation tone for your preset, first select a preamp, a poweramp and a cabinet. OPUS comes with a collection of 32 DynIR™ Virtual Cabinets preloaded into the internal memory. OPUS has a total of 64 slots in its internal memory for DynIR cabinets. Click on the blue screen or the drop-down arrow to access the list of cabinets preloaded within OPUS. Using Torpedo remote’s filtering options, you can:
- Filter the results by showing either BASS or GUITAR cabinets.
- View and audition the cabinets stored in the unit by selecting “TORPEDO”.
- Preview cabinets included in your license that are stored in your computer by selecting “COMPUTER”.
- Audition any cabinets from the Two notes Store by selecting “ONLINE”; please note, when this button is ticked, the list of browsable cabinets will increase significantly as it will show the entire Two notes catalog of 700+ DynIR™s.
2. Using a 3rd party IR
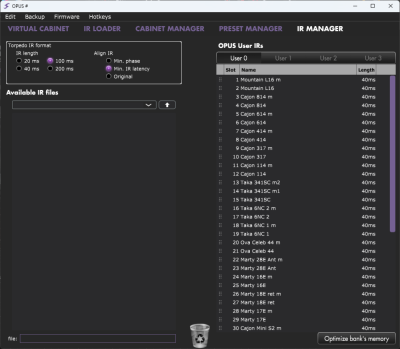
OPUS can load up to 512 static IRs. Import of static IRs is actioned via the desktop variant of Torpedo Remote through the IR MANAGER tab. Upon upload into OPUS, the IR’s length can be set to 20-, 40-, 100- or 200-ms long. If the IR is longer than the specified value, it will be shortened by Torpedo remote to the selected length; if it is shorter it will be extended (filled with zeros) to the selected length. OPUS’ internal memory has the following allowances in relation to the length of the IR(s) imported into its DSP architecture:
- 512 slots for 20ms IRs, in 4 banks of 128 slots
- 256 slots for 40ms IRs, in 4 banks of 64 slots
- 84 slots for 100ms IRs, in 4 banks of 21 slots
- 44 slots for 200ms IRs, in 4 banks of 11 slots
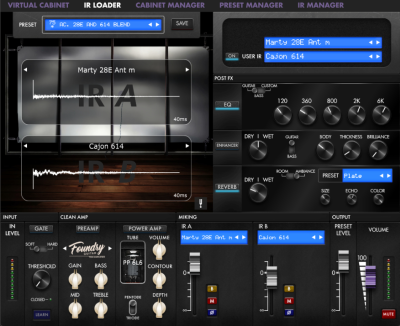
In order to load a static IR, first select the IR LOADER mode in Torpedo Remote. The window will have a similar layout to the VIRTUAL CABINET. You can load up to 2 static IR files simultaneously providing they are both loaded within the internal memory of OPUS (one IR per channel). On each channel, the following controls are available: Mute (M), Bypass (B), Phase (ø) and IR Volume (actioned via the Channel Fader). You can further refine your Static IR tone with OPUS’ suite of built-in Post FX including the EQ, ENHANCER and REVERB.
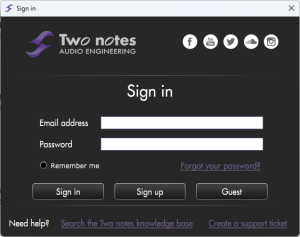
To import or remove 3rd-party IRs in OPUS, registration of OPUS to your Two notes account via Torpedo Remote is required. You cannot import or remove 3rd-party IRs when using Torpedo Remote in Guest mode. To load a file into OPUS’ internal memory, please use the IR MANAGER window.
The left panel indicates files stored on your computer; here you can browse the folders where you have stored your Static IRs. The right panel indicates the IR files that are loaded onto the internal memory of OPUS. You can drag and drop Static IRs from the computer (left) to OPUS (right) to add them to OPUS’ internal memory. If you wish to free-up memory slots in OPUS, drag and drop the Static IR files you wish to remove into the bin located at the bottom of the IR MANAGER window; please note, this does not delete the Static IR from your collection, only from the internal memory of OPUS.
Before transferring your Static IRs to OPUS, the Torpedo IR Format pane provides options to configure the Static IRs:
- IR length: increasing the IR length will improve the resolution of the Torpedo processing (more precision will lead to better accuracy in the low end). Please note that a 40ms IR will take 2 slots in OPUS' internal memory.
- IR offset: you have access to 3 options that will change the way the IR file will be processed:
- Min Phase: an algorithm will move the samples in the file so it will sound in phase with any other IR file (provided you use that function to transfer the other files as well).
- Min. IR Latency: the file is cut so there is no silence before the first sample, this can lead to a change in the sound but your latency will be minimal.
- Original: the samples in the file remain untouched. You may experience phase cancellation issues with mixing it with other IR files.
It is possible to use Static IR files stored on your computer's hard drive directly. When doing so, you will enter Preview mode. In this mode, you will only be able to use one IR at a time, in IR slot A. You will be able to save the preset on your computer using this IR, but not to the internal memory of OPUS. To have access to the full Torpedo processing when using IRs, import the files first directly onto the internal memory of OPUS.
3. Saving The Preset
The preset rack at the top of OPUS' Torpedo Remote user interface lets you save and load presets.
- Save a preset in OPUS’ internal memory by choosing the TORPEDO location; there are 99 memory slots for presets in OPUS
- Save a preset to your computer by choosing the COMPUTER location; here there is no preset limit
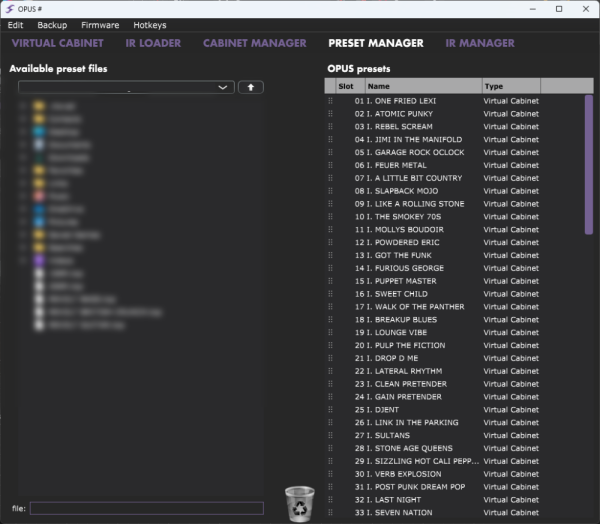
Once the preset is saved, use the PRESET MANAGER tab to manage your presets in Torpedo Remote.
The Left panel indicates the preset folders on your computer. The right panel shows the presets stored on OPUS.
Move the presets up and down to change their order in OPUS. Remove presets by dragging and dropping them in the bin below. Drag and drop presets from the left panel (your computer) to the right panel (internal memory of the OPUS) to transfer presets from your computer to the OPUS hardware.
Using OPUS as an Acoustic DI
OPUS can be used in tandem with your electro-acoustic guitar for an enhanced DI live feed, and expanded possibilities when using OPUS in a recording scenario.
1. Connections & Routing
Connect your acoustic guitar’s output to OPUS’s input, and set the IN LEVEL to INST/+12dB. For optimal use, we suggest bypassing both the TSM™ Pre- and Power-amp processing within your preset.
2. Loading Acoustic IRs
To load a static Impulse response (be it an Acoustic Impulse response or one captured from a traditional guitar cabinet) simply navigate to the IR loader tab in Torpedo Remote and select up to two files to load onto either of the IR Slots (IR A and IR B). You can then use the IR A and IR B channel controls to refine the blend of your IRs within the context of your OPUS preset.
In some instances you may want to blend an IR affected signal with the natural sound of your DI’d acoustic guitar. In order to action this, simply Bypass (the “B” switch situated within the IR A or IR B mixer pane) to route your dry signal through the IR Loader processing block. By using the channel faders on either IR A or IR B, a mix of your dry and wet signal can be achieved. Please note, this bypass processing simply removes any IR processing on your source signal; any processing outside of the IR processing blocks will still be applied to your dry signal including TSM™ Pre- and Power-amp emulation and OPUS’ suite of Post FX.
Top Tip: In order to fuse a full OPUS-processed signal chain with an unaffected dry signal, we recommend using the LINE OUT ROUTING facilities to send Dry and Wet Signals separately to a suitable source (i.e. a mixer or Audio interface) where a resultant Dry/Wet mix can be processed.
3. List Of Pre-Loaded Acoustic IRs
The Following Acoustic IRs are pre-loaded onto OPUS right-out-the-box
- Mountain L16 m - Inspired by a Yamaha® LL16 and featuring post-processing revoicing
- Mountain L16.wav - Inspired by a Yamaha® LL16
- Cajon 814 m.wav - Inspired by a Taylor® 814ce Deluxe and featuring post-processing revoicing
- Cajon 814.wav - Inspired by a Taylor® 814ce Deluxe
- Cajon 614 m.wav - Inspired by a Taylor® 614ce and featuring post-processing revoicing
- Cajon 614.wav - Inspired by a Taylor® 614ce
- Cajon 414 m.wav - Inspired by a Taylor® 414ce and featuring post-processing revoicing
- Cajon 414.wav - Inspired by a Taylor® 414ce
- Cajon 317 m.wav - Inspired by a Taylor® 317e and featuring post-processing revoicing
- Cajon 317.wav - Inspired by a Taylor® 317e
- Cajon 114 m.wav - Inspired by a Taylor® 114ce and featuring post-processing revoicing
- Cajon 114.wav - Inspired by a Taylor® 114ce
- Taka 341SC m2.wav - Inspired by a Takamine® EF341SC and featuring post-processing revoicing
- Taka 341SC m1.wav - Inspired by a Takamine® EF341SC and featuring post-processing revoicing
- Taka 341SC.wav - Inspired by a Takamine® EF341SC
- Taka 6NC 2 m.wav - Inspired by a Takamine® P6NC and featuring post-processing r revoicing
- Taka 6NC 2.wav - Inspired by a Takamine® P6NC
- Taka 6NC 1 m.wav - Inspired by a Takamine® P6NC and featuring post-processing revoicing
- Taka 6NC 1.wav - Inspired by a Takamine® P6NC
- Ova Celeb 44 m.wav - Inspired by a Ovation® Celebrity CE44 and featuring post-processing revoicing
- Ova Celeb 44.wav - Inspired by a Ovation® Celebrity CE44
- Marty 28E Ant m.wav - Inspired by a Martin® HD-28E and featuring post-processing revoicing
- Marty 28E Ant.wav - Inspired by a Martin® HD-28E
- Marty 16E m.wav - Inspired by a Martin® GPC-16E Matrix VTE and featuring post-processing revoicing
- Marty 16E.wav - Inspired by a Martin® GPC-16E
- Marty 18E Ret m.wav - Inspired by a Martin® D18E Retro and featuring post-processing revoicing
- Marty 18E Ret.wav - Inspired by a Martin® D18E Retro
- Marty 17E m.wav - Inspired by a Martin® 000-17E Matrix VTE and featuring post-processing revoicing
- Marty 17E.wav - Inspired by a Martin® 000-17E Matrix VTE
- Cajon Mini S2 M.wav - Inspired by a Taylor® GS Mini Koa ES2 and featuring post-processing revoicing
- Cajon GS Mini ES2.wav - Inspired by a Taylor® GS Mini Koa ES2
- Federation 150CE M.wav - Inspired by a Guild® D-150ce and featuring post-processing revoicing
- Federation 150CE.wav - Inspired by a Guild® D-150ce
- Nashville 200 2 m.wav - Inspired by a Gibson® SJ-200 standard and featuring post-processing revoicing
- Nashville 200 2.wav - Inspired by a Gibson® SJ-200 standard
- Nashville 200 1 m.wav - Inspired by a Gibson® SJ-200 standard and featuring post-processing revoicing
- Nashville 200 1.wav - Inspired by a Gibson® SJ-200 standard
- Nashville 45 Studio m.wav - Inspired by a Gibson® J-45 Standard and featuring post-processing revoicing
- Nashville 45 Studio.wav - Inspired by a Gibson® J-45 Standard
- Nashville 45 2 m.wav - Inspired by a Gibson® J-45 Standard and featuring post-processing revoicing
- Nashville 45 2.wav - Inspired by a Gibson® J-45 Standard
- Nashville 45 1 m.wav - Inspired by a Gibson® J-45 Standard and featuring post-processing revoicing
- Nashville 45 1.wav - Inspired by a Gibson® J-45 Standard
- Nashville Humbird 2 m.wav - Inspired by a Gibson® Hummingbird Standard and featuring post-processing revoicing
- Nashville Humbird 2 .wav - Inspired by a Gibson® Hummingbird Standard
- Nashville Humbird 1 m.wav - Inspired by a Gibson® Hummingbird Standard and featuring post-processing revoicing
- Nashville Humbird 1.wav - Inspired by a Gibson® Hummingbird Standard
- Seoul 710 m.wav - Inspired by a Cort® MR710F and featuring post-processing revoicing
- Seoul 710.wav - Inspired by a Cort® MR710F
Within OPUS’ Acoustic Impulse Response library, each IR is available in 2 versions; a standard version and one denoted by the letter “m”, indicating a “matched” variant (example Seoul 710.wav and Seoul 710 m.wav).
The “m” versions have been passed through a post-processing algorithm in order to generate a more balanced tone. In contrast, you may find that the non-Match files are a little bass-heavy and as such we advise using OPUS’ EQ to balance and enhance your tone. In addition, we also advise trialing with a blend of your raw DI tone and the non-Matched Acoustic IRs for best results.
Setup manager
In the SETUP window, access core information and the global setting preferences for OPUS. These settings are global and will impact all presets; as such they are not specific to one preset or saved per preset.
1. Product Information
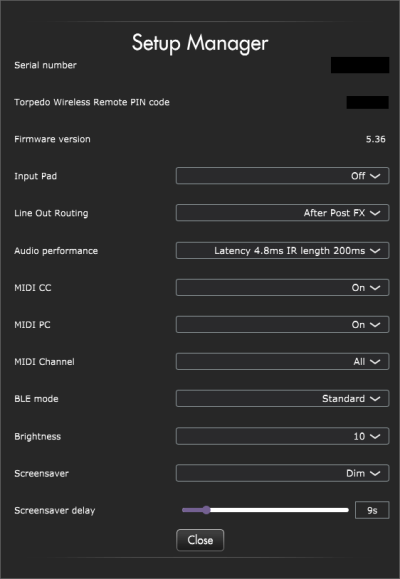
The SETUP manager shows the serial number of the pedal, the pin code (TORPEDO WIRELESS REMOTE PIN CODE) used to pair OPUS with your mobile device and the firmware version installed on the device.
2. Input Pad
The INPUT PAD is set to Off by default. It is engineered to reduce the input level of the source audio before reaching OPUS’ audio DSP. The INPUT PAD is a technical corrective tool and not a creative tool, attenuating the signal by 10dB.
Before instantiating the INPUT PAD, it is important to first set the 3-way IN LEVEL switch to match the nature of the input source:
- If you are connecting your instrument, set the switch to INST
- If you are connecting a hardware audio device that delivers line level signal, set the switch to LINE
- If you are connecting an amp, set the switch to AMP
If after setting the 3-way IN LEVEL switch - correctly in accordance with your signal requirements - OPUS displays a clipping signal , please then use the INPUT PAD to further attenuate your source signal.
3. Line Out Routing
OPUS’ LINE OUT ROUTING is accessible through the MENU directly via the pedal's screen:
- First, from the Preset Window on OPUS’ OLED display, push the right encoder to enter the Main Menu
- Then, navigate to the “Global” Menu (indicated by a cog icon) using the right encoder to scroll through the sections and push the right encoder to enter this menu.
- Once inside the Global Menu, scroll to “Line Out Routing” using the right encoder
- You can then use the right encoder to select where in OPUS’ DSP architecture the signal for the ¼-inch Line output is fed:
- NO PROCESSING: The LINE output sends the dry input signal from OPUS without any processing. Please note, this non-processed signal still passes through OPUS' DSP and therefore features the same latency as the signal feeding the XLR DI output. The latency can be configured in the AUDIO PERFORMANCE menu.
- AFTER TSM PREAMPLIFIER: The LINE output sends the signal after the PREAMP (in that setting, the NOISE GATE has no effect on the signal).
- AFTER TSM POWER AMPLIFIER: The LINE output sends the signal after the PREAMP, POWER AMP and NOISE GATE within OPUS
- AFTER CAB SIM: The LINE output sends the signal post the volume levels of the DynIR cabinet emulation microphone channels within OPUS
- AFTER POST FX: The LINE output sends the signal featuring all DSP processing within OPUS. With this setting, the LINE and DI outputs send the same processed signal
Please be advised, you can also set the LINE OUTPUT ROUTING via the SETUP menu in Torpedo Remote, accessible from the main window via the EDIT menu. The different options are listed in the drop down menu next to LINE OUT ROUTING.
Top Tip: In addition, it is important to note that the LINE OUT level is directly affected by the PRESET and VOLUME levels regardless of any DSP-centric processing that is applied.
4. Audio Performance
Within this menu item, the indicated latency is the summative latency of the whole device, measured from the input to the output. Even at the highest setting, the latency is low enough not to be noticed when playing. However, latency is cumulative and can add up when using several digital products; as a result, this can lead to a point where it becomes noticeable. In that case, lowering this setting can prove useful. The following settings - and resulting impact on IR Length - are available in OPUS:
- Latency is 2.2ms with an IR Length at 40ms
- Latency is 3.5ms with an IR Length at 100ms
- Latency is 4.8ms with an IR Length at 200ms
5. MIDI
OPUS has been specified to accept both preset change commands (Program Change or PC) and parameter change commands (Control Change or CC), providing immediate access to interact with all parameters on the unit from a compatible MIDI controller - like a MIDI pedalboard. Within the SETUP MANAGER window, you are able to configure the following:
- Define whether OPUS will receive Program Change and/or Control Change commands. For example, if you plan to use preset switching (PC) only, CC receive functionality can be set to Off
- Define the MIDI channel that the unit is set to receive. Here you can choose to receive all channels, useful if you don’t know which channel the commands are originating from
- With the MIDI monitor, check the correct reception of the commands by OPUS
For further information, See the MIDI Chart section for a comprehensive breakdown of all possible Command Change MIDI messages.
6. BLE Mode
It is possible to set the scale of Bluetooth emission from OPUS in accordance with the following options:
- Low Profile: The lowest emission level
- Standard: The factory setting of the Bluetooth emission level
- Long Range: The most powerful emission level for longer range with your mobile device
7. Screen Settings
7.1 Brightness
This setting determines the brightness of OPUS’ OLED Display.
7.2 Brightness
Within this preference, you can choose either an animation, a dim of the display, or the screen entering sleep mode (turns off) after a pre-designated delay period from 1 to 60 seconds.
Using OPUS Without Torpedo Remote Via the OLED Display & Rotary Encoders
OPUS features an OLED Display and dual rotary encoders for complete standalone operation.
1. PERFORM environment
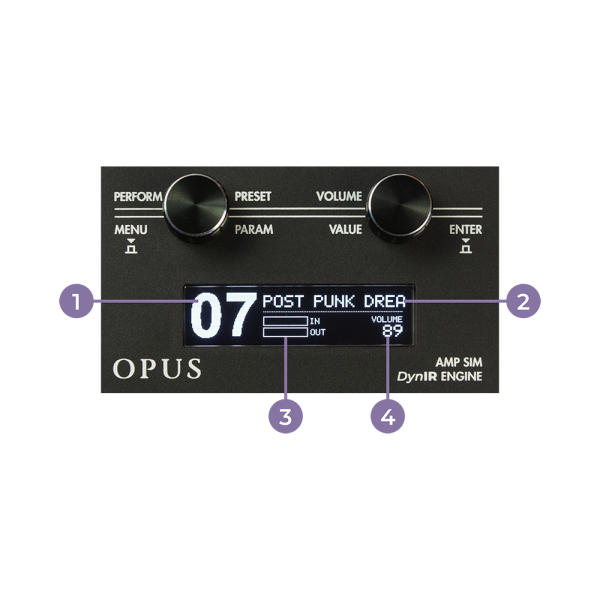 1. Preset number
2. Preset name
3. Bargraphs for input and output levels
4. Output level
By default, the PERFORM window of OPUS shows:
- The current loaded preset number and name
- The output level value
- An input and output bar graph denoting the respective signal levels (if the signal clips the audio processor, the message CLIP will appear in the relevant bar graph)
When a preset is edited, a star appears on screen next to the aforementioned bar graphs; upon saving the edited preset to the same (or a new) preset location, this star will disappear to indicate the preset has been overwritten.
2. Menu Navigation
The MENU environment gives you access to all the editable parameters of a preset, allowing you to modify it, or create your own tone from scratch. To enter the MENU environment from the PERFORM environment, press either the left (MENU) or the right (ENTER) button. This will display the “top layer” of the MENU environment, which lists various DSP-processing blocks that can be edited. By entering any section, you'll go down one layer, accessing the parameters of the preset (or device). In the MENU environment, the encoders have the following behavior:
- Turning the left (PARAM) encoder selects the DSP-processing block or parameter you want to edit
- Turning the right (VALUE) encoder changes the value of the selected section or parameter
- Pressing on the left (MENU) encoder reverts back one level in the menu until you come back to PERFORM environment
- Pressing on the right (ENTER) encoder enters the selected section or toggles the selected parameter
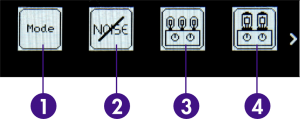
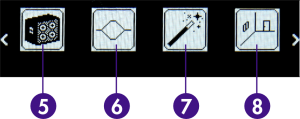
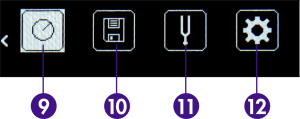
To enter any section and edit the related parameters, scroll to the relevant section by turning the PARAM encoder and press ENTER to enter. Some sections can be modified directly without entering it, by turning the VALUE encoder. For most DSP-processing blocks, this means turning it ON or OFF (the image will then appear in negative mode). There are 12 sections in the MENU environment: (each section is the same as in Torpedo Remote, sharing mirrored controls).
1. Mode: Choose if you wish to work with DynIR™ cabinets via the DynIR™ Engine mode or with 3rd-party IRs in the IR Loader mode.
2. Noise Gate: Activate and set the noise gate
3. Preamp: Choose between one of the 12 TSM™ preamps and configure your tone with the dedicated preamp controls
4. Power Amp: Choose the type and configuration of the power amp tubes
5. Miking: Choose the cabinet simulation, microphone positioning and microphone mixer parameters within the DynIR™ Engine
6. EQ: Shape your tone via one of the 3 EQ modes (Guitar, Bass or Custom)
7. Enhancer: Apply a combination of dynamic and tone-shaping tools specifically tailored for your guitar or bass
8. Reverb: Choose between the 12 acoustic environments and fine tune your reverb using the associated parameters
9. Preset Level: Define the level of your OPUS preset in accordance with all other Presets instantiated within the OPUS hardware
10. Save: Save your Preset to a dedicated internal memory slot within OPUS
11. Tuner: Tune your instrument with OPUS’ built-in Tuner. Note: You can also access the Tuner by actioning a long press of the right encoder knob
12. Global: Access all general settings outside of the aforementioned Preset level settings. Here, you will also find the pin code for Bluetooth pairing as well as the serial number and the firmware version of your OPUS device.
Specifications
1. List of cabinets
| Designation | Description |
|---|---|
| GUITAR cabinets | |
| NOISE FACTORY RIVERBANK 212 WHITE LABEL | Inspired by a Rivera® Hundred Duo Twelve Guitar cabinet loaded with Celestion® G12L-55 speakers |
| PURPLEHAZE | Inspired by a Marshall® 1982B Tall Box Guitar with Celestion® 12“ Heritage G12M speakers |
| MII VT 412 FAT | Inspired by a VHT® Guitar cabinet loaded with Eminence® 12” P50E speakers |
| BHG Exquisite Green | Inspired by a Matchless® ESD 2×12 Guitar cabinet loaded with Celestion® Custom G12M-25 Greenback speakers |
| THE ROCK CLUB | Inspired by a Marshall® 1960AV Guitar cabinet loaded with Celestion® 12” Vintage 30 speakers |
| PHIL X MLC | Artist Series Capture (Phil X) Inspired by a MLC Custom 4×12 Guitar cabinet loaded with Warehouse® 12“ Veteran 30 speakers |
| LYNCH CITRUS | Artist Series Capture (George Lynch) Inspired by an Orange® 4×12 Guitar cabinet loaded with Eminence® 12” Squareback speakers |
| PT PT15 Signature 2×12 | Artist Series Capture (Pete Thorn) inspired by a Suhr® 2×12 Guitar cabinet loaded with Celestion® 12' Vintage 30 speakers |
| FRIEDMAN 412 VINT | Artist Series Capture (Davie Friedman) Inspired by a Friedman® 4×12 Guitar cabinet loaded with Celestion® 12' Vintage 30 speakers |
| ANGL PRO30 | Inspired by an Engl® E412VG Pro Guitar cabinet loaded with Celestion® 12“ Vintage 30 speakers |
| BLONDE 63 | Inspired by a Fender® Bassman '63 Blonde Tolex Piggy Back Guitar cabinet loaded with Oxford® 12” 12M6 XG875 speakers |
| BRIT 60A | Inspired by a Marshall® 1960A Guitar cabinet loaded with Celestion® 12“ G12T-75 speakers |
| STEVENS BRITMALIBUS 412 BLACK | Artist Series Capture (Steve Stevens) Inspired by a Marshall® 4×12 Guitar cabinet loaded with Celestion® G12M Blackback speakers |
| FASTBACK25 | Inspired by a Marshall® 4×12 Purple Slant Guitar cabinet loaded with Celestion® 12” G12M-25 Greenback speakers |
| FREE ROCK2 | Inspired by a VHT® Deliverance 4×12 Guitar cabinet loaded with Eminence® 12“ P-50-E speakers |
| GREENARTC | Inspired by a Marshall® 2033 Guitar cabinet loaded with Celestion® 12” G12H-30 speakers |
| JAZZ 120 | Inspired by a Roland® Jazz Chorus JC-120 Guitar cabinet loaded with Roland® 12“ 60W speakers |
| KEROZEN | Inspired by a Diezel® 4×12 Front Loaded Guitar cabinet loaded with Celestion® 12” G12K-100 speakers |
| NOS V30 | Inspired by a NOS® V30 Guitar cabinet loaded with Celestion® 12“ Vintage 30 speakers |
| SILVERJEN | Inspired by a Fender® Twin Reverb Guitar cabinet loaded with Jensen® 12” C12K speakers |
| TANGER 30C | Inspired by an Orange® Vintage 4×12 Guitar cabinet loaded with Celestion® 12“ G12H speakers |
| VOICE 65 | Inspired by a Vox® AC30/6 TB Combo Guitar cabinet loaded with Vox® / Celestion® 12” Silver Bell Alnico speakers |
| XTCAB | Inspired by a Bogner® Ecstasy 4×12 Guitar cabinet loaded with Celestion® 12“ Vintage 30 speakers |
| BRIT VINT C | Inspired by a Marshall® Slash Signature Guitar cabinet loaded with Celestion® 12” Vintage 30 speakers |
| CALIF STDC | Inspired by a Mesa Engineering® Rectifier 4×12 Standard Guitar cabinet loaded with Celestion® 12“ Vintage 30 speakers |
| Watt FanC | Inspired by a Hiwatt® HG212 Guitar cabinet loaded with Fane® 12” Axiom 12-100L speakers |
| GREEN TRI | Inspired by a Hughes & Kettner® TriAmp Combo Guitar cabinet loaded with Celestion® 12“ G12M-25 Greenback speakers |
| AE LUMBERLEAVER50 412 SHEF | Inspired by – and captured from – an original Peavey® 5150 4×12 enclosure outfitted with a quartet of Sheffield® 1200 Drivers |
| AE PETALUMA 412 VINT | Inspired by – and captured from – a vintage Mesa Engineering® 4×12 enclosure outfitted with a quartet of Celestion® Vintage 30 drivers |
| BASS cabinets | |
| 2NOTES CSB | Inspired by a Custom® CSB Bass cabinet loaded with Custom® 15″ Custom speakers |
| ALU XL | Inspired by a Hartke® 410XL Bass cabinet loaded with Hartke® 10″ XL Aluminium-Cone Bass Driver speakers |
| DUAL BW15 | Inspired by a Peavey® PV 215D Bass cabinet loaded with Peavey® 15″ Black Widow 1505-8 speakers |
| FRIDGE 9 | Inspired by an Ampeg® V-9 Bass cabinet loaded with Eminence® 10″ Custom speakers |
| MARCO | Inspired by a Markbass® Traveler 102P Bass cabinet loaded with Markbass® 10″ Custom Neodymium speakers |
| FRIDGE | Inspired by an Ampeg® SVT-810E Bass cabinet loaded with Eminence® 10” Custom speakers |
2. MIDI Chart
| CC# | Processing block | Naming | Ranges | Details | |
| 0 | Preset mode | Preset mode | 0-1 | 0 = DynIR Engine ; 1 = IR loader | |
| 1 | Noise Gate | On / Off | 0-1 | 0 = Off ; 1 = On | |
| 2 | Mode | 0-1 | 0 = Soft ; 1 = Hard | ||
| 3 | Threshold | 0 - 80 | 0 = -80dB ; 80 = 0dB | ||
| 4 | Preamp | On / Off | 0 - 1 | 0 = Off ; 1 = On | |
| 5 | Model | 0 - 9 | 0 = Foundry ; 1 = Foxy ; 2 = Albion ; 3 = NiftyFifty ; 4 = Peggy ; 5 = Tanger ; 6 = Eldorado ; 7 = Aviator ; 8 = Gemini ; 9 = Flatback | ||
| 6 | Gain | 0 - 127 | 0 = 0% ; 63 = 50% ; 127 = 100% | ||
| 7 | Treble | 0 - 127 | 0 = 0% ; 63 = 50% ; 127 = 100% | ||
| 8 | Middle | 0 - 127 | 0 = 0% ; 63 = 50% ; 127 = 100% | ||
| 9 | Bass | 0 - 127 | 0 = 0% ; 63 = 50% ; 127 = 100% | ||
| 10 | Power Amp | On / Off | 0 - 1 | 0 = Off ; 1 = On | |
| 11 | Model | 0 - 7 | 0 = SE 6L6 ; 1 = SE EL34 ; 2 = SE EL84… | ||
| 12 | Volume | 0 - 127 | 0 = 0% ; 63 = 50% ; 127 = 100% | ||
| 13 | Push-Pull (PP) Models only | Countour | 0 - 127 | 0 = 0% ; 63 = 50% ; 127 = 100% | |
| 14 | Depth | 0 - 127 | 0 = 0% ; 63 = 50% ; 127 = 100% | ||
| 15 | Type | 0 - 1 | 0 = Triode ; 1 = Pentode | ||
| 16 | Miking | DynIR Engine only | On / Off | 0 - 1 | 0 = Off ; 1 = On |
| 17 | Virtual Cabinet | 0 - x | 0 = DynIR #0 ; 1 = DynIR #1… | ||
| 18 | Mic A : Model | 0 - 7 | 0 = Mic #1 ; 1 = Mic #2… | ||
| 19 | Mic B : Model | 0 - 7 | 0 = Mic #1 ; 1 = Mic #2… | ||
| 20 | Both modes | Mic A : Level | 0 - 127 | 0 = 0% ; 63 = 50% ; 127 = 100% | |
| 21 | Mic A : Bypass | 0 - 1 | 0 = Off ; 1 = On | ||
| 22 | Mic A : Mute | 0 - 1 | 0 = Off ; 1 = On | ||
| 23 | Mic A : Phase | 0 - 1 | 0 = Normal ; 1 = Invert | ||
| 24 | Mic B : Level | 0 - 127 | 0 = 0% ; 63 = 50% ; 127 = 100% | ||
| 25 | Mic B : Bypass | 0 - 1 | 0 = Off ; 1 = On | ||
| 26 | Mic B : Mute | 0 - 1 | 0 = Off ; 1 = On | ||
| 27 | Mic B : Phase | 0 - 1 | 0 = Off ; 1 = On | ||
| 28 | DynIR Engine only | Mic A : Axis | 0 - 127 | 0 = 0% ; 63 = 50% ; 127 = 100% | |
| 29 | Mic A : Distance | 0 - 127 | 0 = 0% ; 63 = 50% ; 127 = 100% | ||
| 30 | Mic A : Position | 0 - 1 | 0 = Front ; 1 = Back | ||
| 31 | Mic B : Axis | 0 - 127 | 0 = 0% ; 63 = 50% ; 127 = 100% | ||
| 32 | Mic B : Distance | 0 - 127 | 0 = 0% ; 63 = 50% ; 127 = 100% | ||
| 33 | Mic B : Position | 0 - 1 | 0 = Front ; 1 = Back | ||
| 34 | IR Loader | IR File A | 0 - x | 0 = File #0 ; 1 = File #1… | |
| 35 | IR File B | 0 - x | 0 = File #0 ; 1 = File #1… | ||
| 36 | IR Folder A | 0 - 3 | 0= User 0 ; 1= User1; 2 = User 2 ; 3 = User 3 | ||
| 37 | IR Folder B | 0 - 3 | 0= User 0 ; 1= User1; 2 = User 2 ; 3 = User 3 | ||
| 38 | Equalizer | On / Off | 0 - 1 | 0 = Off ; 1 = On | |
| 39 | EQ Mode | 0 - 2 | 0 = Guitar ; 1 = Bass ; 2 = Custom | ||
| 40 | Custom mode only | Freq : Low Cut | 0 - 127 | Specific mapping to Hz | |
| 41 | Gain: Low | 0 - 30 | 0 = -15dB ; 15 = 0dB ; 30 = +15dB | ||
| 42 | Custom mode only | Freq: Low | 0 - 127 | Specific mapping to Hz | |
| 43 | Gain: Low Mid | 0 - 30 | 0 = -15dB ; 15 = 0dB ; 30 = +15dB | ||
| 44 | Custom mode only | Freq: Low Mid | 0 - 127 | Specific mapping to Hz | |
| 45 | Gain: Mid | 0 - 30 | 0 = -15dB ; 15 = 0dB ; 30 = +15dB | ||
| 46 | Custom mode only | Freq: Mid | 0 - 127 | Specific mapping to Hz | |
| 47 | Gain: High Mid | 0 - 30 | 0 = -15dB ; 15 = 0dB ; 30 = +15dB | ||
| 48 | Custom mode only | Freq: High Mid | 0 - 127 | Specific mapping to Hz | |
| 49 | Gain: High | 0 - 30 | 0 = -15dB ; 15 = 0dB ; 30 = +15dB | ||
| 50 | Custom mode only | Freq : High | 0 - 127 | Specific mapping to Hz | |
| 51 | Freq : High Cut | 0 - 127 | Specific mapping to Hz | ||
| 52 | Enhancer | On / Off | 0 - 1 | 0 = Off ; 1 = On | |
| 53 | Instrument | 0 - 1 | 0 = Guitar ; 1 = Bass | ||
| 54 | Dry / Wet | 0 - 127 | 0 = 0% ; 63 = 50% ; 127 = 100% | ||
| 55 | Body | 0 - 127 | 0 = 0% ; 63 = 50% ; 127 = 100% | ||
| 56 | Thickness | 0 - 127 | 0 = 0% ; 63 = 50% ; 127 = 100% | ||
| 57 | Brilliance | 0 - 127 | 0 = 0% ; 63 = 50% ; 127 = 100% | ||
| 58 | Reverb | On / Off | 0 - 1 | 0 = Off ; 1 = On | |
| 59 | Preset | 0 - 12 | 0 = Studio A ; 1 = Studio B ; 2 = Basement… | ||
| 60 | Type | 0 - 1 | 0 = Room ; 1 = Ambience | ||
| 61 | Dry / Wet | 0 - 127 | 0 = 0% ; 63 = 50% ; 127 = 100% | ||
| 62 | Size | 0 - 127 | 0 = 0% ; 63 = 50% ; 127 = 100% | ||
| 63 | Echo | 0 - 127 | 0 = 0% ; 63 = 50% ; 127 = 100% | ||
| 64 | Color | 0 - 127 | 0 = 0% ; 63 = 50% ; 127 = 100% | ||
| 65 | Preset Level | Preset Level | 0 - 107 | “ | |
| 66 | General | Master Volume | 0 -100 | 0 = Mute ; 1-100 = Level | |
| 67 | Master Mute | 0 - 1 | 0 = Off (no mute) ; 1 = On (mute) | ||
| 68 | Preset | 0 - 99 | 0 = Preset #1 ; 1 = Preset #2… | ||
| 69 | Tuner | On / Off | 0 - 1 | 0 = Off ; 1 = On | |
| 70 | Preset down | 0 - 127 | |||
| 71 | Preset up | 0 -127 | |||
3. Technical Data
| Input/Output | |||
| AMP / INST / LINE IN | 1/4″ Jack balanced (TRS) | ||
| Input Impedance | AMP | 160kΩ unbalanced / 300kΩ balanced | |
| LINE | 37kΩ unbalanced / 55kΩ balanced | ||
| INST. | 1MΩ unbalanced | ||
| Max Level (No Input Pad) | AMP | 26.1dBu | |
| LINE | 11.3dBu | ||
| INST. | 2.8dBu | ||
| Max Level (With Input Pad) | AMP | 36.2dBu | |
| LINE | 20.8dBu | ||
| INST. | 12.3dBu | ||
| Aux In | Connector | 1/8” (3.5mm) TRS jack | |
| Input Impedance | 29kΩ | ||
| TO SPEAKER Output* | 1/4″ Jack balanced (TS) | *Unprocessed, unbuffered, directly connected to “From Amp” | |
| DI Output* | XLR balanced | *Protected against +48V phantom power | |
| Max level: 10dBu | |||
| Output Impedance: 600Ω | |||
| DI Output* | 1/4″ Jack balanced (TRS) | *Not Protected against +48V phantom power | |
| Max level: 10dBu | |||
| Output Impedance: 600Ω | |||
| Headphone Output | 1/8“ (3.5mm) TRS jack | ||
| Max output power: 300mW under 100Ω | |||
| Output impedance: 33Ω | |||
| USB Connector | USB-C 2.0 | ||
| Memory | Internal memory | 64 slots for DynIR cabinets | |
| 99 slots for presets | |||
| up to 512 slots for 20ms IRs (see this section for full information) | |||
| Memory Card | 256Mb Micro-SD included Up to 32Gb cards supported (only for 3rd party IRs) | ||
| Memory Card | 256Mb Micro-SD included Up to 32Gb cards supported | ||
| Digital Audio | |||
| AD/DA Converters | Studio-grade 24-bit / 96kHz | ||
| Bandwidth (-1dB) | 30Hz - 19kHz (-1dB) | ||
| Dynamic Range | 101dB | ||
| Internal Processing | 32-bit floating-point | ||
| Latency | 2.2ms (Line Input to Line Output) | ||
| Power | |||
| Power Input Connector | Connector: 2.1mm x 5.5mm | ||
| Polarity: Center negative | |||
| Voltage: 12V DC | |||
| Current: 200mA | |||
| Power consumption: approx. 2W | |||
| Supplied Adapter | Connector: 2.1mm x 5.5mm | ||
| Polarity: Center negative | |||
| Voltage: 12V DC | |||
| Max Current:2000mA | |||
| Dimensions & Weight | |||
| Width x Depth x Height* | 12.1cm x 10 cm x 6cm ( 4.8” 4“ x 2.4”) | *Including connectors and knobs | |
| Weight | 450g / 0.99 lbs | ||
Technical support
Should you encounter a problem with your product or need help regarding any technical aspects, please note that Two notes Audio Engineering has developed on-line services to provide you with fast and efficient technical support, the Two notes Help Desk.
Don't hesitate to browse the Knowledgebase, which contains all sorts of useful information, or submit a ticket if you have any question or need assistance with a Two notes product.
1. Two notes Website
On the Two notes Audio Engineering website, you will find:
- News about the company and the products (news on the homepage),
- Comprehensive information about OPUS and its many applications (FAQ),
- Firmware and software updates to download (https://www.two-notes.com/en/downloads/),
- Access to the Two notes Store where you can buy new cabinets,
- An official forum where you can share tips and advice with other Torpedo users (forum).
The Two notes Team often visits specialized forums to help out users.
2. E-mail
We do not offer technical support via e-mail. Please contact us via the Help Desk at the address above.
