- en
- fr
Torpedo Captor X SE User's Manual
Compact reactive load box, tube amp attenuator, miked cab simulator, IR loader and stereo expander
The complete electronic version of this manual, as well as the Two notes Audio Engineering software and hardware products, are subject to updates. You can download the most recent versions of the products on the Two notes Audio Engineering website.
This manual describes Captor X SE and provides instructions for its operation. It is highly recommended that you read this document before using the product. The contents of this manual have been thoroughly verified and it is believed to accurately describe the product at the time of shipment from the factory or downloaded from our website.
Two notes Audio Engineering is a registered trademark of:
OROSYS SAS
76 rue de la Mine
34980 Saint-Gély-du-Fesc
France
Tel: +33 (0)484 250 910
Fax: +33 (0)467 595 703
Contact and support: http://support.two-notes.com
Website: http://www.two-notes.com
This document is the exclusive property of OROSYS SAS. In the interest of product development, OROSYS SAS reserves the right to change technical specifications, modify and/or cease production without prior notice. OROSYS SAS cannot be held responsible for any damage, accidental or otherwise, that results from an inappropriate use of the Torpedo Captor X SE Please refer to the safety instructions included in this manual. The reproduction of any part of this document is strictly forbidden without the written authorization of OROSYS SAS.
All product names and trademarks are the property of their respective owners. Product names and trademarks found in this document were used during the development of Captor X SE product but are in no way associated or affiliated with OROSYS SAS.
Foreword
1. Safety instructions
Before using the product, it is necessary to carefully read and to bear in mind the following information. Keep this document in a safe place as it is important for the protection of both user and product. Should you suspect any malfunction of the device, always seek the assistance of a qualified technician.
1.1 Reader warning
1.2 Power adapter
Please verify that the voltage required by the mains power adapter matches the voltage in your country. If not - or if unsure - do not connect the unit to the wall outlet. This could result in damage to the mains power adapter, the unit and injuries to the user. This product must not be used when there is lightning. In case of severe weather with a risk of lightning, unplug the power adapter to reduce the risk of electric shock and fire.
The mains power adapter provided with Captor X SE complies with the standards of the country where you purchased the product. If replacement is needed, please use a standard compliant mains power adapter.
1.3 Safety use conditions
Captor X SE must never be used near a heat source, near a flame, in the rain, in damp areas, near any kinds of liquids. When transporting the unit, care needs to be taken to avoid any shocks that could cause damage that would require the assistance of a qualified technician.
1.4 Cleaning
Always use a dry and soft cloth with no alcohol or solvents for cleaning. Please keep the unit clean and free from dust.
1.5 Maintenance
All maintenance operations must be done by service centers approved by OROSYS SAS. Never try to repair the unit by yourself.
2. Contents of the package
The shipped package contains:
- 1 x Captor X SE unit in a protecting sleeve
- 1 x Mains power adapter with interchangeable plug
- 1 x USB cable (micro-usb to USB B format)
- 1 x Mini jack to 5 pin MIDI (DIN type A) cable adapter.
- 1 x Quickstart guide
- 1 x Welcome card
3. Declaration of conformity
Manufacturer: OROSYS SAS
Category of product: digital audio signal processor
Product: Captor X SE
Test Manager: Guillaume Pille
The Two notes Captor X SE is certified to be compliant to the CE and FCC standards:
- EN 55103-1 : 1996 and EN 55103-2 : 1996.
- EN 60065 05/2002 + A1 05/2006.
- EMC directive 89/336/EEC and Low Voltage Directive 73/23/EEC.
- FCC Part 15 : 2008.
- ICES-003 : 2004.
- AS/NZS 3548 class B for Australia and New Zealand.
- IEC : 2008 - CISPR 22 class B.
4. Disposal of Waste Equipment by Users in Private Household in the European Union
5. Warranty
OROSYS SAS warrants that this TWO NOTES AUDIO ENGINEERING product shall be free of defects in parts and workmanship when used under normal operating conditions for a period of two (2) years from the date of purchase. This warranty shall apply to the original purchaser when purchased from an Authorized TWO NOTES AUDIO ENGINEERING dealer.
IMPORTANT: PLEASE RETAIN YOUR SALES RECEIPT, AS IT IS YOUR PROOF OF PURCHASE COVERING YOUR LIMITED WARRANTY. THIS LIMITED WARRANTY IS VOID WITHOUT YOUR SALES RECEIPT.
Defective products that qualify for coverage under this warranty will be repaired or replaced, (at OROSYS SAS's sole discretion) with a like or comparable product, without charge. In the case that warranty service is required, Please contact your authorized TWO NOTES AUDIO ENGINEERING dealer in order to obtain a Return Merchandise Authorization (RMA) to return the complete product to the Authorized TWO NOTES AUDIO ENGINEERING Service Center closest to you, with proof of purchase, during the applicable warranty period.
Transportation costs to the service center ARE NOT INCLUDED in this limited warranty. OROSYS SAS will cover the cost of standard ground return transportation for repairs performed under this warranty. This limited warranty becomes void if the serial number on the product is defaced or removed, or the product has been damaged by alteration, misuse including connection to faulty or unsuitable ancillary equipment, accident including lightning, water, fire, or neglect; or if repair has been attempted by persons not authorized by OROSYS SAS. Any implied warranties, including without limitation, any implied warranties of merchantability or fitness for any particular purpose, imposed under state or provincial law are limited to the duration of this limited warranty. Some states or provinces do not allow limitations on how long an implied warranty lasts, so the above limitations may not be applicable.
OROSYS SAS ASSUMES NO LIABILITY FOR PROPERTY DAMAGE RESULTING FROM ANY FAILURE OF THIS PRODUCT NOR ANY LOSS OF INCOME, SATISFACTION, OR DAMAGES ARISING FROM THE LOSS OF USE OF SAME DUE TO DEFECTS OR AVAILABILITY OF SAME DURING SERVICE.
In case you have to send your TWO NOTES AUDIO ENGINEERING product to any other location, it is of vital importance to retain the original packing materials. It is very difficult to avoid damage if shipping the product without these materials. OROSYS SAS is not responsible for damages to the product due to improper packaging and reserves the right to charge a reboxing fee for any unit returned for service without the original packing materials. THE FOREGOING CONSTITUTES THE ONLY WARRANTY MADE BY OROSYS SAS WITH RESPECT TO THE PRODUCTS AND IS MADE EXPRESSLY IN LIEU OF ALL OTHER WARRANTIES EXPRESSED OR IMPLIED
Recommendation For The Proper Use of a Load Box With a Tube Amplifier
1. What is a load box?
In the normal use of a tube amplifier, it is highly recommended that you always connect its power output to a speaker cabinet prior to powering it up. The speaker cabinet (4, 8 or 16 Ohms) must always be connected to the corresponding speaker output of your amplifier. Not doing so can lead to partial or complete destruction of the output stage of the tube amplifier.
Most tube amplifier manufacturers protect their products with fuses or other protection systems, however some amplifiers are still insufficiently protected. It is impossible to predict the behavior of all the amplifiers on the market in case of use without a load (a speaker cabinet or a load box).
The electronic term that describes the speaker cabinet with respect to the amplifier is the “load”: we say the cabinet “loads” the amplifier. The term “load box” is used to describe any product that provides a load to the amplifier. The main parameter of the load box is its impedance, expressed in Ohms. An 8-Ohm load box must be plugged to the 8-Ohm speaker output of the amplifier.
The power sent to the load is turned into heat, so please follow the cooling recommendation of the load box — otherwise overheating may cause damage, both to the load box and to the amplifier.
The Captor X SE is a load box. This term indicates that the Captor X SE can electrically replace the speaker cabinet while dissipating (transforming into heat) the power coming out of the amplifier.
The Captor X SE is a reactive load. A reactive load simulates the complex impedance of a real speaker.
 | Always connect the speaker output of your tube amplifier to an appropriate load (speaker cabinet or load box). The Captor X SE is such a load. The Captor X SE does not need to be powered up to act as a load box. The maximum admissible power of the Captor X SE is 100W RMS, your amplifier shouldn't be set to play at a higher output power value. See this article if your amplifier is more powerful than 100W. |
2. Which output volume for my amplifier?
The correct use of your amplifier with a load box requires some precaution. Due to the relative silence while playing with a load box compared to a traditional amp and cab setup, it is much easier to accidentally run your amplifier beyond the reasonable limits set by the manufacturer. This can lead to faster tube wear and, in some cases, more serious and permanent issues.
Keep in mind that the “sweet spot” - the optimal running point of the amplifier and the one that will give you the tone you’re looking for - is rarely obtained at maximum volume – here is a great video showing this. In addition, the volume control of the amplifier is usually logarithmic, which means the volume increases quickly within the first half of the potentiometer rotation, reaches its maximum at 12 o’clock, and doesn’t change much beyond this point. Therefore, you can reach the maximum volume of your amplifier even if the volume potentiometer is not set at maximum.
By reaching the maximum output power of your amplifier, you will hear a lot of distortion, which may not sound as pleasing as you may hope. In fact, most amplifiers sound pretty bad at maximum volume. Always keep in mind that your amplifier may not have been conceived to be used at maximum volume for a long period of time. Running an amplifier at high volume will cause premature wear of the tubes and possible malfunctions or damages at the output stage.
3. Is the use of a load box totally silent?
We usually talk about “silent recording” when a load box is involved. If we compare the load box solution to a traditional cabinet miking solution, it is obviously several orders of magnitude quieter, but you will still experience some minor sounds and noises that have to be taken into account:
- Your guitar or bass strings can be heard. This is obvious, but it can be disturbing, depending on your environment.
- You may hear some noise coming out of your Captor X SE when playing - like there is a tiny speaker inside the box. This is perfectly normal and there is no reason to worry. The sound is produced when power goes through the coil of the reactive load embedded in the Captor X SE. The vibration is related to what power comes out of the amplifier connected to the Torpedo and to the signal’s frequency content (notes played are heard). Your amplifier may also produce similar noise at the output transformer’s level. Such noise is usually not heard, simply because it is normally overcome by the sound coming from the loudspeaker. You are actually hearing the amp actually working for the first time and it can be alarming!
- The Captor X SE includes an embedded fan as there is quite a lot of power dissipated into heat inside the box. We always use a “silent fan”, but as it is running extremely fast, it is never entirely silent. This said, in normal use (hearing your guitar through monitors, or headphones), you can barely hear that fan.
About Captor X SE
1. Introducing Captor X SE
Sporting a limited-run vintage-inspired colorway, alongside an all-new Anniversary Edition DynIR™ cabinet collection*, Captor X SE represents the culmination of Two notes’ 15-years stint pioneering modern loadbox technology. “Feature-packed” doesn't cut it. It’s a compact reactive load box. It’s a tube amp attenuator. It’s a mic-ed cab simulator. It’s a static IR loader. It’s a stereo expander. It’s packed with a raft of studio-grade Post FX to tweak your tone to perfection. Expertly engineered to deliver stand-out sonics for home, live and studio use, Captor X SE is the undisputed ‘player’s choice’, empowering you with every tool to define - and redefine - your sonic signature.
The Torpedo technology was created as an answer to the high pressure musicians have to deal with: lack of time, limited gear availability, loud amplifiers that can't be played at desired volume, as well as bulky and heavy cabinets to carry. In addition, many musicians are more comfortable with their analog amplifier and effect pedals, and don't want to perform using digital modeling systems, which may compromise their playing style and sound.
For these players, Captor X SE offers a “virtual” alternative to traditional miking, using a technology derived from the convolution reverberation, to achieve a degree of realism never experienced previously with simulators. The Captor X SE is the perfect line output everybody should have after their amp section to send the sound directly to a PA or a recorder.
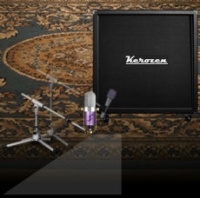
Captor X SE comes with a large library of 32 cabinets and 8 perfectly matched microphones per cabinet. You can also upgrade and add many other cabinets through the Two notes Store - our online virtual cabinet store. The virtual miking is achieved by choosing one cabinet and two microphones, and fine-tuning the position of each microphone in front (or behind) of the cabinet. The Captor X SE allows the user to assume the role of the sound engineer in a professional studio.
The Torpedo Technology: To bring you realism and playing comfort, Two notes has developed a unique technology based on an adaptation of convolution techniques. Starting with the measurement of an actual cabinet + microphone setup, the Captor X SE can accurately reproduce the system as it was measured, as well as the microphone's position in space. In order to take full advantage of these digital algorithms, the highest quality audio design assures a perfect analog-to-digital conversion and a huge dynamic range to retain the ultimate playing experience.
This product has been thoroughly tested in professional studios and stage environments and is the alternative many musicians seek to achieve a professional sound capture of their amplified instruments. Captor X SE will give you the elusive sound of the greatest recording studios and producers, anytime, anywhere.
2. Only A Speaker Simulator?
The Captor X SE is a standalone unit you can bring with you in any situation, whenever silent playing is needed or if you wish to control the level coming out of your cabinet.
The role of the Captor X SE is to replace the following elements of the traditional guitar or bass setup:
- the speaker cabinet
- the microphone
- the microphone preamplifier and certain individual outboard effects
Using our DSP-powered technology, the tools provided within Captor X SE will provide a signal that is akin to traditional guitar/bass miking in a professional studio environment.
The cabinet miking is achieved in 3 steps with Captor X SE:
- Choose a speaker cabinet and a microphone
- Position the microphone inside the virtual environment
- Shape the signal with a DSP-powered Post FX Suite (EQ, ENHANCER, TWIN TRACKER, REVERB)
At each step, Two notes Audio Engineering implements its vast experience to offer the most advanced simulations available and ensure absolute realistic quality both for the musician (in terms of playing feel and reaction) and for the listener (in terms of sound quality). You can load up to 32 Two notes cabinets into Captor X SE. Download the free Torpedo Remote software (Mac OS X and Windows PC) from the Two notes Audio Engineering website, to add or remove cabinets from Captor X SE. There are currently more than 700 Two notes cabinets available in the Two notes Store that you can try in real time and purchase with Torpedo Remote (providing you have a working Internet connection).
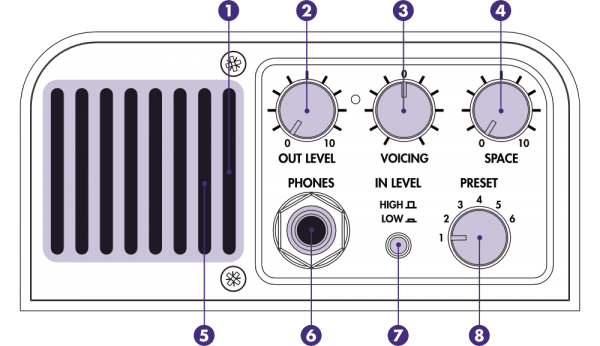
3. The Front Panel
1 - Monitor the input and output levels with the grill LED (red = clipping signal)
2 - Control the level of the headphone and XLR DI outputs
3 - Adjust your global tone depending on tube amp choice and playing environment
4 - Add room space to widen the stereo effect on the headphone and XLR DI outputs
5 - Ensure the vent is kept clear (as this allows air to travel through for cooling)
6 - Connect your headphones here
7 - Set the input level to avoid clipping of the signal
8 - Instantly switch between your favorite presets
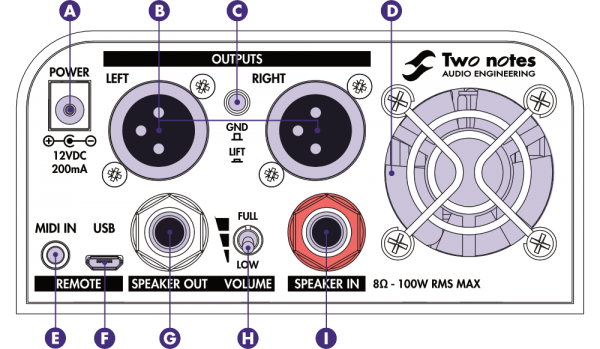
4. The Back Panel
A - Power the unit with the supplied adapter (only use correctly rated power supply)
B - Send STEREO, DUAL MONO or DRY/WET signals through the XLR DI outputs
C - Eliminate unwanted hum caused by ground loops
D - Ensure the fan is kept clear
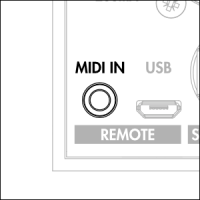
E - Connect the supplied ⅛” jack to MIDI cable adapter for MIDI control
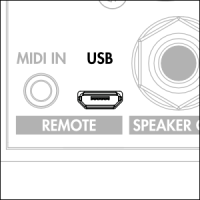
F - Control Captor X SE from a computer (Windows or macOS) via Torpedo Remote (USB cable included)
G - Connect a speaker cabinet here with a ¼” jack SPEAKER cable
H - Choose your cabinet volume level:
- Low position is “Home” level
- Halfway position is “Club” level
- Full position is “Stadium” level
I - Connect your amplifier's output here with a ¼” jack speaker cable (100W RMS max admissible power)
5. Connecting the Captor X SE
Here are the most common use cases when it comes to setting up your Captor X SE and the rest of your equipment.
5.1 Using the attenuator with your cabinet
5.2 Using your amp silently in stereo
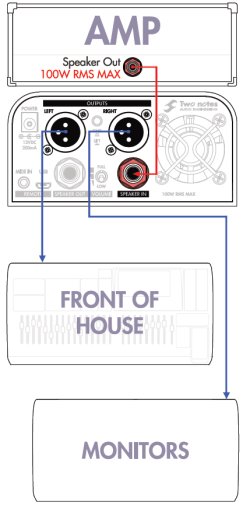
5.3 On stage with Dual/mono routing
5.4 Recording your amp silently
Configuring & Using Captor X SE
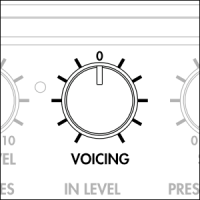
Captor X SE has several quick access knobs to make on-the-fly editing quick and easy. The OUT LEVEL sets the global output level of the unit, VOICING is a fast global EQ, PRESET allows you to have access to 6 presets straight from the unit.
To edit all the parameters of Captor X SE, you will need to use Torpedo Remote on your computer (USB connection) or your mobile device (wireless connection). The 2 next sections will guide you through the process for Captor X SE’s USB and the wireless connectivity options.
1. Torpedo Remote: Your Gateway to Edit All Parameters Inside Captor X SE
1.1 USB connection
1.1.1 Setup with your computer
Download Torpedo Remote from the Torpedo Captor X SE webage. Choose the appropriate version in regards to your OS (Windows or macOS). Once Torpedo Remote is launched, you will be prompted to register the unit to your account or use it as a Guest (we advise registering the unit, for firmware updates, etc.).
Top Tip! Receive exclusive presets and 3 additional cabinets when you register the Captor X SE to your account. The additional 3 free cabinets are only available for the first-hand owner of the Captor X SE. Once the unit has been registered to an account, it is not possible to redeem the 3 free cabinets in another account (in the instance you are a second-hand owner for example).
Once the unit is registered, you will be able to:
- Upload and remove cabinets from the internal memory of the unit using the CABINET MANAGER tab. Please note, removing a cabinet from the unit does not remove it from your license.
- Order and manage your presets via the PRESET MANAGER tab. You will be able to set your first six presets for quick access via the PRESET knob on the front of the unit.
When you are in Guest mode you cannot import cabinets from your personal Two notes license into Captor X SE. In addition, in Guest mode you cannot remove cabinets from Captor X SE.
1.2 Wireless connection
1.2.1 Setup with your phone/tablet
Connection of Captor X SE to your mobile device is actioned via Bluetooth®. Please follow the steps below to wirelessly connect Captor X SE to your compatible phone or tablet:
- Launch the Torpedo Wireless Remote app
- Accept all requested authorizations (they will vary depending on the tablet or phone being used)
- The connection window should show up, please follow the on screen instructions
- Input the pin code to pair Captor X SE and your mobile device. The pin code is a six digit number starting with 000 followed by the last 3 numbers of your Captor X SE's serial number.
TROUBLESHOOTING:
If after inputting the pin code Captor X SE does not show up in the “Devices” menu in Torpedo Wireless Remote, you will need to unpair Captor X SE from the list of devices that are paired via the Bluetooth® menu of your phone. Once you have done this, please repeat the procedure detailed above. Please bear in mind, some phones require Location Services (GPS) activated to allow Bluetooth® pairing. Try activating your Location Services if you find yourself unable to pair with just Bluetooth® activated on your phone or tablet.
1.3 Virtual Cabinet / IR Loader mode
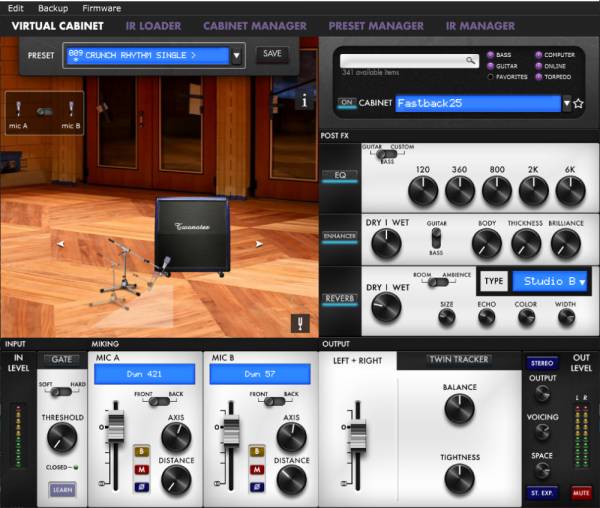
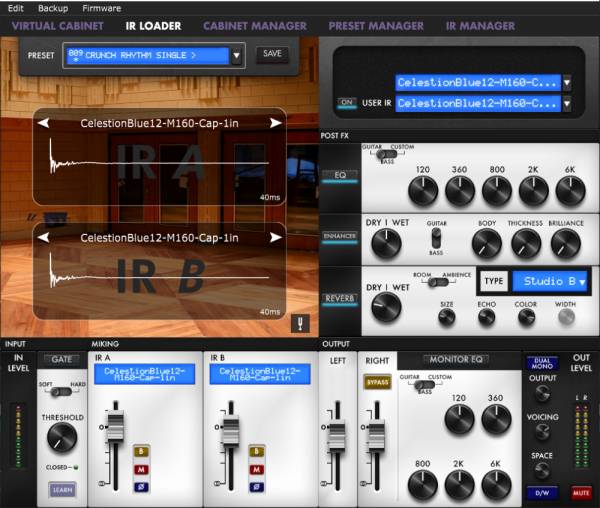
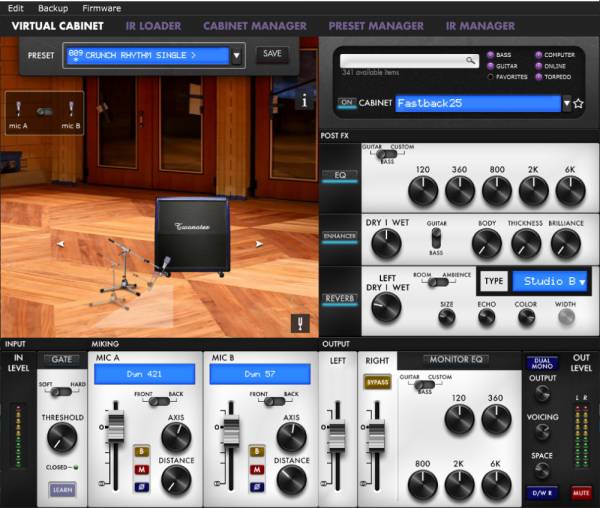
Control every editable parameter in Captor X SE with Torpedo Remote. The software is built around 2 environments: the Virtual Cabinet and IR Loader modes.
The Virtual Cabinet mode has been engineered to command Two notes DynIR Virtual Cabinets. The IR Loader mode can be used to load 3rd party IRs in .wav format. Both modes feature the same Post FX options and routing for the XLR outputs.
2. Creating a Preset With a DynIR Virtual Cabinet
A preset contains:
- A cabinet
- Two (selected from a choice of 8) microphones and their positions within the room
- Post FX Settings (EQ, ENHANCER, REVERB & TWIN TRACKER)
- Levels for the Left and Right outputs
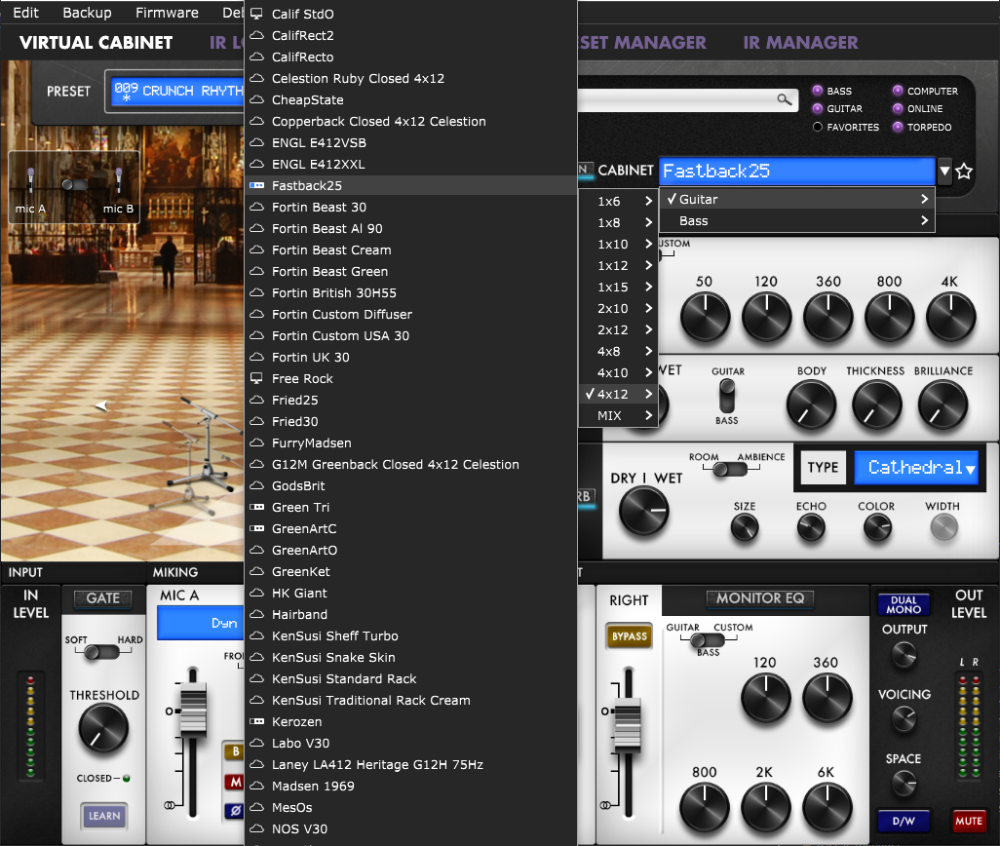
2.1 Cabinet choice
2.2 Microphone choice
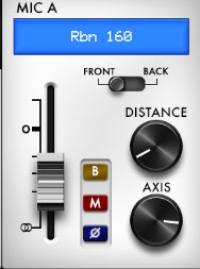
All Two notes Virtual Cabinets come with an individual collection of 8 microphones specifically matched to the cabinet. Access the list of microphones by clicking the blue window above the fader of the mic channel. Microphones are described by their technology: DYN is a dynamic microphone, CND is a condenser microphone and RBN is a ribbon mic.
2.2.1 Positioning
2.2.2 Mic A / Mic B
2.3 Shaping your tone
Captor X SE features a custom-engineered suite of tools to polish your sound before feeding a Public Address system (PA) or audio interface.
2.3.1 Noise gate
2.3.2 EQ
Guitar mode: 120Hz, 360Hz, 800Hz, 2000Hz, 6000Hz (centre frequency of each band from the lowest to the highest).
Bass mode: 50Hz, 120Hz, 360Hz, 800Hz, 4000Hz (centre frequency of each band, from the lowest to the highest)
Custom mode: the bands are as follows:
- Low Cut: low cut, 10 - 500Hz (12 dB per octave slope)
- Low: low shelf, 60 - 240 Hz, +/-20dB
- LMid: peak, 180 - 720 Hz, +/-20dB
- Mid: peak, 400 - 1600 Hz, +/-20dB
- HMid: peak, 1 - 4 kHz, +/-20dB
- High: peak, 3 - 12kHz, +/-20dB
2.3.3 Enhancer
 | The ENHANCER is a combination of dynamic and tone-shaping tools especially tailored for your guitar and/or bass. |
DRY/WET allows you to balance the cab sim signal and the processed signal from the ENHANCER. At zero (knob turned all the way down), only the cab sim signal is heard. At the halfway position, the level of the cab sim signal is equal to the level of the ENHANCER. At full (knob turned all the way up), you are only hearing the signal processed by the ENHANCER.
BODY is a compressor with a high-pass filter (set at 100hz in GUITAR mode and 150hz in BASS mode). It only affects the low-mids (and above) frequency content of the signal. BODY will render your tone fuller and more present. THICKNESS and BRILLIANCE emphasize the low end and high end of the tone, respectively.
THICKNESS is centered at 400 Hz in GUITAR mode and 150 Hz in BASS mode.
BRILLIANCE is centered at 1500hz in GUITAR mode and 2000hz in BASS mode. Both THICKNESS and BRILLIANCE have a gain range of 0 to +15dB.
2.3.4 Reverb
When using the Custom Reverb, you have access to the following parameters:
- DRY/WET: adjusts the level of the incoming signal and the reverb. With the knob at halfway, both levels are equal
- SIZE: adjusts the size of the room - from tiny to gigantic
- ECHO: adjusts the level of the reflections
- COLOR: adjusts the tone of the reverb from darker to bright
There is also a switch to change the acoustic characteristics of the reverb:
- ROOM: plenty of early reflections with a bright sound.
- AMBIENCE: subtle early reflections and a bass-heavy response.
2.4 Importing cabinets into Captor X SE
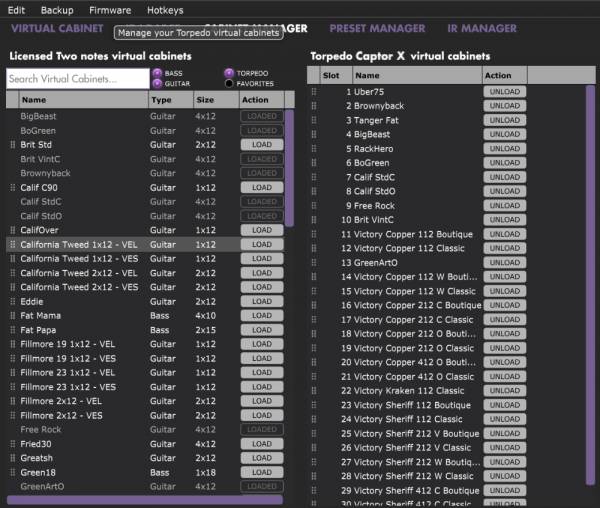
To import or remove cabinets in Captor X SE, you need to register your Captor X SE via Torpedo Remote to your Two notes account. You cannot import or remove cabinets when using Torpedo Remote in Guest mode. Use the CABINET MANAGER tab to manage the Two notes Virtual Cabinets in Captor X SE. The Left panel indicates the cabinets available on your computer. The right panel shows the Virtual Cabinets stored in the unit.
The Captor X SE comes with its internal memory for Virtual Cabinets at full capacity with 32 DynIR cabinets already loaded. To import a cabinet that is stored in your computer to the unit, you need to free space by unloading one or more cabinets located on the right panel. (Note: The cabinet is only removed from Captor X SE; it will still be available in your license, and you can re-import it at any time with Torpedo Remote). Drag and drop any cabinets from the left panel (your computer) to the right panel for the import into Captor X SE, or click the load button to move the cabinet from the left panel to the right panel.
In CABINET MANAGER, you can rearrange the order of the DynIR cabinets in Captor X SE. Select one cabinet, and move it up and down the list to change its designated slot.
2.5 Saving and loading presets
 | The preset rack at the top of the VIRTUAL CABINET screen lets you save and load presets in Captor X SE. There are 128 memory slots for presets. |
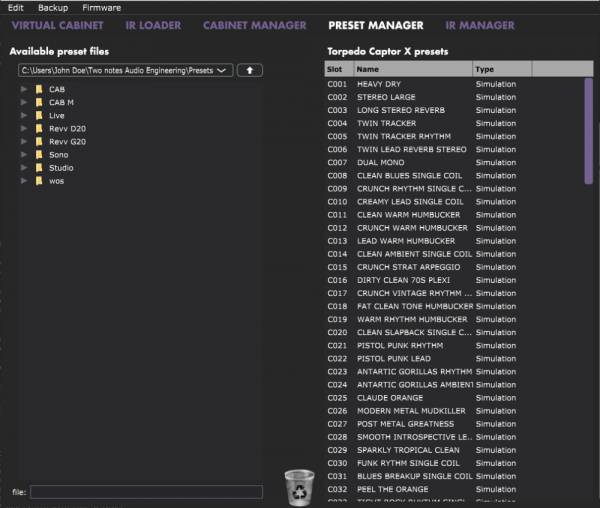
Use the PRESET MANAGER tab to manage the presets stored on Captor X SE. The Left panel indicates the preset folders on your computer. The right panel shows the presets stored in the unit.
Move the presets up and down to change their order in Captor X SE. The first 6 slots are accessible by the PRESET knob at the front of the unit. Remove presets by dragging and dropping them in the bin below. Drag and drop presets from the left panel (your computer) to the right panel (internal memory of the Captor X SE).
3. Creating a preset with a 3rd-party IR
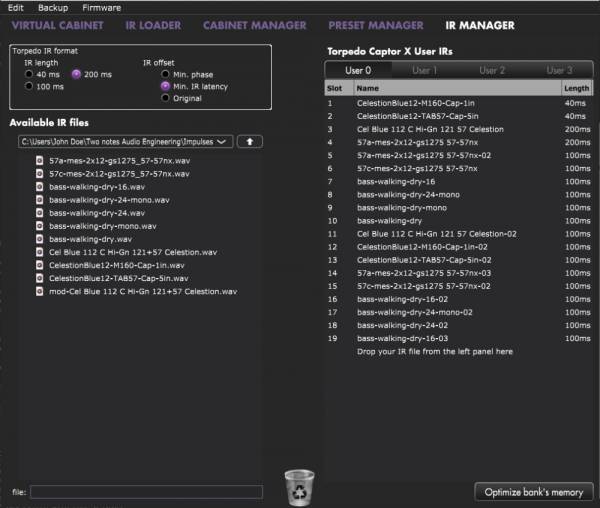
The Captor X SE can load up to 512 IRs. All imports of IRs are actioned via Torpedo Remote through the IR MANAGER tab (via computer only). Upon upload into the Captor X SE, the IR’s length can be set to 20, 40, 100 or 200 ms long. If the IR is longer it will be shortened by Torpedo Remote to the selected length; if it is shorter it will be extended (filled with zeros) to the selected length.
The internal memory has the following allowances regarding the length of the IR:
- 512 slots for 20ms IRs, in 4 banks of 128 slots
- 256 slots for 40ms IRs, in 4 banks of 64 slots
- 84 slots for 100ms IRs, in 4 banks of 21 slots
- 44 slots for 200ms IRs, in 4 banks of 11 slots
3.1 IR choice
To use custom made IRs with Torpedo BlendIR or 3rd-party IRs, you first need to select the IR Loader mode in Torpedo Remote. This window features a similar layout to the CABINET MANAGER pane in Torpedo Remote. Here, you can load one IR per channel, and have full control over each channel via dedicated mute, bypass, phase, and volume controls. In addition, you can further refine your tone via the DSP-powered EQ, ENHANCER, TWIN TRACKER and REVERB Post FX.
3.2 Importing IRs in the Torpedo Captor X SE
To import or remove 3rd-party IRs in Captor X SE, you first need to register your Captor X SE to your Two notes account via Torpedo Remote. You cannot import or remove 3rd-party IRs when using Torpedo Remote in Guest mode. To load a file into Captor X SE’s internal memory, use the IR Manager window.
The left panel highlights the files stored on your computer; here, you can browse the folders where you have stored your IRs. The right side represents the IR files that are loaded in the Torpedo Captor X SE. You can drag and drop the IRs from the computer (left) to Captor X SE (right). If you wish to free memory slots, you can drag and drop the IRs to the bin at the bottom. (this does not delete the IR from your collection, only from Captor X SE’s internal memory).
Within this window, you have access to some useful options to modify the IR file selected for transfer:
- IR length: increasing the IR length will improve the resolution of the Torpedo processing (more precision will lead to better accuracy in the low end). Please note that a 40ms IR will take 2 slots in your Captor X SE' s internal memory.
- IR offset: you have access to 3 options that will change the way the IR file will be processed:
- Min Phase: an algorithm will move the samples in the file so it will sound in phase with any other IR file (provided you use that function to transfer the other files as well).
- Min. IR Latency: the file is cut so there is no silence before the first sample, this can lead to a change in the sound but your latency will be minimal.
- Original: the samples in the file remain untouched. You may experience phase cancellation issues with mixing it with other IR files.
It is possible to use IRs that are stored on your computer's hard drive directly. When doing so, you will enter Preview mode. You will only be able to use one IR at a time, in IR slot A. You will be able to save the preset on your computer using this IR, but not to the Torpedo. To have access to the full Torpedo processing when using IRs, import the files first directly into Captor X SE.
4. Output Routing
4.1 STEREO Routing
In STEREO, both outputs send the same cab sim signal. In STEREO mode, you retain access to the TWIN TRACKER and all Stereo REVERB processing.
4.1.1 The TWIN TRACKER
The TWIN TRACKER features 2 parameters:
- BALANCE: sets the level of the TWIN TRACKER. If turned all the way down, you will only hear the left output of the Torpedo Captor X SE.
- TIGHTNESS: sets the delay of the virtual guitarist. The maximum latency can reach 70 ms. (if you plug only the right XLR output and notice an enormous amount of latency while playing, check that you are not in the STEREO routing mode with the TWIN TRACKER instantiated and the TIGHTNESS parameter is set to maximum.
Please note, the TWIN TRACKER is only available in STEREO routing. When on, the WIDTH of the REVERB is automatically set to 100%.
4.1.2 Stereo REVERB
In stereo, you can set the stereo size of any room simulation with the WIDTH parameter: from mono (knob turned all the way to the left) to full stereo (knob turned all the way to the right).
4.1.3 SPACE knob assignement
Here are the different assignment possibilities:
4.2 DUAL MONO Routing
This routing option allows you to send independent signals from each XLR output; you will be able to set a different EQ and DRY/WET REVERB level on the right XLR output. The layout of the Torpedo Remote will show you an additional EQ next to the right output fader.
4.2.1 Additional EQ
4.2.2 DRY/WET REVERB setting
You can set 2 different DRY/WET REVERB levels for each XLR output. The parameter in the REVERB rack is only editable via Torpedo Remote. Depending on the SPACE knob assignment, the DRY/WET in the REVERB rack will affect either the Left or the Right XLR output.
4.2.3 SPACE knob assignement
It is possible to set different behaviors to the SPACE Knob:
4.2.4 "BYPASS Torpedo Processing"
5. TUNER
6. VOICING knob
7. MIDI control
8. Flashing red LED
Captor X SE is equipped with a red LED to signal the following events or issues with your Captor X SE:
- Clipping of the input or the output stages of the Captor X SE
- File transfer with the Remote software
- System errors, unrelated to the incoming signal
8.1 Clipping the input or output
It is possible to overload the input or output stages of the Captor X SE’s audio processor. The red LED will then light up in accordance with the signal being fed to the Captor X SE's built-in DSP. Start by turning the OUT LEVEL down. If the LED is still lighting up when you play, the input of the audio processor is clipping. Engage the IN LEVEL switch see front panel image, element N°7 to the LOW position. It activates a -15dB pad on the input signal. If the LOW switch is engaged and you are still clipping the input stage of the Captor X SE, turn down the volume of the amp until the red LED turns itself off. For surgical control, within Torpedo Remote, the input and output levels can be monitored via the dedicated VU meters.
8.2 Communication with Remote
When a file transfer is occurring between Captor X SE and the Torpedo Remote desktop application, the red LED acts as a progress indicator: it flashes when a certain percentage of the data is actually sent. This allows you to check if the transfer is occurring normally, or stalled. This happens when transferring virtual cabinets, IR files, and firmware files (during firmware updates).
8.3 System error
The Torpedo Captor X SE red LED flashes when an error is detected inside the firmware of the unit.
To differentiate system error LED flashes from input or output clipping errors, turn off your amp, and disconnect it from Captor X SE. If Captor X SE keeps flashing red light while being unplugged from the amp, this shows a system error. You can decipher the flashes with this article: LED report. If you encounter any system errors, please submit a ticket on the helpdesk with the transcription of the LED report.
User Cases
1. Using the attenuator
The attenuator allows you to dim the volume level of the cabinet connected to the SPEAKER OUT of Captor X SE. The use of a cabinet is not mandatory with Captor X SE as it features a built-in load box; your amp is therefore provided with a safe load at all times when connected to the SPEAKER INPUT.
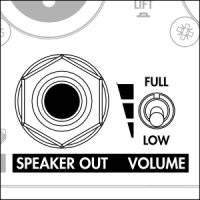 | To use the attenuator, connect a cabinet to the SPEAKER OUT of the Captor X SE. You can then activate the attenuator with the 3-way Volume Level switch. |
You have 3 settings for the Volume Level of the cabinet:
- FULL: the attenuator is bypassed. The full power delivered by the amp is passed on to the cabinet and the impedance seen by the amp is that of the cabinet. In this case, use the amp's speaker output that matches the cabinet (for example: for a 16 Ohms cabinet, use the 16 Ohms output of your amplifier regardless of the impedance of the Captor X SE).
- “HALFWAY” (unlabelled): the attenuator is activated and the level of your cabinet’s output is dimmed by 20dB. In this case, the amp is seeing the impedance of the Captor X SE. This level is considered to be very useful when using your cabinet on stage.
- LOW: The attenuator is fully activated and the level is reduced by 38dB - in this case, the amp is seeing the impedance of Captor X SE. This level is designed to allow you to play your tube amp at home. In most situations this will fully attenuate your amplifier, but some signal may still pass to your cabinet.
2. Captor X SE at home
2.1 Silent use
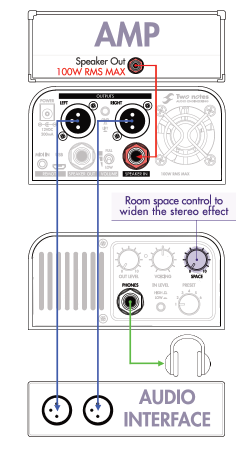
The Torpedo Captor X SE is a reactive load box. This allows you to play your tube amp without using a cabinet - perfect for recording or practicing at any time of the day or night. For this scenario type, connect your amp to the SPEAKER IN of Captor X SE and listen to your tube amp via the headphone output, or via monitors connected to the dual XLR DI outputs.
2.2 With a cabinet
With the attenuator, it is possible to reduce / attenuate the level of your physical cabinet suitable for home playing by up to 38dB. For this scenario, connect your cabinet to the SPEAKER OUT of Captor X SE. Please note, none of the DSP-powered effects (ENHANCER, REVERB, TWIN TRACKER, EQ) or cabinet emulation within the unit can be heard through the cabinet. To monitor with effects and our class-leading DynIR cabinet emulation, please connect the XLR DI outputs to an audio interface or a mixing desk to listen to the audio treatment facilitated via Captor X SE through a standard monitoring source.
3. Captor X SE on stage
3.1 Using the DUAL MONO routing
With Torpedo Remote, you can set Captor X SE to send 2 separate signals from the dual XLR outputs. First, select the DUAL MONO routing option, indicated as a purple button above the Output level knob (see section 4.4 for output routings). In this mode, the signal passing out of each of the XLR outputs can be configured with different EQ and a different REVERB settings (See section 4.4.2 for a detailed breakdown of all options). Top Tip: Did you know you can use the DUAL MONO routing option to send one specifically-processed signal to Front Of House and an alternative signal to stage monitors or a personal IEM source. Please be advised however that the Voicing knob impacts both outputs.
3.2 With a cabinet
With the built-in attenuator, it is possible to dim the level of your physical cabinet. The halfway position is suitable for stage levels offering 20dB of attenuation. In this instance, your cabinet will be an added source to your stage monitoring rig. To configure this setup, first connect your cabinet to the SPEAKER OUT of Captor X SE and then select the middle setting of the 3-way attenuation toggle switch. None of the DSP-powered effects (ENHANCER, REVERB, TWIN TRACKER, EQ) or cabinet emulation within the unit can be heard through the cabinet when configured in this manner.
4. Captor X SE in the studio
4.1 Using "BYPASS Torpedo Processing"
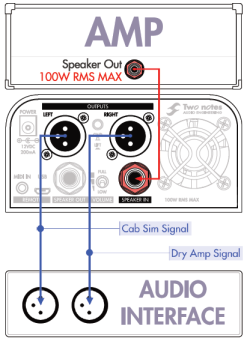
Captor X SE’s DUAL MONO routing also allows you to send a dry signal of the incoming amp signal through the right XLR output. To bypass the DSP-powered Torpedo processing on this output, Click on the BYPASS button above the fader of the RIGHT channel. The dry amp signal will allow you to add the cabinet simulation later in your mix with the bundled Wall of Sound plugin.
With Captor X SE, You are able to record two different amp signals simultaneously in your DAW using the DUAL MONO routing mode: the full Torpedo cab sim signal via the LEFT XLR output of Captor X SE, and the dry amp signal from the RIGHT XLR output.
4.2 With a cabinet
All outputs on Captor X SE will send signals simultaneously for complete hookup flexibility. Connect your favorite physical cabinet and mic it to record 3 different signals at the same time (i.e. the physical cabinet, the Dry DI signal and the Wet Torpedo-processed signal). For added convenience, use the different attenuation Level settings to switch-up the level of the cabinet on the fly.
5. Want more cabs?
5.1 Two notes cabinets
You can preview any cabinets not tied to your license when using the Desktop variant of Torpedo Remote with the ONLINE button ticked (located next to the cabinet search bar).
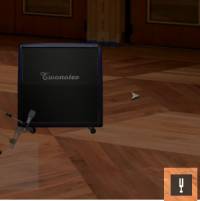
When browsing cabinets, you will see 3 different icons in front of the cabinet names:
When previewing an owned cabinet that is available on your computer, Torpedo Remote needs to load the cabinet first so you can edit all the parameters. As you are previewing, you will only have access to one microphone for the cabinet. To access all editable parameters, the cabinet will need to be transferred to the Captor X SE’s internal memory. In the Preview scenario, audio is still passing through the unit, so you can use Captor X SE as you would normally.
| | This box allows you to transfer the cabinet you are previewing from your computer to your Captor X SE (providing you have sufficient memory slots available on your unit). |
When you are previewing a cabinet that you do not own, random silences are inserted and you only have access to one mic to preview the cabinets.
For your security, no billing or information concerning the payment method is stored within Torpedo Remote.
5.2 .tur files
.tur files are a proprietary format created with the Two notes Audio Engineering Torpedo BlendIR software. The software is available for download from this page. With Torpedo BlendIR you are able to use the Torpedo technology to capture the sound signature of your own cabinet and microphone.
To load this file type into Captor X SE, place it in the default Impulse directory or select the directory containing the files through Torpedo Remote (actioned via the dedicated menu). You can then load the files into Captor X SE via the Memory Manager or directly listen to them through the main Remote window.
Please note, .tur files do not have facilities akin to the DynIR format, specifically in relation to microphone positioning parameters.
Setup Manager
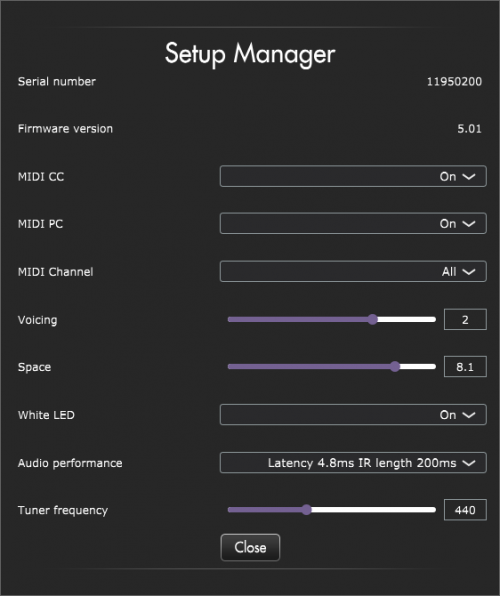
This section of Torpedo Remote sets hardware preference parameters of Captor X SE including audio latency, MIDI mapping, the white LED indicators on the front panel of the unit and more. You will also find the serial number of the unit, as well as the current instantiated firmware version. Here, you can also define the reference point for the TUNER - by default, it is set at 440 hz.
1. MIDI
Captor X SE has been specified to accept both preset change commands (Program Change or PC) and parameter change commands (Control Change or CC), providing immediate access to interact with all parameters on the unit from any kind of standard MIDI controller - like a MIDI pedalboard or a keyboard. Within the setup manager window, you are able to configure the following:
- Define whether Captor X SE will receive Program Change and/or Control Change commands. For example, if you plan to use the preset switching (PC) only, the CC receive can be set to Off.
- Define the MIDI channel that the unit is set to receive. Here you can choose to receive all channels, which is useful when you don’t know exactly on which channel the commands are originating from.
- With the MIDI monitor, check the correct reception of the commands by Captor X SE.
For further information, See Section 7.1 MIDI Mapping for a comprehensive breakdown of possible Program Change and Command Change MIDI messages.
2. Audio Performance
The indicated latency dictates the latency of the whole device, measured from the input to the output. Even at the highest setting, the latency is low enough not to be noticed when playing. Please bear in mind, latency across your rig is cumulative and adds up when using several digital products; this ultimately leads to a point where it becomes noticeable. In that case, lowering this setting can prove useful.
- Latency is 1.2ms with IR Length at 20ms
- Latency is 2.2ms with IR Length at 40ms
- Latency is 3.5ms with IR Length at 100ms
- Latency is 4.8ms with IR Length at 200ms
Impedance selection guide
The effective impedance of the ensemble “amp + Torpedo Captor X + speaker cabinet (ie, the impedance actually seen by the amplifier) depends on the position of the VOLUME LEVEL switch:
| My Situation | Volume Level Setting | Impedance Seen by the Amp |
| I have a speaker cabinet connected to the SPEAKER output | Volume Level on LOW and halfway position | Impedance of the Captor X |
| I have a speaker cabinet connected to the SPEAKER output | Volume Level on FULL position | Impedance of the cabinet |
It is implied throughout the manual that the amp and the Captor X have matching impedance (you are using the matching speaker output of your amp to connect to the Captor X). In that setup, when the Volume Level switch is on FULL, if your cabinet has a different impedance than the Captor X, you will have an impedance mismatch. If you want or need to mismatch the impedance of the amp and load, we recommend the following:
- Only go for small mismatches: 4 vs 8, 8 vs 16. But not 2 vs 8 or 16, 4 vs 16.
- Play your amp at low level, at least at first. Monitor the behavior of the amp, the tone coming out of it, the color of the output tubes. If anything seems wrong, stop playing. In short, follow even more carefully the Recommendation on the proper use of a load box with a tube amplifier you'll find in the user manual of your Torpedo product.
This article about Impedance mismatch outlines all the precautions to take in making this match as safe as possible.
Transistor (solid-state) amps are designed differently, and usually have a “minimum load” rating rather than expecting an exact impedance match. This means you can use any speaker or load box with an impedance equal or greater than this rating. A speaker output rated “8 ohms min” can safely be used with 8 or 16 ohms loads.
IMPORTANT NOTE: when the Volume Level switch is on FULL, the internal loadbox is disconnected as soon as you plug a cable in the SPEAKER output of the Captor X. The amplifier connected to the Captor X is no longer connected to its internal loadbox, but to whatever is connected to the other end of this cable. As a result, if you connect a cable in the SPEAKER output of the Captor X with nothing else connected to the other end, your amplifier will not be connected to a proper load.
Specifications
1. MIDI
1.1 MIDI cable
The Torpedo Captor X SE is supplied with a MIDI 5 pin DIN type A connector to TRS jack 3.5 mm (1/8“) connector. The wiring of the cable complies with the standard set by The MIDI Manufacturers Association (MMA) for use of TRS Connectors with MIDI Devices.
The wiring is as follows:
- Tip is connected to pin N°5
- Ring is connected to pin N°4
- Sleeve is connected to pin N°2
For all information concerning the standard set by the MMA, visit their website.
1.2 Program Change (PC)
Each preset in Captor X SE has a single program number. The preset 001 of the machine is triggered by MIDI PC 1; you can trigger the 128 preset locations with MIDI PC 1 to MIDI PC 128. This way, it is possible to instantly access any preset by sending the appropriate MIDI PC number.
1.3 Control change (CC)
The following table indicates the Control Change numbers for every parameter within Captor X SE, as well as their range and behavior.
| Parameter | CC# | Range | Behavior |
|---|---|---|---|
| Simulation & IR Loader modes | |||
| Cab/mic | |||
| On/Off | 6 | 0-1 | 0 = Off ; 1 = On |
| Unused | 7 | 0-1 | 0 = Off ; 1 = On |
| Cab | 8 | 0-x | 0 = Cab #0 ; 1 = Cab #1… |
| File A | 9 | 0-x | 0 = File #0 ; 1 = File #1… |
| File B | 10 | 0-x | 0 = File #0 ; 1 = File #1… |
| Folder A | 11 | 0-3 | 0= User 0 ; 1= User1; 2 = User 2 ; 3 = User 3 |
| Folder B | 12 | 0-3 | 0= User 0 ; 1= User1; 2 = User 2 ; 3 = User 3 |
| Mic A | 13 | 0-7 | 0 = Mic #1 ; 1 = Mic #1… |
| Distance A | 14 | 0-127 | 0 = 0% ; 63 = 50% ; 127 = 100% |
| Center A | 15 | 0-127 | 0 = 0% ; 63 = 50% ; 127 = 100% |
| Position A | 16 | 0-1 | 0 = Back : 1 = Front |
| Level A | 35 | 0-107 | 0 = -95dB ; 95 = 0dB ; 107 = 12dB |
| Phase A | 36 | 0-1 | 0 = Normal ; 1 = Invert |
| Mute A | 37 | 0-1 | 0 = Off (no mute) ; 1 = On (mute) |
| Mic B | 38 | 0-7 | 0 = Mic #1 ; 1 = Mic #1… |
| Distance B | 39 | 0-127 | 0 = 0% ; 63 = 50% ; 127 = 100% |
| Center B | 40 | 0-127 | 0 = 0% ; 63 = 50% ; 127 = 100% |
| Position B | 41 | 0-1 | 0 = Back : 1 = Front |
| Level B | 42 | 0-107 | 0 = -95dB ; 95 = 0dB ; 107 = 12dB |
| Phase B | 43 | 0-1 | 0 = Normal ; 1 = Invert |
| Mute B | 44 | 0-1 | 0 = Off (no mute) ; 1 = On (mute) |
| Bypass A | 51 | 0-1 | 0 = Off (Mic on) ; 1 = On (Mic Bypass) |
| Bypass B | 52 | 0-1 | 0 = Off (Mic on) ; 1 = On (Mic Bypass) |
| EQ | |||
| On/Off | 17 | 0-1 | 0 = Off ; 1 = On |
| Mode | 18 | 0-2 | 0 = Guitar : 1 = Bass ; 2 = Custom |
| Gain: Low | 19 | 0-40 | 0 = -20dB ; 20 = 0dB ; 40 = 20dB |
| Gain: Low Mid | 20 | 0-40 | 0 = -20dB ; 20 = 0dB ; 40 = 20dB |
| Gain: Mid | 21 | 0-40 | 0 = -20dB ; 20 = 0dB ; 40 = 20dB |
| Gain: High Mid | 22 | 0-40 | 0 = -20dB ; 20 = 0dB ; 40 = 20dB |
| Gain: High | 23 | 0-40 | 0 = -20dB ; 20 = 0dB ; 40 = 20dB |
| Freq: Low Cut | 45 | 0-127 | Specific mapping to Hz |
| Freq: Low | 46 | 0-127 | Specific mapping to Hz |
| Freq: Low Mid | 47 | 0-127 | Specific mapping to Hz |
| Freq: Mid | 48 | 0-127 | Specific mapping to Hz |
| Freq: High Mid | 49 | 0-127 | Specific mapping to Hz |
| Freq: High | 50 | 0-127 | Specific mapping to Hz |
| Level | |||
| Preset Level | 24 | 0-107 | 0 = -95dB ; 107 = +12dB |
| Preset Level R | 86 | 0-107 | 0 = -95dB ; 107 = +12dB |
| Reverb | |||
| On/Off | 25 | 0-1 | 0 = Off ; 1 = On |
| Preset | 26 | 0-7 | 0 = Room #0 ; 1 = Room #1… |
| Dry/Wet | 27 | 0-127 | 0 = 0% ; 63 = 50% ; 127 = 100% |
| Dry/Wet R | 72 | 0-127 | 0 = 0% ; 63 = 50% ; 127 = 100% |
| Size | 53 | 0-127 | 0 = 0% ; 63 = 50% ; 127 = 100% |
| Echo | 54 | 0-127 | 0 = 0% ; 63 = 50% ; 127 = 100% |
| Color | 55 | 0-127 | 0 = 0% ; 63 = 50% ; 127 = 100% |
| Type | 56 | 0-1 | 0 = Room ; 1= Ambience |
| Width | 57 | 0-127 | 0 = 0% ; 63 = 50% ; 127 = 100% |
| Noise Gate | |||
| On/Off | 58 | 0-1 | 0 = Off ; 1 = On |
| Mode | 59 | 0-1 | Soft = Off ; Hard = On |
| Threshold | 60 | 0-80 | 0 = -80dB ; 80 = 0dB |
| Enhancer | |||
| On/Off | 61 | 0-1 | 0 = Off ; 1 = On |
| Instrument | 62 | 0-1 | 0 = Guitar ; 1 = Bass |
| Body | 63 | 0-127 | 0 = 0% ; 63 = 50% ; 127 = 100% |
| Thickness | 44 | 0-127 | 0 = 0% ; 63 = 50% ; 127 = 100% |
| Brilliance | 65 | 0-127 | 0 = 0% ; 63 = 50% ; 127 = 100% |
| Dry/Wet | 66 | 0-127 | 0 = 0% ; 63 = 50% ; 127 = 100% |
| Twin Tracker | |||
| On/Off | 67 | 0-1 | 0 = Off ; 1 = On |
| Tightness | 68 | 0-127 | 0 = 0% ; 63 = 50% ; 127 = 100% |
| Balance | 69 | 0-127 | 0 = 0% ; 63 = 50% ; 127 = 100% |
| Output | |||
| Mode | 70 | 0-2 | 0 = Stereo ; 1 = Dual Mono ; 2 = Dual Mono, R Bypass) |
| Space Pot Assign | 71 | 0-1 | Stereo: 0 = Stereo Expander ; 1 = Dry/Wet Dual Mono: 0 = Dry/Wet ; 1 = Dry/Wet L ; 2 = Dry/Wet R Dual Mono, R Bypass: 0 = Dry/Wet |
| EQ R | |||
| On/Off | 73 | 0-1 | 0 = Off ; 1 = On |
| Mode | 74 | 0-2 | 0 = Guitar : 1 = Bass ; 2 = Custom |
| Gain: Low | 75 | 0-40 | 0 = -20dB ; 20 = 0dB ; 40 = 20dB |
| Gain: Low Mid | 76 | 0-40 | 0 = -20dB ; 20 = 0dB ; 40 = 20dB |
| Gain: Mid | 77 | 0-40 | 0 = -20dB ; 20 = 0dB ; 40 = 20dB |
| Gain: High Mid | 78 | 0-40 | 0 = -20dB ; 20 = 0dB ; 40 = 20dB |
| Gain: High | 79 | 0-40 | 0 = -20dB ; 20 = 0dB ; 40 = 20dB |
| Freq: Low Cut | 80 | 0-127 | Specific mapping to Hz |
| Freq: Low | 81 | 0-127 | Specific mapping to Hz |
| Freq: Low Mid | 82 | 0-127 | Specific mapping to Hz |
| Freq: Mid | 83 | 0-127 | Specific mapping to Hz |
| Freq: High Mid | 84 | 0-127 | Specific mapping to Hz |
| Freq: High | 85 | 0-127 | Specific mapping to Hz |
| General - Preset | |||
| Mode | 34 | 0-2 | 0 or 1 = Simulation ; 2 = IR Loader |
| General | |||
| Out Level | 87 | 0-107 | 0 = -95dB ; 95 = 0dB ; 107 = 12dB |
| Mute | 88 | 0-1 | 0 = Off (no mute) ; 1 = On (mute) |
| Bypass | 89 | 0-1 | 0 = Bypass ; 1 = On |
| Preset | 90 | 0-127 | 0 = Preset #1 ; 1 = Preset #2… |
| Voicing | 91 | 0-127 | 0 = 0% ; 63 = 50% ; 127 = 100% |
| Space | 92 | 0-127 | 0 = 0% ; 63 = 50% ; 127 = 100% |
2. List of included cabinets
Out-the-box, Captor X SE comes pre-loaded with a first-rate collection of 32 expertly curated vintage-inspired DynIR™ virtual cabinets.
| GUITAR cabinets | |
| Designation | Inspired by |
| BLACKJEN | DynIR Capture from Hop Pole Studios inspired by a Fender® Twin Amp Guitar cabinet loaded with Jensen® Fender® Special speakers |
| VIBRO UTAH | DynIR Capture from Two notes inspired by a Fender® Vibrolux Blackface Guitar cabinet loaded with Fender® 12” Utah speakers |
| DARKPRINZ | DynIR Capture from Black Bear Studio inspired by a Fender® Princeton Blackface Guitar cabinet loaded with Oxford® 10“ 10J4-3 speakers |
| CROC SKIN | DynIR Capture from Diffusion Audio Inc inspired by a Selmer® Zodiac Twin 30 Guitar cabinet loaded with Celestion® 12” G12 T731 speakers |
| GREENARTC | DynIR Capture from Two notes inspired by a Marshall® 2033 Guitar cabinet loaded with Celestion® 12“ G12H-30 speakers |
| ARGENTUM | DynIR Capture from Diffusion Audio Inc inspired by a Silvertone® 1449 Amp in Case Guitar cabinet loaded with Jensen® 6”x9“ 69J11 speakers |
| DELUXE | DynIR Capture from Mirador inspired by a Fender® Deluxe Reverb Guitar cabinet loaded with Jensen® 12” P12N Alnico Vintage speakers. |
| PURPLEHAZE | DynIR Capture from Hop Pole Studios inspired by a Marshall® 1982B Tall Box Guitar cabinet loaded with Celestion® 12“ Heritage G12M speakers |
| BLONDE 63 | DynIR Capture from Two notes inspired by a Fender® Bassman '63 Blonde Tolex Piggy Back Guitar cabinet loaded with Oxford® 12” 12M6 XG875 speakers |
| GREATSH | DynIR Capture from Mirador inspired by a Gretsch® 6159 2×12 Combo Guitar cabinet loaded with Jensen® 12“ C12-PS Special Design speakers |
| TWEED 212 | DynIR Capture from Noise Factory inspired by a Fender® Extension 2×12 Guitar cabinet loaded with Jensen® 12” C12N speakers |
| SPARKLY | DynIR Capture from Black Bear Studio inspired by a Fender® Champ Silverface Guitar cabinet loaded with Jensen® 8“ C8R speakers |
| ANGL 60C | DynIR Capture from Two notes inspired by an Engl® E412SS Guitar cabinet loaded with Celestion® 12” V12-60 speakers |
| BRIT 60A | DynIR Capture from Two notes inspired by a Marshall® 1960A Guitar cabinet loaded with Celestion® 12“ G12T-75 speakers |
| BRIT 65C | DynIR Capture from Two notes inspired by a Marshall® 1965A Guitar cabinet loaded with Celestion® 10” G10L-35 speakers |
| BRIT STD | DynIR Capture from Two notes inspired by a Marshall® 1936 Guitar cabinet loaded with Celestion® 12“ G12T-75 speakers |
| CALIF STDO | DynIR Capture from Two notes inspired by a Mesa Engineering® Rectifier 4×12 Standard Guitar cabinet loaded with Celestion® 12” Vintage 30 speakers |
| FREE ROCK | DynIR Capture from Two notes inspired by a VHT® Deliverance 4×12 Guitar cabinet loaded with Eminence® 12“ P-50-E speakers |
| NOS V30 | DynIR Capture from Two notes inspired by a NOS® V30 Guitar cabinet loaded with Celestion® 12” Vintage 30 speakers |
| SILVER77 | DynIR Capture from Two notes inspired by a Fender® Twin Reverb Guitar cabinet loaded with JBL® 12“ D120F Orange Frame speakers |
| TANGER 30O | DynIR Capture from Two notes inspired by an Orange® Vintage 4×12 Guitar cabinet loaded with Celestion® 12” G12H speakers |
| VOICEMODRN | DynIR Capture from Two notes inspired by a Vox® V212H Guitar cabinet loaded with Celestion® 12“ Alnico Blue speakers |
| BDELUXE | DynIR Capture from Two notes inspired by a Fender® Blues Deluxe 1×12 Guitar cabinet loaded with an Eminence® 12” Special Design speaker |
| BRIT 65O | DynIR Capture from Two notes inspired by a Marshall® 1965A Guitar cabinet loaded with Celestion® 10“ G10L-35 speakers |
| FASTBACK25 | DynIR Capture from Two notes inspired by a Marshall® 4×12 Purple Slant Guitar cabinet loaded with Celestion® 12” G12M-25 Greenback speakers |
| JAZZ 120 | DynIR Capture from Two notes inspired by a Roland® Jazz Chorus JC-120 Guitar cabinet loaded with Roland® 12“ 60w speakers |
| SILVERJEN | DynIR Capture from Two notes inspired by a Fender® Twin Reverb Guitar cabinet loaded with Jensen® 12” C12K speakers |
| BASS cabinets | |
| AluXL | DynIR Capture from Two notes inspired by a Hartke® 410XL Bass cabinet loaded with Hartke® 10“ XL Aluminium-Cone Bass Driver speaker |
| Bull Neo2 | DynIR Capture from Two notes inspired by a Taurus® TN-210 Bass cabinet loaded with Taurus® 10” New Generation Neodymium speakers |
| Fridge9 | DynIR Capture from Two notes inspired by an Ampeg® V-9 Bass cabinet loaded with Eminence® 10“ Custom speakers |
| Heaven Top | DynIR Capture from Two notes inspired by a David Eden® D410XLT Bass cabinet loaded with Eminence® 10” Custom speakers |
| Marco | DynIR Capture from Two notes inspired by a Markbass® Traveler 102P Bass cabinet loaded with Markbass® 10“ Custom Neodymium speakers |
Anniversary Edition Cabinet Collection (Downloads Upon Product Registration)
That’s not all folks! Post registration, we will add the new-for-2023 Anniversary Edition cabinet collection to your licence! Captured at Mirador Studios, the Anniversary Edition Cabinet Collection has been engineered under a singular guiding mantra: deliver pinnacle in mojo-fuelled sonics from a selection of hard-to-come-by cabinets, primed for everything from raunch-filled means to vibey cleans.
3. List of Microphones
Each cabinet in the Two notes library comes with a choice of 8 perfectly matched microphones. The selection of microphones depends on the type and model of the cabinet and each had been carefully selected for maximum response and tonal quality.
Top Tip: Don’t be afraid to try the bass mics on your guitar tone and guitar mics on your bass tones!
4. Block diagram
5. Technical Data
| Designation | Characteristics |
|---|---|
| SPEAKER IN | 6.35mm (1/4”) Jack unbalanced (TS, Tip/Sleeve) IN LEVEL switch affects input sensitivity High: 0dB Low: -15dB |
| SPEAKER OUT | 6.35mm (1/4 in) Jack unbalanced (TS) |
| LEFT/RIGHT OUTPUTS | XLR Balanced Maximum output level: 15dBu. Impedance: 600Ω |
| PHONES | 6.35mm (1/4“) Jack balanced TRS, Tip/Ring/sleeve) |
| MIDI Input | 1/8″ jack balanced TRS. Jack to MIDI cable adapter supplied. |
| USB | Micro USB B port. Micro USB-B to USB-A cable supplied. |
| ADC/DAC | Sampling frequency: 96kHz Resolution: 24-bit |
| Frequency response | 30Hz - 19kHz |
| Min Latency | 2.2ms (LINE IN to LINE OUT) |
| THD+N ratio | 0.03% (IN LEVEL 0dB, sine wave 1kHz 4dBu) |
| Signal to Noise Ratio | 95dB |
| Power supply | 100-240v AC / Output: 12V DC, 1A supplied. |
| Dimensions | 128 (w) x 175 (d) x 64 (h) mm Weight: 1.3kg |
Technical support
Should you encounter a problem with your product or need help regarding any technical aspects, Two notes Audio Engineering has developed an on-line service to provide you with fast and efficient technical support, the Two notes Help Desk.
Don't hesitate to browse the Knowledgebase, which contains a plethora of useful information, or submit a ticket if you have any specific questions or need assistance with your Two notes product.
1. Two notes Website
On the Two notes Audio Engineering website, you will find:
- News about the company and the products (news on the homepage)
- Comprehensive information concerning Captor X SE and its many applications (FAQ)
- Firmware and software updates to download (products/Torpedo Captor X/downloads)
- Access to the Two notes Store where you can buy new cabinets
- An official forum where you can share tips and advice with other Torpedo users.
The Two notes Team often visits specialized forums to help out users.
Social Media
Please follow us on Facebook, Instagram (@twonotesaudio) and Twitter (@twonotesaudio) for the latest updates and product news. We love it when people share photos of their Two notes loaded rigs and we often share them - make sure you use the #mytwonotes hashtag to get our attention!
We also have a group on Facebook where customers from all over the world get together to discuss gear and tone, it would be great to see you there!
Connect With Us and Get 20% Off Your First DynIR Order!
To grab a 20%-off coupon and stay up-to-date with the latest news, releases and promotions from Two notes, please subscribe to our newsletter.
2. E-mail
We do not offer technical support via e-mail. Please contact us via the Help Desk at the address above.
